


 Abstract
 HTML
HTML Reference
 Related
 PDF
PDF



-
Heavy-ion collisions involving massive nuclei at near-barrier energies exhibit a pronounced competition among several reaction pathways [1]. After capture, the dinuclear system may evolve toward compound-nucleus formation and subsequently undergo fusion–fission [2], or it may reseparate before reaching statistical equilibrium, leading to quasifission (QF) [3]. Systematic studies have shown that many fission-like events in heavy systems originate from rapid dynamical reseparation rather than compound-nucleus fission [4], and that QF can dominate the reaction outcome in systems involving deformed actinide targets, strongly suppressing compound-nucleus formation [5]. Because QF occurs on relatively short timescales after capture [6], its final-state mass, angular, and energy distributions often overlap with those of fusion-related processes [7], making it one of the major dynamical obstacles to superheavy-element formation [8−13]. Among the entrance-channel factors governing this competition, the orientation of a deformed target plays a particularly important role. Different initial orientations modify the effective barrier, the touching geometry, and the formation of the neck region [14−18], thereby affecting the degree of post-capture dissipation and leaving clear imprints on final-state observables such as fragment mass distributions, mass–angle distributions (MADs), and mass–total-kinetic-energy (mass–TKE) correlations [19]. Experimental systematics have confirmed strong orientation effects in heavy systems, indicating that orientation not only perturbs final observables but also modifies the underlying dynamical evolution [6, 20].
Experimentally, QF is mainly identified through correlations among final-state observables [21]. Typical probes include fragment mass distributions and their widths [22], as well as MADs and mass–TKE or mass–energy-loss correlations [23−26]. For example, the double-peaked mass distribution reflects incomplete mass equilibration, while the slope of the MAD is related to the angular deflection accumulated before reseparation and thus to the dissipation timescale [19]. In the
$^{64}\mathrm{Ni}+{}^{238}\mathrm{U}$ system, experiments have shown a QF-dominated double-humped mass distribution with weak symmetric-mass yields [23]. However, when orientation effects are strong, different dynamical pathways may overlap in the final-state observables, making it difficult to uniquely infer the reaction mechanism from final distributions alone [1, 21].On the theoretical side, a variety of approaches have been developed to describe dissipation, nucleon transport, and pathway competition in near-barrier heavy-ion systems. Microscopic mean-field theories such as time-dependent Hartree–Fock (TDHF) have shown that entrance-channel orientation can significantly affect multinucleon transfer, mass equilibration, and final-state correlations [27−29]. In this framework, the reaction dynamics is self-consistently determined by the time evolution of single-particle states in an average mean field, providing a unified description of collective motion, while event-by-event fluctuations are not explicitly included. Macroscopic approaches, including Langevin-type models and the dinuclear-system (DNS) model, have also been widely employed to investigate the competition between QF and fusion as a function of entrance-channel properties [9−11, 17, 30−33]. These frameworks incorporate dissipation and fluctuations at a phenomenological level and are suitable for describing the statistical evolution of collective degrees of freedom, with certain ingredients, such as transport coefficients and dynamical trajectories, introduced through model-dependent prescriptions. Semiclassical transport models, such as the Boltzmann–Uehling–Uhlenbeck (BUU) approach, provide a complementary description by combining mean-field propagation with a collision term that accounts for nucleon-nucleon scattering and associated stochastic effects. This allows for an event-by-event treatment of reaction dynamics and establishes a direct link between the early-stage interaction dynamics and final-state observables.
The influence of nuclear deformation and orientation on heavy-ion observables has also attracted renewed attention in intermediate- and high-energy heavy-ion collisions. Recent transport-model studies have shown that quadrupole deformation can leave visible imprints on final-state particle multiplicities, anisotropic flows, and other global observables. In parallel, machine-learning methods have been developed to infer the initial orientation of deformed collision systems from event-by-event final-state observables. These studies suggest that orientation-dependent observables may provide a bridge between the initial geometric configuration and the measured final state, and they offer a useful perspective for future analyses of near-barrier QF dynamics[34−39].
Building on our previous developments of event-level window analysis and orientation-dependent studies within the BUU framework [40], the present work focuses on the heavier
$^{64}\mathrm{Ni}+{}^{238}\mathrm{U}$ system, where Coulomb repulsion and target deformation effects are more pronounced, and aims to establish a quantitative and event-resolved connection between contact-stage dynamics and experimentally accessible final-state observables.Specifically, we employ the BUU transport model to investigate the orientation-dependent dynamics of the
$^{64}\mathrm{Ni}+{}^{238}\mathrm{U}$ reaction at$E_{\mathrm{c.m.}}=301.05 \;\mathrm{MeV}$ . For three representative initial orientations of$^{238}\mathrm{U}$ , we systematically compare fragment mass distributions, MADs, and mass–TKE correlations under a unified analysis framework and assess their consistency with available experimental data. We further introduce the contact probability$P_{\rm{cont}}(b)$ and the contact time$T_{\rm{cont}}$ , and correlate them with fragment$(Z,N)$ and$N/Z$ on an event-by-event basis. Through this approach, the present study aims to clarify how orientation-dependent contact configurations and dissipation histories give rise to the observed final-state patterns, and to provide a dynamical interpretation of the branching between quasielastic (QE) and QF pathways.The remainder of this paper is organized as follows. Section II introduces the BUU transport model. Section III presents the results and discussion. Section IV gives the summary and outlook.
-
Heavy-ion collisions involving massive nuclei at near-barrier energies exhibit a pronounced competition among several reaction pathways [1]. After capture, the dinuclear system may evolve toward compound-nucleus formation and subsequently undergo fusion–fission [2], or it may reseparate before reaching statistical equilibrium, leading to quasifission (QF) [3]. Systematic studies have shown that many fission-like events in heavy systems originate from rapid dynamical reseparation rather than compound-nucleus fission [4], and that QF can dominate the reaction outcome in systems involving deformed actinide targets, strongly suppressing compound-nucleus formation [5]. Because QF occurs on relatively short timescales after capture [6], its final-state mass, angular, and energy distributions often overlap with those of fusion-related processes [7], making it one of the major dynamical obstacles to superheavy-element formation [8−13]. Among the entrance-channel factors governing this competition, the orientation of a deformed target plays a particularly important role. Different initial orientations modify the effective barrier, the touching geometry, and the formation of the neck region [14−18], thereby affecting the degree of post-capture dissipation and leaving clear imprints on final-state observables such as fragment mass distributions, mass–angle distributions (MADs), and mass–total-kinetic-energy (mass–TKE) correlations [19]. Experimental systematics have confirmed strong orientation effects in heavy systems, indicating that orientation not only perturbs final observables but also modifies the underlying dynamical evolution [6, 20].
Experimentally, QF is mainly identified through correlations among final-state observables [21]. Typical probes include fragment mass distributions and their widths [22], as well as MADs and mass–TKE or mass–energy-loss correlations [23−26]. For example, the double-peaked mass distribution reflects incomplete mass equilibration, while the slope of the MAD is related to the angular deflection accumulated before reseparation and thus to the dissipation timescale [19]. In the
$^{64}\mathrm{Ni}+{}^{238}\mathrm{U}$ system, experiments have shown a QF-dominated double-humped mass distribution with weak symmetric-mass yields [23]. However, when orientation effects are strong, different dynamical pathways may overlap in the final-state observables, making it difficult to uniquely infer the reaction mechanism from final distributions alone [1, 21].On the theoretical side, a variety of approaches have been developed to describe dissipation, nucleon transport, and pathway competition in near-barrier heavy-ion systems. Microscopic mean-field theories such as time-dependent Hartree–Fock (TDHF) have shown that entrance-channel orientation can significantly affect multinucleon transfer, mass equilibration, and final-state correlations [27−29]. In this framework, the reaction dynamics is self-consistently determined by the time evolution of single-particle states in an average mean field, providing a unified description of collective motion, while event-by-event fluctuations are not explicitly included. Macroscopic approaches, including Langevin-type models and the dinuclear-system (DNS) model, have also been widely employed to investigate the competition between QF and fusion as a function of entrance-channel properties [9−11, 17, 30−33]. These frameworks incorporate dissipation and fluctuations at a phenomenological level and are suitable for describing the statistical evolution of collective degrees of freedom, with certain ingredients, such as transport coefficients and dynamical trajectories, introduced through model-dependent prescriptions. Semiclassical transport models, such as the Boltzmann–Uehling–Uhlenbeck (BUU) approach, provide a complementary description by combining mean-field propagation with a collision term that accounts for nucleon-nucleon scattering and associated stochastic effects. This allows for an event-by-event treatment of reaction dynamics and establishes a direct link between the early-stage interaction dynamics and final-state observables.
The influence of nuclear deformation and orientation on heavy-ion observables has also attracted renewed attention in intermediate- and high-energy heavy-ion collisions. Recent transport-model studies have shown that quadrupole deformation can leave visible imprints on final-state particle multiplicities, anisotropic flows, and other global observables. In parallel, machine-learning methods have been developed to infer the initial orientation of deformed collision systems from event-by-event final-state observables. These studies suggest that orientation-dependent observables may provide a bridge between the initial geometric configuration and the measured final state, and they offer a useful perspective for future analyses of near-barrier QF dynamics[34−39].
Building on our previous developments of event-level window analysis and orientation-dependent studies within the BUU framework [40], the present work focuses on the heavier
$^{64}\mathrm{Ni}+{}^{238}\mathrm{U}$ system, where Coulomb repulsion and target deformation effects are more pronounced, and aims to establish a quantitative and event-resolved connection between contact-stage dynamics and experimentally accessible final-state observables.Specifically, we employ the BUU transport model to investigate the orientation-dependent dynamics of the
$^{64}\mathrm{Ni}+{}^{238}\mathrm{U}$ reaction at$E_{\mathrm{c.m.}}=301.05 \;\mathrm{MeV}$ . For three representative initial orientations of$^{238}\mathrm{U}$ , we systematically compare fragment mass distributions, MADs, and mass–TKE correlations under a unified analysis framework and assess their consistency with available experimental data. We further introduce the contact probability$P_{\rm{cont}}(b)$ and the contact time$T_{\rm{cont}}$ , and correlate them with fragment$(Z,N)$ and$N/Z$ on an event-by-event basis. Through this approach, the present study aims to clarify how orientation-dependent contact configurations and dissipation histories give rise to the observed final-state patterns, and to provide a dynamical interpretation of the branching between quasielastic (QE) and QF pathways.The remainder of this paper is organized as follows. Section II introduces the BUU transport model. Section III presents the results and discussion. Section IV gives the summary and outlook.
-
Heavy-ion collisions involving massive nuclei at near-barrier energies exhibit a pronounced competition among several reaction pathways [1]. After capture, the dinuclear system may evolve toward compound-nucleus formation and subsequently undergo fusion–fission [2], or it may reseparate before reaching statistical equilibrium, leading to quasifission (QF) [3]. Systematic studies have shown that many fission-like events in heavy systems originate from rapid dynamical reseparation rather than compound-nucleus fission [4], and that QF can dominate the reaction outcome in systems involving deformed actinide targets, strongly suppressing compound-nucleus formation [5]. Because QF occurs on relatively short timescales after capture [6], its final-state mass, angular, and energy distributions often overlap with those of fusion-related processes [7], making it one of the major dynamical obstacles to superheavy-element formation [8−13]. Among the entrance-channel factors governing this competition, the orientation of a deformed target plays a particularly important role. Different initial orientations modify the effective barrier, the touching geometry, and the formation of the neck region [14−18], thereby affecting the degree of post-capture dissipation and leaving clear imprints on final-state observables such as fragment mass distributions, mass–angle distributions (MADs), and mass–total-kinetic-energy (mass–TKE) correlations [19]. Experimental systematics have confirmed strong orientation effects in heavy systems, indicating that orientation not only perturbs final observables but also modifies the underlying dynamical evolution [6, 20].
Experimentally, QF is mainly identified through correlations among final-state observables [21]. Typical probes include fragment mass distributions and their widths [22], as well as MADs and mass–TKE or mass–energy-loss correlations [23−26]. For example, the double-peaked mass distribution reflects incomplete mass equilibration, while the slope of the MAD is related to the angular deflection accumulated before reseparation and thus to the dissipation timescale [19]. In the
$^{64}\mathrm{Ni}+{}^{238}\mathrm{U}$ system, experiments have shown a QF-dominated double-humped mass distribution with weak symmetric-mass yields [23]. However, when orientation effects are strong, different dynamical pathways may overlap in the final-state observables, making it difficult to uniquely infer the reaction mechanism from final distributions alone [1, 21].On the theoretical side, a variety of approaches have been developed to describe dissipation, nucleon transport, and pathway competition in near-barrier heavy-ion systems. Microscopic mean-field theories such as time-dependent Hartree–Fock (TDHF) have shown that entrance-channel orientation can significantly affect multinucleon transfer, mass equilibration, and final-state correlations [27−29]. In this framework, the reaction dynamics is self-consistently determined by the time evolution of single-particle states in an average mean field, providing a unified description of collective motion, while event-by-event fluctuations are not explicitly included. Macroscopic approaches, including Langevin-type models and the dinuclear-system (DNS) model, have also been widely employed to investigate the competition between QF and fusion as a function of entrance-channel properties [9−11, 17, 30−33]. These frameworks incorporate dissipation and fluctuations at a phenomenological level and are suitable for describing the statistical evolution of collective degrees of freedom, with certain ingredients, such as transport coefficients and dynamical trajectories, introduced through model-dependent prescriptions. Semiclassical transport models, such as the Boltzmann–Uehling–Uhlenbeck (BUU) approach, provide a complementary description by combining mean-field propagation with a collision term that accounts for nucleon-nucleon scattering and associated stochastic effects. This allows for an event-by-event treatment of reaction dynamics and establishes a direct link between the early-stage interaction dynamics and final-state observables.
The influence of nuclear deformation and orientation on heavy-ion observables has also attracted renewed attention in intermediate- and high-energy heavy-ion collisions. Recent transport-model studies have shown that quadrupole deformation can leave visible imprints on final-state particle multiplicities, anisotropic flows, and other global observables. In parallel, machine-learning methods have been developed to infer the initial orientation of deformed collision systems from event-by-event final-state observables. These studies suggest that orientation-dependent observables may provide a bridge between the initial geometric configuration and the measured final state, and they offer a useful perspective for future analyses of near-barrier QF dynamics[34−39].
Building on our previous developments of event-level window analysis and orientation-dependent studies within the BUU framework [40], the present work focuses on the heavier
$^{64}\mathrm{Ni}+{}^{238}\mathrm{U}$ system, where Coulomb repulsion and target deformation effects are more pronounced, and aims to establish a quantitative and event-resolved connection between contact-stage dynamics and experimentally accessible final-state observables.Specifically, we employ the BUU transport model to investigate the orientation-dependent dynamics of the
$^{64}\mathrm{Ni}+{}^{238}\mathrm{U}$ reaction at$E_{\mathrm{c.m.}}=301.05 \;\mathrm{MeV}$ . For three representative initial orientations of$^{238}\mathrm{U}$ , we systematically compare fragment mass distributions, MADs, and mass–TKE correlations under a unified analysis framework and assess their consistency with available experimental data. We further introduce the contact probability$P_{\rm{cont}}(b)$ and the contact time$T_{\rm{cont}}$ , and correlate them with fragment$(Z,N)$ and$N/Z$ on an event-by-event basis. Through this approach, the present study aims to clarify how orientation-dependent contact configurations and dissipation histories give rise to the observed final-state patterns, and to provide a dynamical interpretation of the branching between quasielastic (QE) and QF pathways.The remainder of this paper is organized as follows. Section II introduces the BUU transport model. Section III presents the results and discussion. Section IV gives the summary and outlook.
-
Heavy-ion collisions involving massive nuclei at near-barrier energies exhibit a pronounced competition among several reaction pathways [1]. After capture, the dinuclear system may evolve toward compound-nucleus formation and subsequently undergo fusion–fission [2], or it may reseparate before reaching statistical equilibrium, leading to quasifission (QF) [3]. Systematic studies have shown that many fission-like events in heavy systems originate from rapid dynamical reseparation rather than compound-nucleus fission [4], and that QF can dominate the reaction outcome in systems involving deformed actinide targets, strongly suppressing compound-nucleus formation [5]. Because QF occurs on relatively short timescales after capture [6], its final-state mass, angular, and energy distributions often overlap with those of fusion-related processes [7], making it one of the major dynamical obstacles to superheavy-element formation [8−13]. Among the entrance-channel factors governing this competition, the orientation of a deformed target plays a particularly important role. Different initial orientations modify the effective barrier, the touching geometry, and the formation of the neck region [14−18], thereby affecting the degree of post-capture dissipation and leaving clear imprints on final-state observables such as fragment mass distributions, mass–angle distributions (MADs), and mass–total-kinetic-energy (mass–TKE) correlations [19]. Experimental systematics have confirmed strong orientation effects in heavy systems, indicating that orientation not only perturbs final observables but also modifies the underlying dynamical evolution [6, 20].
Experimentally, QF is mainly identified through correlations among final-state observables [21]. Typical probes include fragment mass distributions and their widths [22], as well as MADs and mass–TKE or mass–energy-loss correlations [23−26]. For example, the double-peaked mass distribution reflects incomplete mass equilibration, while the slope of the MAD is related to the angular deflection accumulated before reseparation and thus to the dissipation timescale [19]. In the
$^{64}\mathrm{Ni}+{}^{238}\mathrm{U}$ system, experiments have shown a QF-dominated double-humped mass distribution with weak symmetric-mass yields [23]. However, when orientation effects are strong, different dynamical pathways may overlap in the final-state observables, making it difficult to uniquely infer the reaction mechanism from final distributions alone [1, 21].On the theoretical side, a variety of approaches have been developed to describe dissipation, nucleon transport, and pathway competition in near-barrier heavy-ion systems. Microscopic mean-field theories such as time-dependent Hartree–Fock (TDHF) have shown that entrance-channel orientation can significantly affect multinucleon transfer, mass equilibration, and final-state correlations [27−29]. In this framework, the reaction dynamics is self-consistently determined by the time evolution of single-particle states in an average mean field, providing a unified description of collective motion, while event-by-event fluctuations are not explicitly included. Macroscopic approaches, including Langevin-type models and the dinuclear-system (DNS) model, have also been widely employed to investigate the competition between QF and fusion as a function of entrance-channel properties [9−11, 17, 30−33]. These frameworks incorporate dissipation and fluctuations at a phenomenological level and are suitable for describing the statistical evolution of collective degrees of freedom, with certain ingredients, such as transport coefficients and dynamical trajectories, introduced through model-dependent prescriptions. Semiclassical transport models, such as the Boltzmann–Uehling–Uhlenbeck (BUU) approach, provide a complementary description by combining mean-field propagation with a collision term that accounts for nucleon-nucleon scattering and associated stochastic effects. This allows for an event-by-event treatment of reaction dynamics and establishes a direct link between the early-stage interaction dynamics and final-state observables.
The influence of nuclear deformation and orientation on heavy-ion observables has also attracted renewed attention in intermediate- and high-energy heavy-ion collisions. Recent transport-model studies have shown that quadrupole deformation can leave visible imprints on final-state particle multiplicities, anisotropic flows, and other global observables. In parallel, machine-learning methods have been developed to infer the initial orientation of deformed collision systems from event-by-event final-state observables. These studies suggest that orientation-dependent observables may provide a bridge between the initial geometric configuration and the measured final state, and they offer a useful perspective for future analyses of near-barrier QF dynamics[34−39].
Building on our previous developments of event-level window analysis and orientation-dependent studies within the BUU framework [40], the present work focuses on the heavier
$^{64}\mathrm{Ni}+{}^{238}\mathrm{U}$ system, where Coulomb repulsion and target deformation effects are more pronounced, and aims to establish a quantitative and event-resolved connection between contact-stage dynamics and experimentally accessible final-state observables.Specifically, we employ the BUU transport model to investigate the orientation-dependent dynamics of the
$^{64}\mathrm{Ni}+{}^{238}\mathrm{U}$ reaction at$E_{\mathrm{c.m.}}=301.05 \;\mathrm{MeV}$ . For three representative initial orientations of$^{238}\mathrm{U}$ , we systematically compare fragment mass distributions, MADs, and mass–TKE correlations under a unified analysis framework and assess their consistency with available experimental data. We further introduce the contact probability$P_{\rm{cont}}(b)$ and the contact time$T_{\rm{cont}}$ , and correlate them with fragment$(Z,N)$ and$N/Z$ on an event-by-event basis. Through this approach, the present study aims to clarify how orientation-dependent contact configurations and dissipation histories give rise to the observed final-state patterns, and to provide a dynamical interpretation of the branching between quasielastic (QE) and QF pathways.The remainder of this paper is organized as follows. Section II introduces the BUU transport model. Section III presents the results and discussion. Section IV gives the summary and outlook.
-
In this work, the near-barrier reaction
$^{64}\mathrm{Ni}+{}^{238}\mathrm{U}$ is studied within the Boltzmann–Uehling–Uhlenbeck (BUU) transport framework. The calculation follows the event-by-event evolution of the one-body phase-space distribution and is used to analyze the contact dynamics, nucleon exchange, dissipation, and final fragment observables associated with different entrance-channel orientations. -
In this work, the near-barrier reaction
$^{64}\mathrm{Ni}+{}^{238}\mathrm{U}$ is studied within the Boltzmann–Uehling–Uhlenbeck (BUU) transport framework. The calculation follows the event-by-event evolution of the one-body phase-space distribution and is used to analyze the contact dynamics, nucleon exchange, dissipation, and final fragment observables associated with different entrance-channel orientations. -
In this work, the near-barrier reaction
$^{64}\mathrm{Ni}+{}^{238}\mathrm{U}$ is studied within the Boltzmann–Uehling–Uhlenbeck (BUU) transport framework. The calculation follows the event-by-event evolution of the one-body phase-space distribution and is used to analyze the contact dynamics, nucleon exchange, dissipation, and final fragment observables associated with different entrance-channel orientations. -
In this work, the near-barrier reaction
$^{64}\mathrm{Ni}+{}^{238}\mathrm{U}$ is studied within the Boltzmann–Uehling–Uhlenbeck (BUU) transport framework. The calculation follows the event-by-event evolution of the one-body phase-space distribution and is used to analyze the contact dynamics, nucleon exchange, dissipation, and final fragment observables associated with different entrance-channel orientations. -
The BUU equation can be derived from the BBGKY hierarchy under the molecular-chaos approximation. In operator form, the evolution of the one-body density matrix may be written as
$ \frac{\partial \hat{\rho}}{\partial t} = -\frac{{\mathrm{i}}}{\hbar} [\hat{h}[\hat{\rho}],\hat{\rho}] +\hat{I}[\hat{\rho}], $
(1) where
$\hat{\rho}$ is the one-body density matrix,$\hat{h}[\hat{\rho}]$ is the self-consistent mean-field Hamiltonian, and$\hat{I}[\hat{\rho}]$ denotes the collision term induced by two-body correlations. In the semiclassical limit, the one-body dynamics is described by the phase-space distribution function$f({\boldsymbol{r}},{\boldsymbol{p}},t)$ , which satisfies$ \left( \frac{\partial}{\partial t} +\frac{{\boldsymbol{p}}}{m}\cdot\nabla_{{\boldsymbol{r}}} -\nabla_{{\boldsymbol{r}}}U(f)\cdot\nabla_{{\boldsymbol{p}}} \right) f({\boldsymbol{r}},{\boldsymbol{p}},t) = I(f). $
(2) The left-hand side describes Vlasov propagation in the self-consistent mean field, whereas the right-hand side accounts for two-body scattering with Pauli blocking.
The mean field is described using an isospin-dependent parametrization. With the saturation density
$\rho_0= 0.16 \;\mathrm{fm}^{-3}$ , the total density$\rho=\rho_n+\rho_p$ , and the isospin asymmetry$\delta=(\rho_n-\rho_p)/\rho$ , the neutron and proton mean-field potentials are written as$ \begin{aligned}[b] U_{n(p)}(\rho,\delta) =\;& \alpha\frac{\rho}{\rho_0} +\beta\frac{\rho^{\gamma}}{\rho_0^{\gamma}} \\ &+ \frac{C_{\mathrm{sp}}(\gamma_i+1)}{2} \left(\frac{\rho}{\rho_0}\right)^{\gamma_i} \delta^2 \pm C_{\mathrm{sp}} \left(\frac{\rho}{\rho_0}\right)^{\gamma_i} \delta . \end{aligned}$
(3) where the plus and minus signs correspond to neutrons and protons, respectively, and the Coulomb potential is included for protons. In the present calculations, we use the parameter set corresponding to the incompressibility
$K=230 \;\mathrm{MeV}$ , with$\alpha=-209.2 \;\mathrm{MeV}$ ,$\beta=156.4 \;\mathrm{MeV}$ , and$\gamma=1.35$ for the isoscalar part, and$C_{\mathrm{sp}}=40.0 \;\mathrm{MeV}$ and$\gamma_i=0.75$ for the symmetry-energy part. This parameter set is consistent with that used in Ref. [40].For completeness, the Uehling–Uhlenbeck collision integral is expressed as
$ \begin{aligned}[b] I(f) =\;& \int \Big[ f^{\prime\prime}f^{\prime\prime\prime}(1-f)(1-f^{\prime}) -ff^{\prime}(1-f^{\prime\prime})(1-f^{\prime\prime\prime}) \Big] \\&\times W({\boldsymbol{p}},{\boldsymbol{p}}^{\prime};{\boldsymbol{p}}^{\prime\prime},{\boldsymbol{p}}^{\prime\prime\prime}) \,{\mathrm{d}}{\boldsymbol{p}}^{\prime}\,{\mathrm{d}}{\boldsymbol{p}}^{\prime\prime}\,{\mathrm{d}}{\boldsymbol{p}}^{\prime\prime\prime}, \end{aligned}$
(4) where
$f^{\prime}=f({\boldsymbol{r}},{\boldsymbol{p}}^{\prime},t)$ ,$f^{\prime\prime}=f({\boldsymbol{r}},{\boldsymbol{p}}^{\prime\prime},t)$ , and$f^{\prime\prime\prime}=f({\boldsymbol{r}},{\boldsymbol{p}}^{\prime\prime\prime},t)$ . The two terms represent the gain and loss contributions, respectively. The transition rate is expressed as$ W({\boldsymbol{p}},{\boldsymbol{p}}^{\prime};{\boldsymbol{p}}^{\prime\prime},{\boldsymbol{p}}^{\prime\prime\prime}) = \frac{{\mathrm{d}}\sigma}{{\mathrm{d}}\Omega}\, \delta({\boldsymbol{p}}+{\boldsymbol{p}}^{\prime}-{\boldsymbol{p}}^{\prime\prime}-{\boldsymbol{p}}^{\prime\prime\prime}) \delta(\epsilon+\epsilon^{\prime}-\epsilon^{\prime\prime}-\epsilon^{\prime\prime\prime}), $
(5) where
$\epsilon,\epsilon^{\prime}$ and$\epsilon^{\prime\prime},\epsilon^{\prime\prime\prime}$ are the single-particle energies before and after the collision, respectively. The differential nucleon–nucleon cross section in channel$jk$ is parametrized as$ \left(\frac{{\mathrm{d}}\sigma}{{\mathrm{d}}\Omega}\right)_{jk} = \sigma^{\mathrm{free}}_{jk}\, f^{\mathrm{ang}}_{jk}\, f^{\mathrm{med}}_{jk}, $
(6) where
$\sigma^{\mathrm{free}}_{jk}$ ,$f^{\mathrm{ang}}_{jk}$ , and$f^{\mathrm{med}}_{jk}$ denote the free-space cross section, the angular-distribution factor, and the in-medium correction factor, respectively. The parametrizations of the free-space$NN$ cross sections and angular distributions are taken from Ref. [41], and the in-medium correction follows Ref. [42].In the present near-barrier calculations, Pauli blocking strongly suppresses stochastic two-body scattering during the contact stage. The dynamics is therefore dominated by mean-field propagation, whereas the collision term provides the formal Uehling–Uhlenbeck structure of the transport equation. To control spurious local phase-space overoccupation arising from the test-particle representation, a phase-space density constraint (PSDC) is applied after each mean-field propagation step. This procedure serves as a fermionic numerical constraint and should not be regarded as an additional physical source of dissipation.
-
The BUU equation can be derived from the BBGKY hierarchy under the molecular-chaos approximation. In operator form, the evolution of the one-body density matrix may be written as
$ \frac{\partial \hat{\rho}}{\partial t} = -\frac{{\mathrm{i}}}{\hbar} [\hat{h}[\hat{\rho}],\hat{\rho}] +\hat{I}[\hat{\rho}], $
(1) where
$\hat{\rho}$ is the one-body density matrix,$\hat{h}[\hat{\rho}]$ is the self-consistent mean-field Hamiltonian, and$\hat{I}[\hat{\rho}]$ denotes the collision term induced by two-body correlations. In the semiclassical limit, the one-body dynamics is described by the phase-space distribution function$f({\boldsymbol{r}},{\boldsymbol{p}},t)$ , which satisfies$ \left( \frac{\partial}{\partial t} +\frac{{\boldsymbol{p}}}{m}\cdot\nabla_{{\boldsymbol{r}}} -\nabla_{{\boldsymbol{r}}}U(f)\cdot\nabla_{{\boldsymbol{p}}} \right) f({\boldsymbol{r}},{\boldsymbol{p}},t) = I(f). $
(2) The left-hand side describes Vlasov propagation in the self-consistent mean field, whereas the right-hand side accounts for two-body scattering with Pauli blocking.
The mean field is described using an isospin-dependent parametrization. With the saturation density
$\rho_0= 0.16 \;\mathrm{fm}^{-3}$ , the total density$\rho=\rho_n+\rho_p$ , and the isospin asymmetry$\delta=(\rho_n-\rho_p)/\rho$ , the neutron and proton mean-field potentials are written as$ \begin{aligned}[b] U_{n(p)}(\rho,\delta) =\;& \alpha\frac{\rho}{\rho_0} +\beta\frac{\rho^{\gamma}}{\rho_0^{\gamma}} \\ &+ \frac{C_{\mathrm{sp}}(\gamma_i+1)}{2} \left(\frac{\rho}{\rho_0}\right)^{\gamma_i} \delta^2 \pm C_{\mathrm{sp}} \left(\frac{\rho}{\rho_0}\right)^{\gamma_i} \delta . \end{aligned}$
(3) where the plus and minus signs correspond to neutrons and protons, respectively, and the Coulomb potential is included for protons. In the present calculations, we use the parameter set corresponding to the incompressibility
$K=230 \;\mathrm{MeV}$ , with$\alpha=-209.2 \;\mathrm{MeV}$ ,$\beta=156.4 \;\mathrm{MeV}$ , and$\gamma=1.35$ for the isoscalar part, and$C_{\mathrm{sp}}=40.0 \;\mathrm{MeV}$ and$\gamma_i=0.75$ for the symmetry-energy part. This parameter set is consistent with that used in Ref. [40].For completeness, the Uehling–Uhlenbeck collision integral is expressed as
$ \begin{aligned}[b] I(f) =\;& \int \Big[ f^{\prime\prime}f^{\prime\prime\prime}(1-f)(1-f^{\prime}) -ff^{\prime}(1-f^{\prime\prime})(1-f^{\prime\prime\prime}) \Big] \\&\times W({\boldsymbol{p}},{\boldsymbol{p}}^{\prime};{\boldsymbol{p}}^{\prime\prime},{\boldsymbol{p}}^{\prime\prime\prime}) \,{\mathrm{d}}{\boldsymbol{p}}^{\prime}\,{\mathrm{d}}{\boldsymbol{p}}^{\prime\prime}\,{\mathrm{d}}{\boldsymbol{p}}^{\prime\prime\prime}, \end{aligned}$
(4) where
$f^{\prime}=f({\boldsymbol{r}},{\boldsymbol{p}}^{\prime},t)$ ,$f^{\prime\prime}=f({\boldsymbol{r}},{\boldsymbol{p}}^{\prime\prime},t)$ , and$f^{\prime\prime\prime}=f({\boldsymbol{r}},{\boldsymbol{p}}^{\prime\prime\prime},t)$ . The two terms represent the gain and loss contributions, respectively. The transition rate is expressed as$ W({\boldsymbol{p}},{\boldsymbol{p}}^{\prime};{\boldsymbol{p}}^{\prime\prime},{\boldsymbol{p}}^{\prime\prime\prime}) = \frac{{\mathrm{d}}\sigma}{{\mathrm{d}}\Omega}\, \delta({\boldsymbol{p}}+{\boldsymbol{p}}^{\prime}-{\boldsymbol{p}}^{\prime\prime}-{\boldsymbol{p}}^{\prime\prime\prime}) \delta(\epsilon+\epsilon^{\prime}-\epsilon^{\prime\prime}-\epsilon^{\prime\prime\prime}), $
(5) where
$\epsilon,\epsilon^{\prime}$ and$\epsilon^{\prime\prime},\epsilon^{\prime\prime\prime}$ are the single-particle energies before and after the collision, respectively. The differential nucleon–nucleon cross section in channel$jk$ is parametrized as$ \left(\frac{{\mathrm{d}}\sigma}{{\mathrm{d}}\Omega}\right)_{jk} = \sigma^{\mathrm{free}}_{jk}\, f^{\mathrm{ang}}_{jk}\, f^{\mathrm{med}}_{jk}, $
(6) where
$\sigma^{\mathrm{free}}_{jk}$ ,$f^{\mathrm{ang}}_{jk}$ , and$f^{\mathrm{med}}_{jk}$ denote the free-space cross section, the angular-distribution factor, and the in-medium correction factor, respectively. The parametrizations of the free-space$NN$ cross sections and angular distributions are taken from Ref. [41], and the in-medium correction follows Ref. [42].In the present near-barrier calculations, Pauli blocking strongly suppresses stochastic two-body scattering during the contact stage. The dynamics is therefore dominated by mean-field propagation, whereas the collision term provides the formal Uehling–Uhlenbeck structure of the transport equation. To control spurious local phase-space overoccupation arising from the test-particle representation, a phase-space density constraint (PSDC) is applied after each mean-field propagation step. This procedure serves as a fermionic numerical constraint and should not be regarded as an additional physical source of dissipation.
-
The BUU equation can be derived from the BBGKY hierarchy under the molecular-chaos approximation. In operator form, the evolution of the one-body density matrix may be written as
$ \frac{\partial \hat{\rho}}{\partial t} = -\frac{{\mathrm{i}}}{\hbar} [\hat{h}[\hat{\rho}],\hat{\rho}] +\hat{I}[\hat{\rho}], $
(1) where
$\hat{\rho}$ is the one-body density matrix,$\hat{h}[\hat{\rho}]$ is the self-consistent mean-field Hamiltonian, and$\hat{I}[\hat{\rho}]$ denotes the collision term induced by two-body correlations. In the semiclassical limit, the one-body dynamics is described by the phase-space distribution function$f({\boldsymbol{r}},{\boldsymbol{p}},t)$ , which satisfies$ \left( \frac{\partial}{\partial t} +\frac{{\boldsymbol{p}}}{m}\cdot\nabla_{{\boldsymbol{r}}} -\nabla_{{\boldsymbol{r}}}U(f)\cdot\nabla_{{\boldsymbol{p}}} \right) f({\boldsymbol{r}},{\boldsymbol{p}},t) = I(f). $
(2) The left-hand side describes Vlasov propagation in the self-consistent mean field, whereas the right-hand side accounts for two-body scattering with Pauli blocking.
The mean field is described using an isospin-dependent parametrization. With the saturation density
$\rho_0= 0.16 \;\mathrm{fm}^{-3}$ , the total density$\rho=\rho_n+\rho_p$ , and the isospin asymmetry$\delta=(\rho_n-\rho_p)/\rho$ , the neutron and proton mean-field potentials are written as$ \begin{aligned}[b] U_{n(p)}(\rho,\delta) =\;& \alpha\frac{\rho}{\rho_0} +\beta\frac{\rho^{\gamma}}{\rho_0^{\gamma}} \\ &+ \frac{C_{\mathrm{sp}}(\gamma_i+1)}{2} \left(\frac{\rho}{\rho_0}\right)^{\gamma_i} \delta^2 \pm C_{\mathrm{sp}} \left(\frac{\rho}{\rho_0}\right)^{\gamma_i} \delta . \end{aligned}$
(3) where the plus and minus signs correspond to neutrons and protons, respectively, and the Coulomb potential is included for protons. In the present calculations, we use the parameter set corresponding to the incompressibility
$K=230 \;\mathrm{MeV}$ , with$\alpha=-209.2 \;\mathrm{MeV}$ ,$\beta=156.4 \;\mathrm{MeV}$ , and$\gamma=1.35$ for the isoscalar part, and$C_{\mathrm{sp}}=40.0 \;\mathrm{MeV}$ and$\gamma_i=0.75$ for the symmetry-energy part. This parameter set is consistent with that used in Ref. [40].For completeness, the Uehling–Uhlenbeck collision integral is expressed as
$ \begin{aligned}[b] I(f) =\;& \int \Big[ f^{\prime\prime}f^{\prime\prime\prime}(1-f)(1-f^{\prime}) -ff^{\prime}(1-f^{\prime\prime})(1-f^{\prime\prime\prime}) \Big] \\&\times W({\boldsymbol{p}},{\boldsymbol{p}}^{\prime};{\boldsymbol{p}}^{\prime\prime},{\boldsymbol{p}}^{\prime\prime\prime}) \,{\mathrm{d}}{\boldsymbol{p}}^{\prime}\,{\mathrm{d}}{\boldsymbol{p}}^{\prime\prime}\,{\mathrm{d}}{\boldsymbol{p}}^{\prime\prime\prime}, \end{aligned}$
(4) where
$f^{\prime}=f({\boldsymbol{r}},{\boldsymbol{p}}^{\prime},t)$ ,$f^{\prime\prime}=f({\boldsymbol{r}},{\boldsymbol{p}}^{\prime\prime},t)$ , and$f^{\prime\prime\prime}=f({\boldsymbol{r}},{\boldsymbol{p}}^{\prime\prime\prime},t)$ . The two terms represent the gain and loss contributions, respectively. The transition rate is expressed as$ W({\boldsymbol{p}},{\boldsymbol{p}}^{\prime};{\boldsymbol{p}}^{\prime\prime},{\boldsymbol{p}}^{\prime\prime\prime}) = \frac{{\mathrm{d}}\sigma}{{\mathrm{d}}\Omega}\, \delta({\boldsymbol{p}}+{\boldsymbol{p}}^{\prime}-{\boldsymbol{p}}^{\prime\prime}-{\boldsymbol{p}}^{\prime\prime\prime}) \delta(\epsilon+\epsilon^{\prime}-\epsilon^{\prime\prime}-\epsilon^{\prime\prime\prime}), $
(5) where
$\epsilon,\epsilon^{\prime}$ and$\epsilon^{\prime\prime},\epsilon^{\prime\prime\prime}$ are the single-particle energies before and after the collision, respectively. The differential nucleon–nucleon cross section in channel$jk$ is parametrized as$ \left(\frac{{\mathrm{d}}\sigma}{{\mathrm{d}}\Omega}\right)_{jk} = \sigma^{\mathrm{free}}_{jk}\, f^{\mathrm{ang}}_{jk}\, f^{\mathrm{med}}_{jk}, $
(6) where
$\sigma^{\mathrm{free}}_{jk}$ ,$f^{\mathrm{ang}}_{jk}$ , and$f^{\mathrm{med}}_{jk}$ denote the free-space cross section, the angular-distribution factor, and the in-medium correction factor, respectively. The parametrizations of the free-space$NN$ cross sections and angular distributions are taken from Ref. [41], and the in-medium correction follows Ref. [42].In the present near-barrier calculations, Pauli blocking strongly suppresses stochastic two-body scattering during the contact stage. The dynamics is therefore dominated by mean-field propagation, whereas the collision term provides the formal Uehling–Uhlenbeck structure of the transport equation. To control spurious local phase-space overoccupation arising from the test-particle representation, a phase-space density constraint (PSDC) is applied after each mean-field propagation step. This procedure serves as a fermionic numerical constraint and should not be regarded as an additional physical source of dissipation.
-
The BUU equation can be derived from the BBGKY hierarchy under the molecular-chaos approximation. In operator form, the evolution of the one-body density matrix may be written as
$ \frac{\partial \hat{\rho}}{\partial t} = -\frac{{\mathrm{i}}}{\hbar} [\hat{h}[\hat{\rho}],\hat{\rho}] +\hat{I}[\hat{\rho}], $
(1) where
$\hat{\rho}$ is the one-body density matrix,$\hat{h}[\hat{\rho}]$ is the self-consistent mean-field Hamiltonian, and$\hat{I}[\hat{\rho}]$ denotes the collision term induced by two-body correlations. In the semiclassical limit, the one-body dynamics is described by the phase-space distribution function$f({\boldsymbol{r}},{\boldsymbol{p}},t)$ , which satisfies$ \left( \frac{\partial}{\partial t} +\frac{{\boldsymbol{p}}}{m}\cdot\nabla_{{\boldsymbol{r}}} -\nabla_{{\boldsymbol{r}}}U(f)\cdot\nabla_{{\boldsymbol{p}}} \right) f({\boldsymbol{r}},{\boldsymbol{p}},t) = I(f). $
(2) The left-hand side describes Vlasov propagation in the self-consistent mean field, whereas the right-hand side accounts for two-body scattering with Pauli blocking.
The mean field is described using an isospin-dependent parametrization. With the saturation density
$\rho_0= 0.16 \;\mathrm{fm}^{-3}$ , the total density$\rho=\rho_n+\rho_p$ , and the isospin asymmetry$\delta=(\rho_n-\rho_p)/\rho$ , the neutron and proton mean-field potentials are written as$ \begin{aligned}[b] U_{n(p)}(\rho,\delta) =\;& \alpha\frac{\rho}{\rho_0} +\beta\frac{\rho^{\gamma}}{\rho_0^{\gamma}} \\ &+ \frac{C_{\mathrm{sp}}(\gamma_i+1)}{2} \left(\frac{\rho}{\rho_0}\right)^{\gamma_i} \delta^2 \pm C_{\mathrm{sp}} \left(\frac{\rho}{\rho_0}\right)^{\gamma_i} \delta . \end{aligned}$
(3) where the plus and minus signs correspond to neutrons and protons, respectively, and the Coulomb potential is included for protons. In the present calculations, we use the parameter set corresponding to the incompressibility
$K=230 \;\mathrm{MeV}$ , with$\alpha=-209.2 \;\mathrm{MeV}$ ,$\beta=156.4 \;\mathrm{MeV}$ , and$\gamma=1.35$ for the isoscalar part, and$C_{\mathrm{sp}}=40.0 \;\mathrm{MeV}$ and$\gamma_i=0.75$ for the symmetry-energy part. This parameter set is consistent with that used in Ref. [40].For completeness, the Uehling–Uhlenbeck collision integral is expressed as
$ \begin{aligned}[b] I(f) =\;& \int \Big[ f^{\prime\prime}f^{\prime\prime\prime}(1-f)(1-f^{\prime}) -ff^{\prime}(1-f^{\prime\prime})(1-f^{\prime\prime\prime}) \Big] \\&\times W({\boldsymbol{p}},{\boldsymbol{p}}^{\prime};{\boldsymbol{p}}^{\prime\prime},{\boldsymbol{p}}^{\prime\prime\prime}) \,{\mathrm{d}}{\boldsymbol{p}}^{\prime}\,{\mathrm{d}}{\boldsymbol{p}}^{\prime\prime}\,{\mathrm{d}}{\boldsymbol{p}}^{\prime\prime\prime}, \end{aligned}$
(4) where
$f^{\prime}=f({\boldsymbol{r}},{\boldsymbol{p}}^{\prime},t)$ ,$f^{\prime\prime}=f({\boldsymbol{r}},{\boldsymbol{p}}^{\prime\prime},t)$ , and$f^{\prime\prime\prime}=f({\boldsymbol{r}},{\boldsymbol{p}}^{\prime\prime\prime},t)$ . The two terms represent the gain and loss contributions, respectively. The transition rate is expressed as$ W({\boldsymbol{p}},{\boldsymbol{p}}^{\prime};{\boldsymbol{p}}^{\prime\prime},{\boldsymbol{p}}^{\prime\prime\prime}) = \frac{{\mathrm{d}}\sigma}{{\mathrm{d}}\Omega}\, \delta({\boldsymbol{p}}+{\boldsymbol{p}}^{\prime}-{\boldsymbol{p}}^{\prime\prime}-{\boldsymbol{p}}^{\prime\prime\prime}) \delta(\epsilon+\epsilon^{\prime}-\epsilon^{\prime\prime}-\epsilon^{\prime\prime\prime}), $
(5) where
$\epsilon,\epsilon^{\prime}$ and$\epsilon^{\prime\prime},\epsilon^{\prime\prime\prime}$ are the single-particle energies before and after the collision, respectively. The differential nucleon–nucleon cross section in channel$jk$ is parametrized as$ \left(\frac{{\mathrm{d}}\sigma}{{\mathrm{d}}\Omega}\right)_{jk} = \sigma^{\mathrm{free}}_{jk}\, f^{\mathrm{ang}}_{jk}\, f^{\mathrm{med}}_{jk}, $
(6) where
$\sigma^{\mathrm{free}}_{jk}$ ,$f^{\mathrm{ang}}_{jk}$ , and$f^{\mathrm{med}}_{jk}$ denote the free-space cross section, the angular-distribution factor, and the in-medium correction factor, respectively. The parametrizations of the free-space$NN$ cross sections and angular distributions are taken from Ref. [41], and the in-medium correction follows Ref. [42].In the present near-barrier calculations, Pauli blocking strongly suppresses stochastic two-body scattering during the contact stage. The dynamics is therefore dominated by mean-field propagation, whereas the collision term provides the formal Uehling–Uhlenbeck structure of the transport equation. To control spurious local phase-space overoccupation arising from the test-particle representation, a phase-space density constraint (PSDC) is applied after each mean-field propagation step. This procedure serves as a fermionic numerical constraint and should not be regarded as an additional physical source of dissipation.
-
Near-barrier reactions of heavy systems involve long evolution times and are sensitive to the stability of the nuclear surface. To suppress unphysical surface diffusion and spurious particle emission during the long-time mean-field evolution, a surface term is added to the potential,
$ U_s({\boldsymbol{r}}) = g\,\nabla^2 \rho({\boldsymbol{r}}), $
(7) with
$g=5 \;\mathrm{MeV}\,\;\mathrm{fm}^5$ . This term effectively mimics surface tension effects and has been widely used in transport calculations to stabilize nuclear density profiles during long-time evolution.The numerical solution is obtained using the test-particle method, in which the continuous phase-space distribution
$f({\boldsymbol{r}},{\boldsymbol{p}},t)$ is represented by a finite number of test particles. Local densities, mean fields, spatial gradients, and phase-space occupation probabilities are evaluated on a three-dimensional grid. In the present work, each nucleon is represented by$N_{\mathrm{TP}}=100$ test particles, reducing finite-test-particle fluctuations while maintaining computational feasibility for long-time near-barrier evolution.The PSDC is introduced to restore the fermionic character of the system in the test-particle representation. The local phase-space occupation probability is defined as
$ \bar{f}_{n(p)} = \frac{1}{2}\int_{h^3} f_{n(p)}\,{\mathrm{d}}{\boldsymbol{r}}\,{\mathrm{d}}{\boldsymbol{p}}, $
(8) where the factor
$1/2$ accounts for spin degeneracy. In the test-particle representation, it is evaluated as$ \bar{f}({\boldsymbol{r}}_i,{\boldsymbol{p}}_i) = \frac{h^3}{2N_{\mathrm{TP}}V_rV_p} \sum\limits_{j} \delta(\tau_i,\tau_j)\,\rho_{ij}, $
(9) where
$V_r$ and$V_p$ are the coordinate-space and momentum-space cells centered at$({\boldsymbol{r}}_i,{\boldsymbol{p}}_i)$ ,$\tau_i$ is the isospin of the i-th test particle,$\delta(\tau_i,\tau_j)$ selects particles with the same isospin, and$\rho_{ij}$ denotes the density contribution of the j-th test particle at${\boldsymbol{r}}_i$ .After each mean-field propagation step, the local occupation is checked for every test particle. If a particle satisfies
$\bar{f}>1$ , the corresponding phase-space cell is considered overoccupied. The code then searches the neighboring phase-space region for a test particle with the same isospin and a lower occupation probability, preferably with$\bar{f}<1$ , and performs a local two-body rearrangement. The purpose of this procedure is not to generate a physical binary collision, but to suppress persistent nonphysical phase-space accumulation through repeated local corrections.The attempted rearrangement is rejected if the final occupation would generate or enhance local overoccupation. This blocking condition is implemented through
$ \bar{f}_m({\boldsymbol{r}}_i,{\boldsymbol{p}}_i)<1,\qquad \bar{f}_f({\boldsymbol{r}}_i,{\boldsymbol{p}}_i)>1, $
(10) and
$ \bar{f}_m({\boldsymbol{r}}_i,{\boldsymbol{p}}_i)>1,\qquad \bar{f}_f({\boldsymbol{r}}_i,{\boldsymbol{p}}_i)>\bar{f}_m({\boldsymbol{r}}_i,{\boldsymbol{p}}_i), $
(11) where
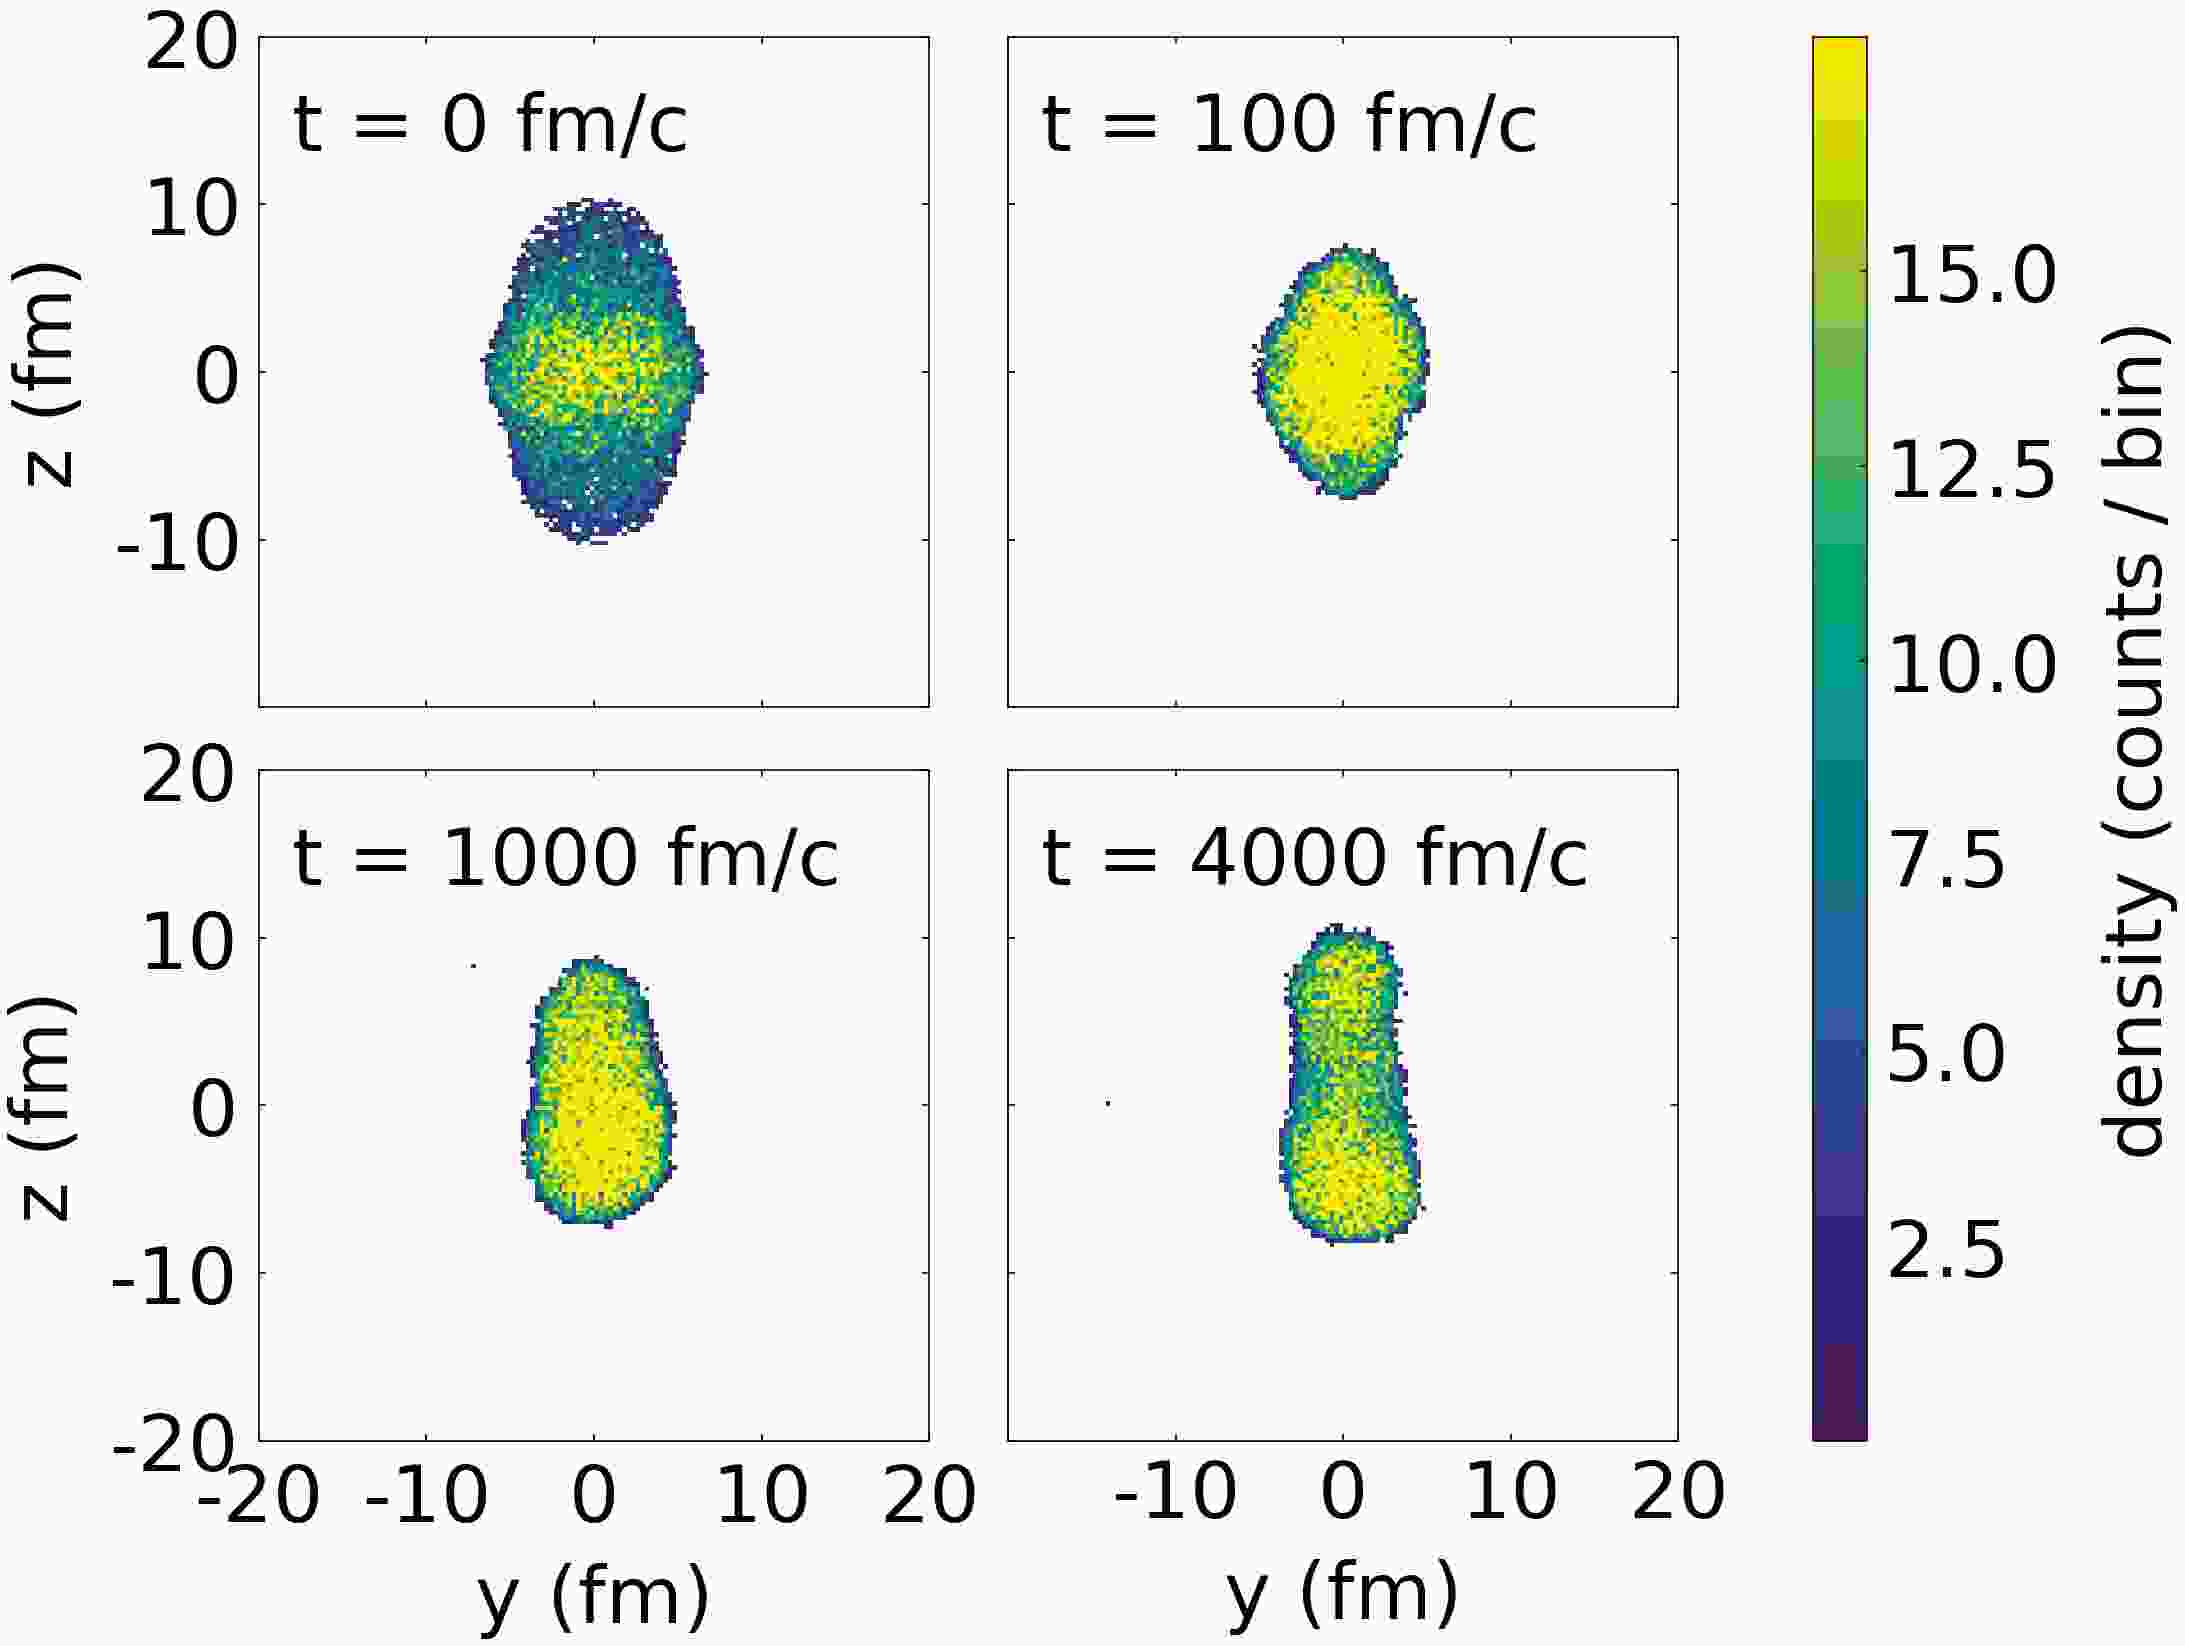
$\bar{f}_m$ and$\bar{f}_f$ denote the local occupations before and after the attempted rearrangement, respectively. Thus, the PSDC suppresses spurious phase-space pileup and improves the stability of finite nuclei during long-time propagation. It should be emphasized that the PSDC acts solely as a numerical constraint to enforce the fermionic character of the system and does not introduce additional physical dissipation or stochastic scattering processes. To test the numerical stability of the present treatment, the deformed target nucleus$^{238}\mathrm{U}$ is propagated in the mean field up to$t=5000 \;\mathrm{fm}/c$ . As shown in Fig. 1, the density profile and prolate deformation are preserved over the time scale relevant to the reaction calculation.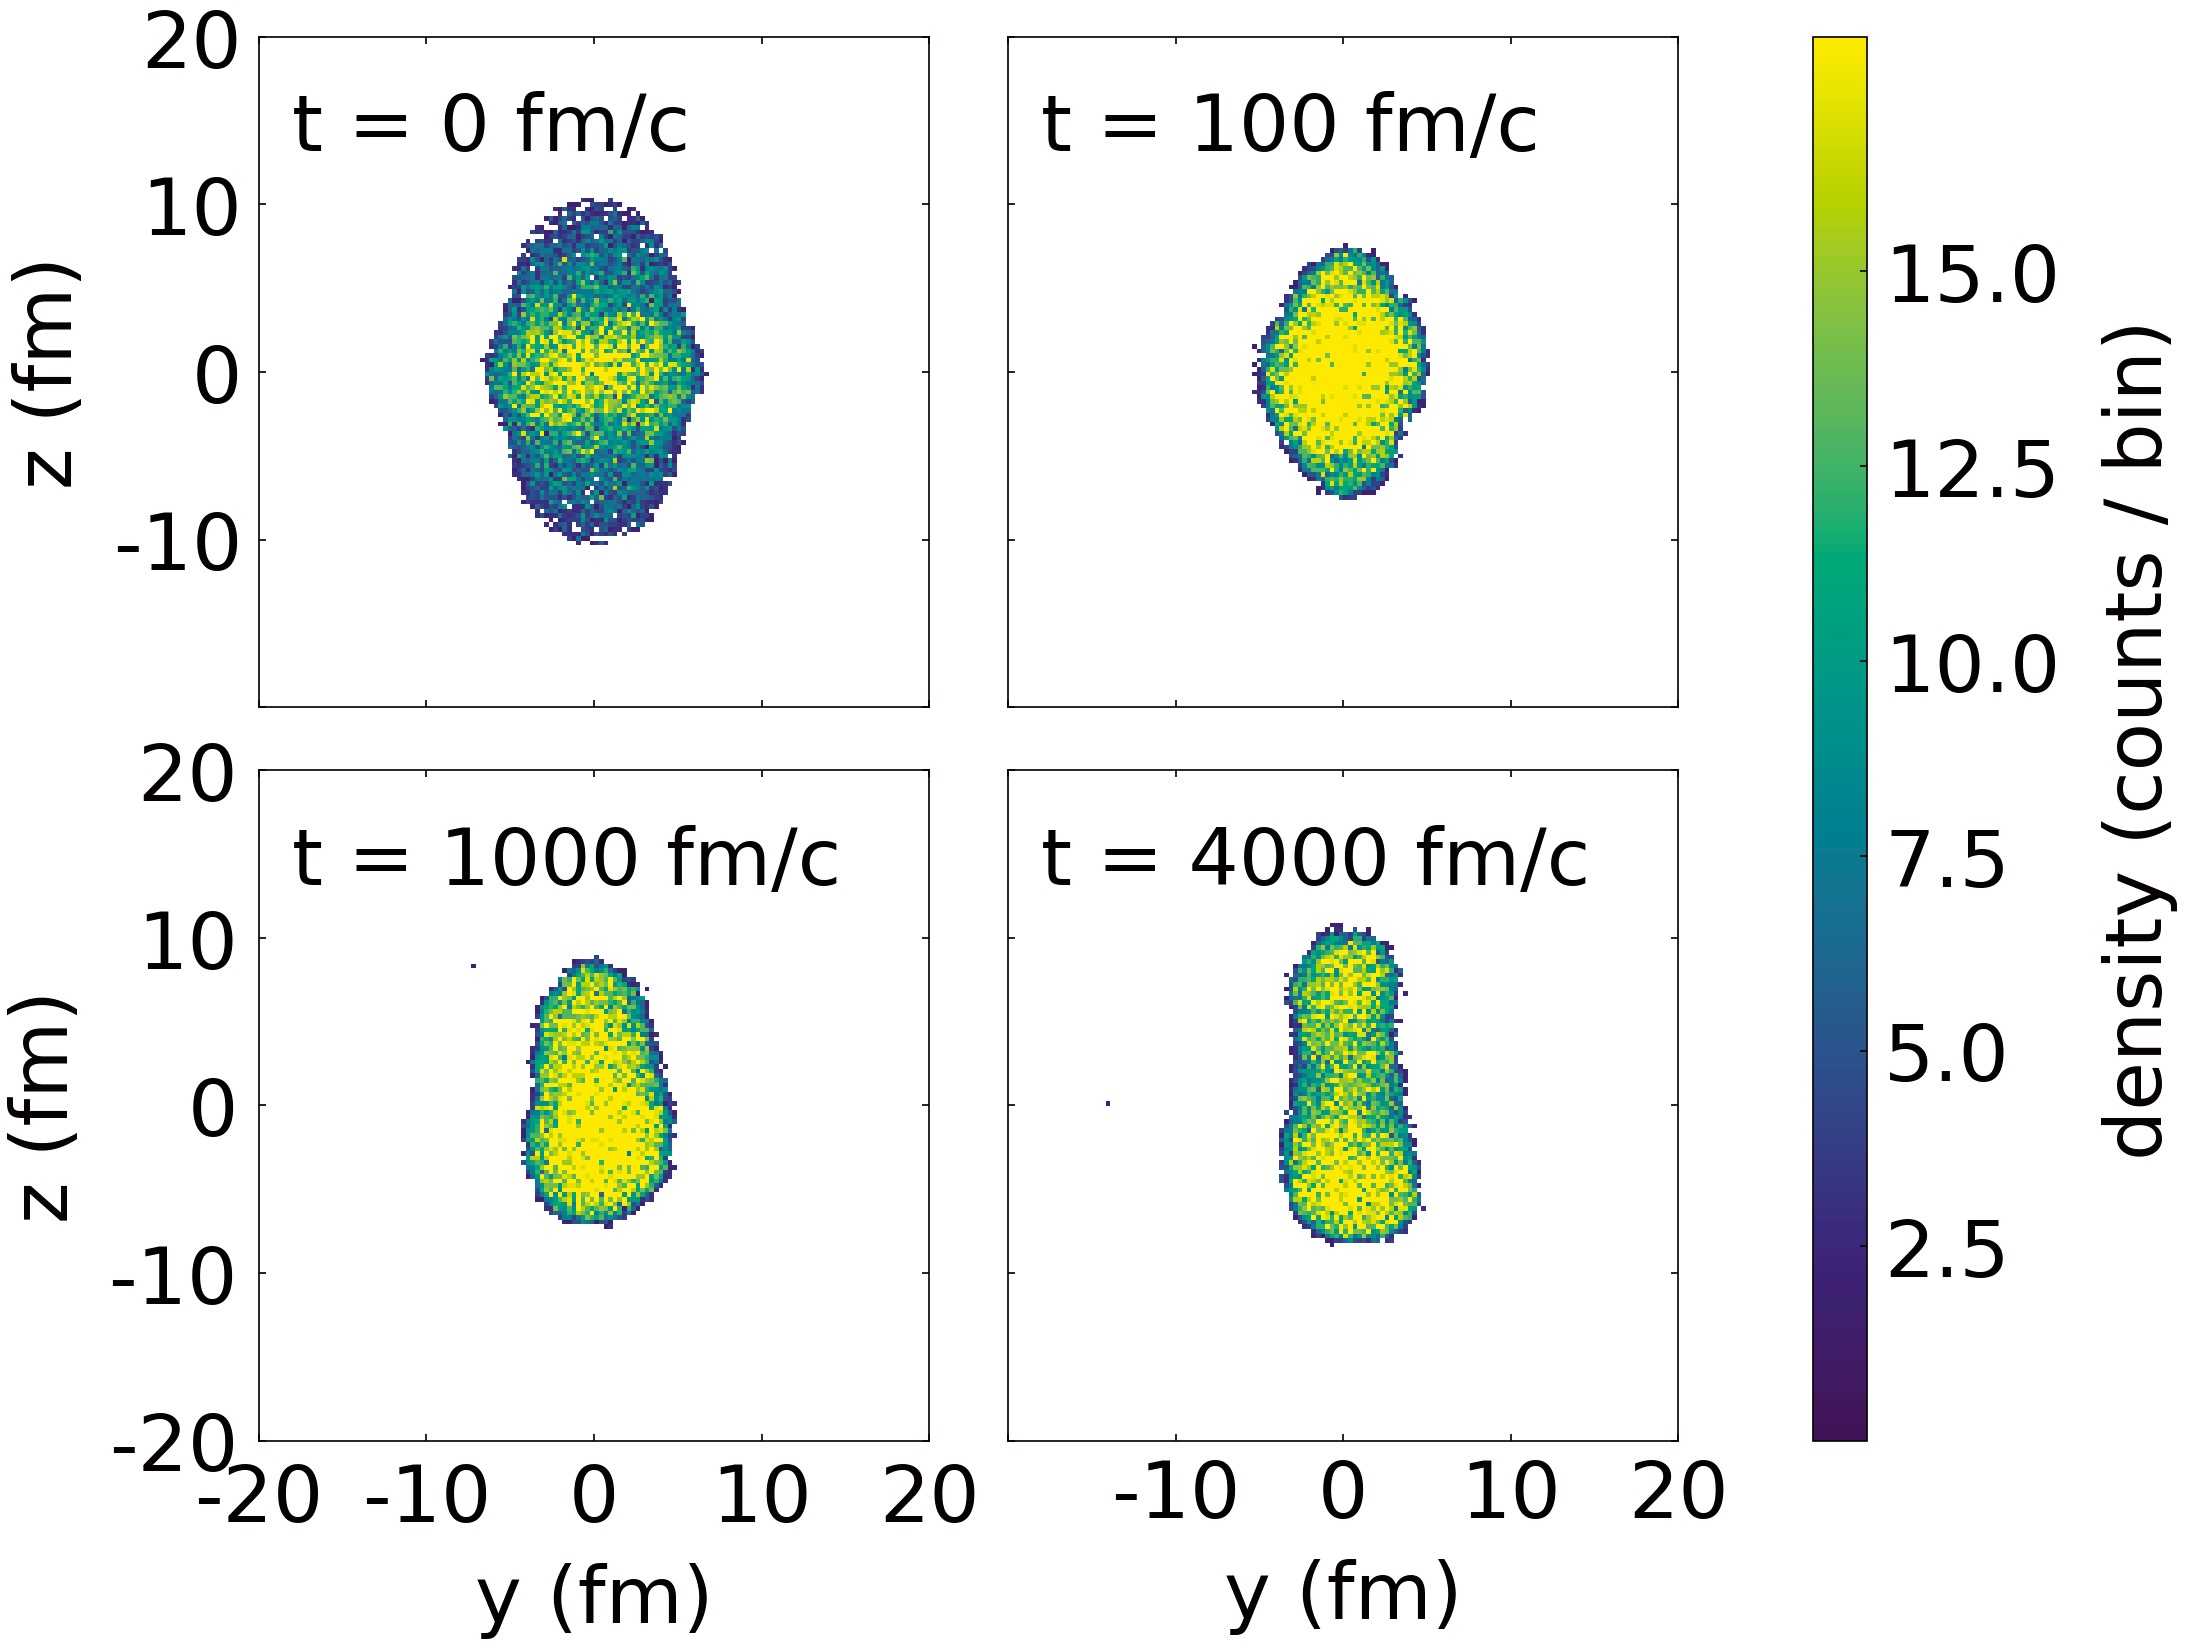
Figure 1. (color online) Time evolution of the density distribution of
$^{238}\mathrm{U}$ propagated in the mean field. The density profile and deformation are preserved up to$t=4000 \;\mathrm{fm}/c$ . -
Near-barrier reactions of heavy systems involve long evolution times and are sensitive to the stability of the nuclear surface. To suppress unphysical surface diffusion and spurious particle emission during the long-time mean-field evolution, a surface term is added to the potential,
$ U_s({\boldsymbol{r}}) = g\,\nabla^2 \rho({\boldsymbol{r}}), $
(7) with
$g=5 \;\mathrm{MeV}\,\;\mathrm{fm}^5$ . This term effectively mimics surface tension effects and has been widely used in transport calculations to stabilize nuclear density profiles during long-time evolution.The numerical solution is obtained using the test-particle method, in which the continuous phase-space distribution
$f({\boldsymbol{r}},{\boldsymbol{p}},t)$ is represented by a finite number of test particles. Local densities, mean fields, spatial gradients, and phase-space occupation probabilities are evaluated on a three-dimensional grid. In the present work, each nucleon is represented by$N_{\mathrm{TP}}=100$ test particles, reducing finite-test-particle fluctuations while maintaining computational feasibility for long-time near-barrier evolution.The PSDC is introduced to restore the fermionic character of the system in the test-particle representation. The local phase-space occupation probability is defined as
$ \bar{f}_{n(p)} = \frac{1}{2}\int_{h^3} f_{n(p)}\,{\mathrm{d}}{\boldsymbol{r}}\,{\mathrm{d}}{\boldsymbol{p}}, $
(8) where the factor
$1/2$ accounts for spin degeneracy. In the test-particle representation, it is evaluated as$ \bar{f}({\boldsymbol{r}}_i,{\boldsymbol{p}}_i) = \frac{h^3}{2N_{\mathrm{TP}}V_rV_p} \sum\limits_{j} \delta(\tau_i,\tau_j)\,\rho_{ij}, $
(9) where
$V_r$ and$V_p$ are the coordinate-space and momentum-space cells centered at$({\boldsymbol{r}}_i,{\boldsymbol{p}}_i)$ ,$\tau_i$ is the isospin of the i-th test particle,$\delta(\tau_i,\tau_j)$ selects particles with the same isospin, and$\rho_{ij}$ denotes the density contribution of the j-th test particle at${\boldsymbol{r}}_i$ .After each mean-field propagation step, the local occupation is checked for every test particle. If a particle satisfies
$\bar{f}>1$ , the corresponding phase-space cell is considered overoccupied. The code then searches the neighboring phase-space region for a test particle with the same isospin and a lower occupation probability, preferably with$\bar{f}<1$ , and performs a local two-body rearrangement. The purpose of this procedure is not to generate a physical binary collision, but to suppress persistent nonphysical phase-space accumulation through repeated local corrections.The attempted rearrangement is rejected if the final occupation would generate or enhance local overoccupation. This blocking condition is implemented through
$ \bar{f}_m({\boldsymbol{r}}_i,{\boldsymbol{p}}_i)<1,\qquad \bar{f}_f({\boldsymbol{r}}_i,{\boldsymbol{p}}_i)>1, $
(10) and
$ \bar{f}_m({\boldsymbol{r}}_i,{\boldsymbol{p}}_i)>1,\qquad \bar{f}_f({\boldsymbol{r}}_i,{\boldsymbol{p}}_i)>\bar{f}_m({\boldsymbol{r}}_i,{\boldsymbol{p}}_i), $
(11) where
$\bar{f}_m$ and$\bar{f}_f$ denote the local occupations before and after the attempted rearrangement, respectively. Thus, the PSDC suppresses spurious phase-space pileup and improves the stability of finite nuclei during long-time propagation. It should be emphasized that the PSDC acts solely as a numerical constraint to enforce the fermionic character of the system and does not introduce additional physical dissipation or stochastic scattering processes. To test the numerical stability of the present treatment, the deformed target nucleus$^{238}\mathrm{U}$ is propagated in the mean field up to$t=5000 \;\mathrm{fm}/c$ . As shown in Fig. 1, the density profile and prolate deformation are preserved over the time scale relevant to the reaction calculation.
Figure 1. (color online) Time evolution of the density distribution of
$^{238}\mathrm{U}$ propagated in the mean field. The density profile and deformation are preserved up to$t=4000 \;\mathrm{fm}/c$ . -
Near-barrier reactions of heavy systems involve long evolution times and are sensitive to the stability of the nuclear surface. To suppress unphysical surface diffusion and spurious particle emission during the long-time mean-field evolution, a surface term is added to the potential,
$ U_s({\boldsymbol{r}}) = g\,\nabla^2 \rho({\boldsymbol{r}}), $
(7) with
$g=5 \;\mathrm{MeV}\,\;\mathrm{fm}^5$ . This term effectively mimics surface tension effects and has been widely used in transport calculations to stabilize nuclear density profiles during long-time evolution.The numerical solution is obtained using the test-particle method, in which the continuous phase-space distribution
$f({\boldsymbol{r}},{\boldsymbol{p}},t)$ is represented by a finite number of test particles. Local densities, mean fields, spatial gradients, and phase-space occupation probabilities are evaluated on a three-dimensional grid. In the present work, each nucleon is represented by$N_{\mathrm{TP}}=100$ test particles, reducing finite-test-particle fluctuations while maintaining computational feasibility for long-time near-barrier evolution.The PSDC is introduced to restore the fermionic character of the system in the test-particle representation. The local phase-space occupation probability is defined as
$ \bar{f}_{n(p)} = \frac{1}{2}\int_{h^3} f_{n(p)}\,{\mathrm{d}}{\boldsymbol{r}}\,{\mathrm{d}}{\boldsymbol{p}}, $
(8) where the factor
$1/2$ accounts for spin degeneracy. In the test-particle representation, it is evaluated as$ \bar{f}({\boldsymbol{r}}_i,{\boldsymbol{p}}_i) = \frac{h^3}{2N_{\mathrm{TP}}V_rV_p} \sum\limits_{j} \delta(\tau_i,\tau_j)\,\rho_{ij}, $
(9) where
$V_r$ and$V_p$ are the coordinate-space and momentum-space cells centered at$({\boldsymbol{r}}_i,{\boldsymbol{p}}_i)$ ,$\tau_i$ is the isospin of the i-th test particle,$\delta(\tau_i,\tau_j)$ selects particles with the same isospin, and$\rho_{ij}$ denotes the density contribution of the j-th test particle at${\boldsymbol{r}}_i$ .After each mean-field propagation step, the local occupation is checked for every test particle. If a particle satisfies
$\bar{f}>1$ , the corresponding phase-space cell is considered overoccupied. The code then searches the neighboring phase-space region for a test particle with the same isospin and a lower occupation probability, preferably with$\bar{f}<1$ , and performs a local two-body rearrangement. The purpose of this procedure is not to generate a physical binary collision, but to suppress persistent nonphysical phase-space accumulation through repeated local corrections.The attempted rearrangement is rejected if the final occupation would generate or enhance local overoccupation. This blocking condition is implemented through
$ \bar{f}_m({\boldsymbol{r}}_i,{\boldsymbol{p}}_i)<1,\qquad \bar{f}_f({\boldsymbol{r}}_i,{\boldsymbol{p}}_i)>1, $
(10) and
$ \bar{f}_m({\boldsymbol{r}}_i,{\boldsymbol{p}}_i)>1,\qquad \bar{f}_f({\boldsymbol{r}}_i,{\boldsymbol{p}}_i)>\bar{f}_m({\boldsymbol{r}}_i,{\boldsymbol{p}}_i), $
(11) where
$\bar{f}_m$ and$\bar{f}_f$ denote the local occupations before and after the attempted rearrangement, respectively. Thus, the PSDC suppresses spurious phase-space pileup and improves the stability of finite nuclei during long-time propagation. It should be emphasized that the PSDC acts solely as a numerical constraint to enforce the fermionic character of the system and does not introduce additional physical dissipation or stochastic scattering processes. To test the numerical stability of the present treatment, the deformed target nucleus$^{238}\mathrm{U}$ is propagated in the mean field up to$t=5000 \;\mathrm{fm}/c$ . As shown in Fig. 1, the density profile and prolate deformation are preserved over the time scale relevant to the reaction calculation.
Figure 1. (color online) Time evolution of the density distribution of
$^{238}\mathrm{U}$ propagated in the mean field. The density profile and deformation are preserved up to$t=4000 \;\mathrm{fm}/c$ . -
Near-barrier reactions of heavy systems involve long evolution times and are sensitive to the stability of the nuclear surface. To suppress unphysical surface diffusion and spurious particle emission during the long-time mean-field evolution, a surface term is added to the potential,
$ U_s({\boldsymbol{r}}) = g\,\nabla^2 \rho({\boldsymbol{r}}), $
(7) with
$g=5 \;\mathrm{MeV}\,\;\mathrm{fm}^5$ . This term effectively mimics surface tension effects and has been widely used in transport calculations to stabilize nuclear density profiles during long-time evolution.The numerical solution is obtained using the test-particle method, in which the continuous phase-space distribution
$f({\boldsymbol{r}},{\boldsymbol{p}},t)$ is represented by a finite number of test particles. Local densities, mean fields, spatial gradients, and phase-space occupation probabilities are evaluated on a three-dimensional grid. In the present work, each nucleon is represented by$N_{\mathrm{TP}}=100$ test particles, reducing finite-test-particle fluctuations while maintaining computational feasibility for long-time near-barrier evolution.The PSDC is introduced to restore the fermionic character of the system in the test-particle representation. The local phase-space occupation probability is defined as
$ \bar{f}_{n(p)} = \frac{1}{2}\int_{h^3} f_{n(p)}\,{\mathrm{d}}{\boldsymbol{r}}\,{\mathrm{d}}{\boldsymbol{p}}, $
(8) where the factor
$1/2$ accounts for spin degeneracy. In the test-particle representation, it is evaluated as$ \bar{f}({\boldsymbol{r}}_i,{\boldsymbol{p}}_i) = \frac{h^3}{2N_{\mathrm{TP}}V_rV_p} \sum\limits_{j} \delta(\tau_i,\tau_j)\,\rho_{ij}, $
(9) where
$V_r$ and$V_p$ are the coordinate-space and momentum-space cells centered at$({\boldsymbol{r}}_i,{\boldsymbol{p}}_i)$ ,$\tau_i$ is the isospin of the i-th test particle,$\delta(\tau_i,\tau_j)$ selects particles with the same isospin, and$\rho_{ij}$ denotes the density contribution of the j-th test particle at${\boldsymbol{r}}_i$ .After each mean-field propagation step, the local occupation is checked for every test particle. If a particle satisfies
$\bar{f}>1$ , the corresponding phase-space cell is considered overoccupied. The code then searches the neighboring phase-space region for a test particle with the same isospin and a lower occupation probability, preferably with$\bar{f}<1$ , and performs a local two-body rearrangement. The purpose of this procedure is not to generate a physical binary collision, but to suppress persistent nonphysical phase-space accumulation through repeated local corrections.The attempted rearrangement is rejected if the final occupation would generate or enhance local overoccupation. This blocking condition is implemented through
$ \bar{f}_m({\boldsymbol{r}}_i,{\boldsymbol{p}}_i)<1,\qquad \bar{f}_f({\boldsymbol{r}}_i,{\boldsymbol{p}}_i)>1, $
(10) and
$ \bar{f}_m({\boldsymbol{r}}_i,{\boldsymbol{p}}_i)>1,\qquad \bar{f}_f({\boldsymbol{r}}_i,{\boldsymbol{p}}_i)>\bar{f}_m({\boldsymbol{r}}_i,{\boldsymbol{p}}_i), $
(11) where
$\bar{f}_m$ and$\bar{f}_f$ denote the local occupations before and after the attempted rearrangement, respectively. Thus, the PSDC suppresses spurious phase-space pileup and improves the stability of finite nuclei during long-time propagation. It should be emphasized that the PSDC acts solely as a numerical constraint to enforce the fermionic character of the system and does not introduce additional physical dissipation or stochastic scattering processes. To test the numerical stability of the present treatment, the deformed target nucleus$^{238}\mathrm{U}$ is propagated in the mean field up to$t=5000 \;\mathrm{fm}/c$ . As shown in Fig. 1, the density profile and prolate deformation are preserved over the time scale relevant to the reaction calculation.
Figure 1. (color online) Time evolution of the density distribution of
$^{238}\mathrm{U}$ propagated in the mean field. The density profile and deformation are preserved up to$t=4000 \;\mathrm{fm}/c$ . -
The initial nuclei are generated in coordinate and momentum spaces. In coordinate space, nucleons are sampled according to the ground-state density distributions. For deformed nuclei, the deformation parameters and initial orientation are specified explicitly. In momentum space, nucleons are sampled from a local Fermi distribution at
$T=0$ .The reaction
$^{64}\mathrm{Ni}+{}^{238}\mathrm{U}$ is simulated at$E_{\mathrm{c.m.}}= 301.05 \;\mathrm{MeV}$ . The total evolution time is set to$t= 5000 \;\mathrm{fm}/c$ , which is sufficient for most events to reach a reseparated configuration, allowing the fragment mass, charge, and relative-motion observables to be extracted.To examine the effect of target orientation, three representative entrance-channel configurations are considered, as illustrated in Fig. 2. The deformation parameters are taken from Ref. [43]. The quadrupole deformation of
$^{64}\mathrm{Ni}$ is small,$\beta_2=0.09$ , and the projectile is treated approximately as spherical. The target$^{238}\mathrm{U}$ is prolately deformed, with$\beta_2=0.23$ and$\beta_4=0.06$ .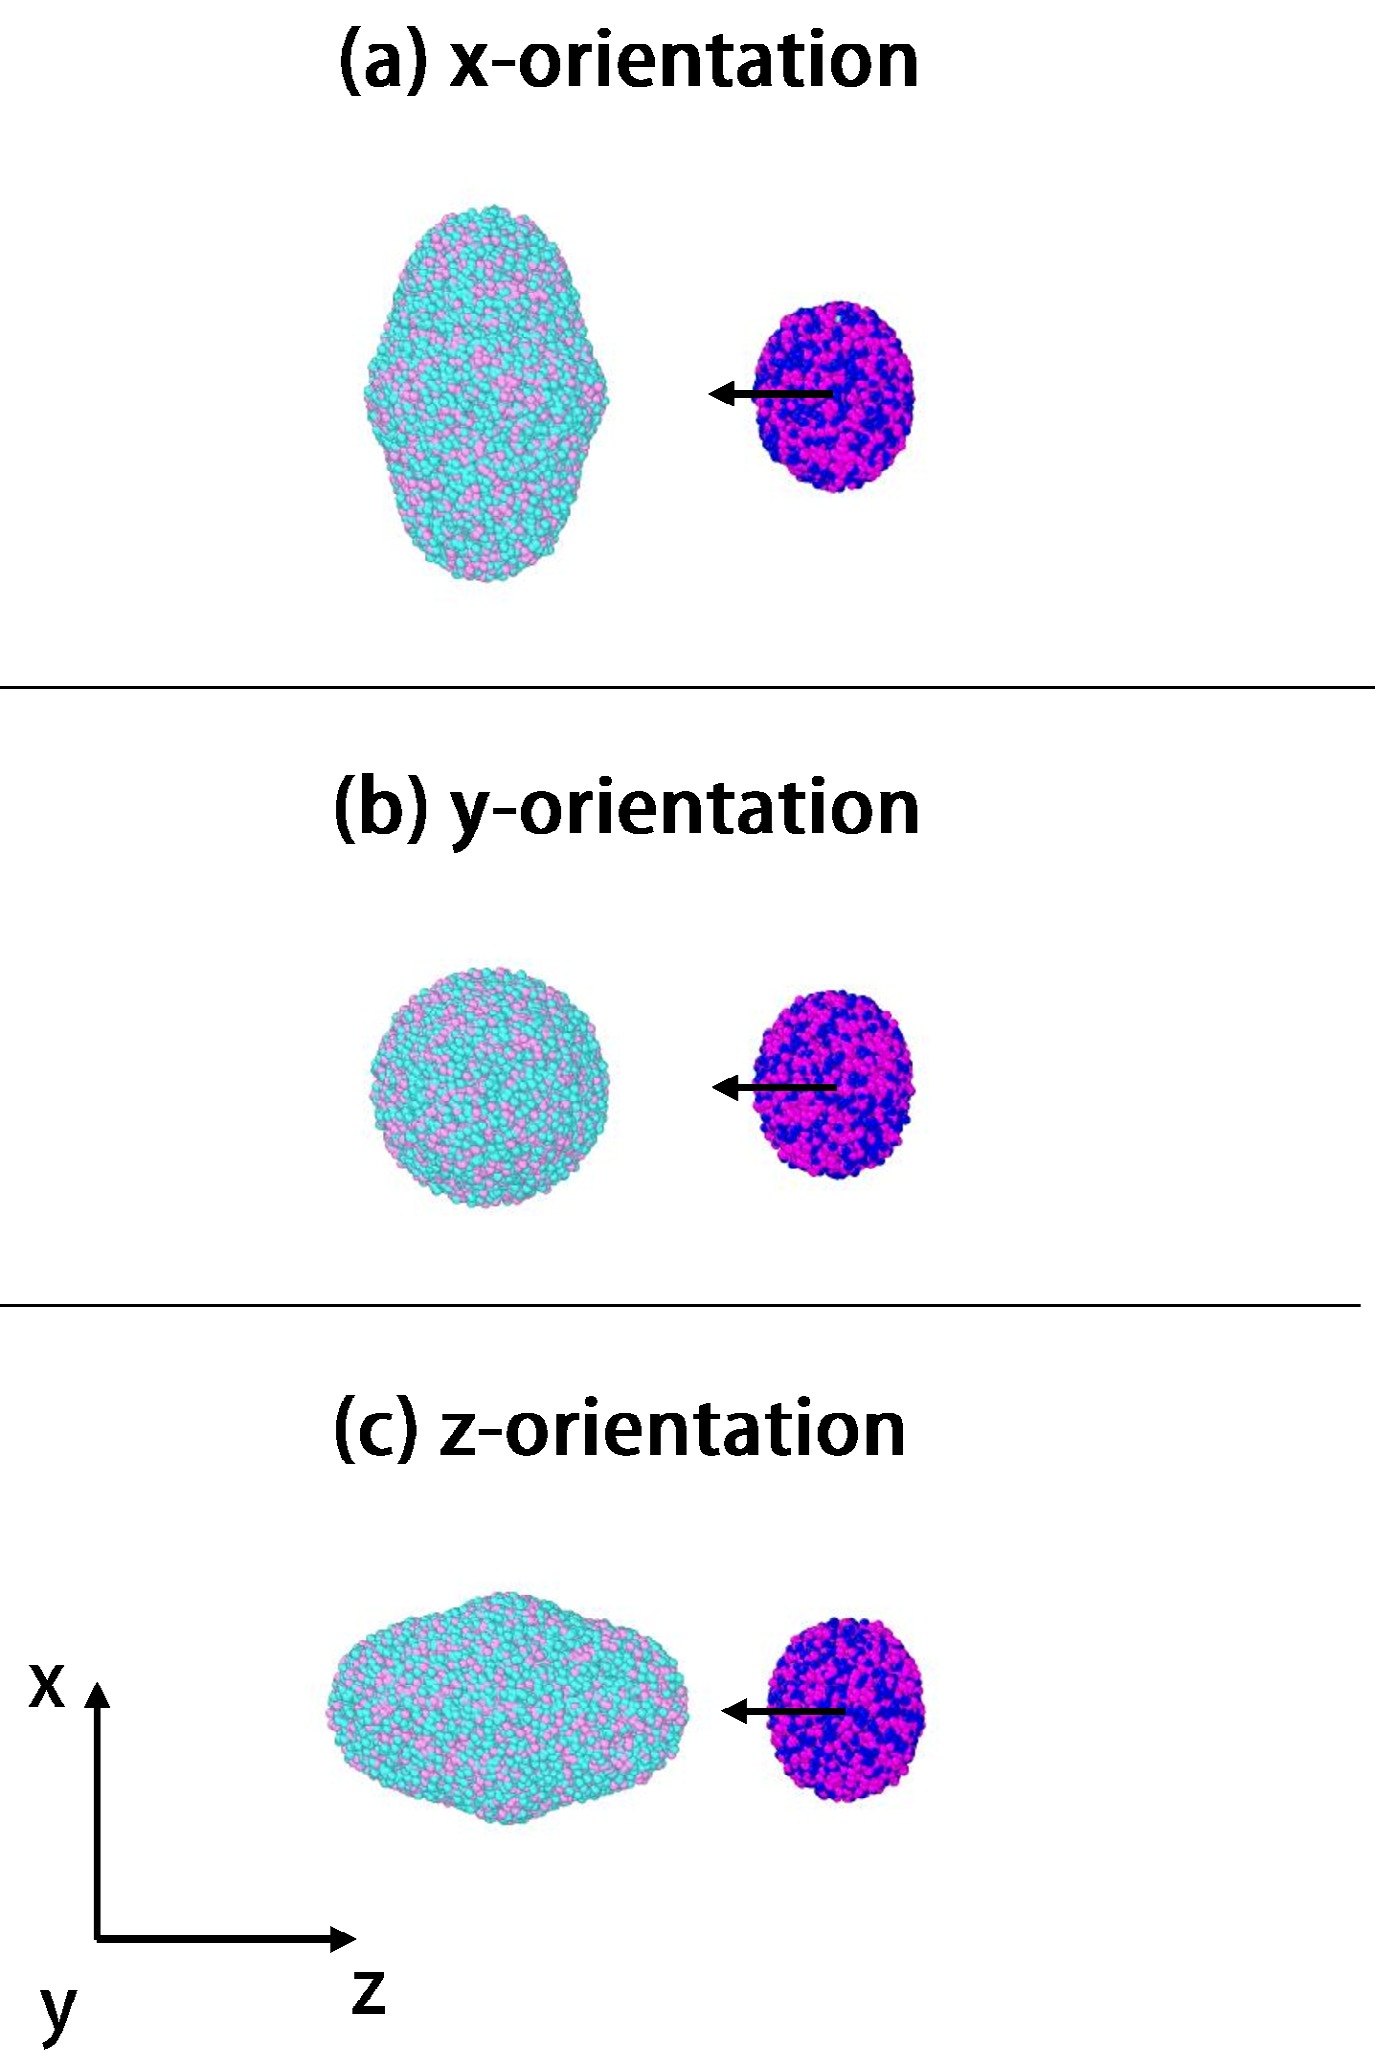
Figure 2. (color online) Schematic illustration of the three initial orientations adopted for the
$^{64}\mathrm{Ni}+{}^{238}\mathrm{U}$ reaction. The symmetry axis of$^{238}\mathrm{U}$ is aligned along the x-, y-, and z-axes.Since
$^{238}\mathrm{U}$ is axially symmetric, the initial orientation is specified by the direction of its symmetry axis in the reaction coordinate system. The z axis is chosen along the beam direction, the x axis along the impact-parameter direction, and the y axis perpendicular to the reaction plane. The x, y, and z orientations therefore correspond to the symmetry axis of$^{238}\mathrm{U}$ being aligned along the x, y, and z directions, respectively. For each orientation, events are generated under the same collision conditions, allowing a direct comparison of the resulting observables. -
The initial nuclei are generated in coordinate and momentum spaces. In coordinate space, nucleons are sampled according to the ground-state density distributions. For deformed nuclei, the deformation parameters and initial orientation are specified explicitly. In momentum space, nucleons are sampled from a local Fermi distribution at
$T=0$ .The reaction
$^{64}\mathrm{Ni}+{}^{238}\mathrm{U}$ is simulated at$E_{\mathrm{c.m.}}= 301.05 \;\mathrm{MeV}$ . The total evolution time is set to$t= 5000 \;\mathrm{fm}/c$ , which is sufficient for most events to reach a reseparated configuration, allowing the fragment mass, charge, and relative-motion observables to be extracted.To examine the effect of target orientation, three representative entrance-channel configurations are considered, as illustrated in Fig. 2. The deformation parameters are taken from Ref. [43]. The quadrupole deformation of
$^{64}\mathrm{Ni}$ is small,$\beta_2=0.09$ , and the projectile is treated approximately as spherical. The target$^{238}\mathrm{U}$ is prolately deformed, with$\beta_2=0.23$ and$\beta_4=0.06$ .
Figure 2. (color online) Schematic illustration of the three initial orientations adopted for the
$^{64}\mathrm{Ni}+{}^{238}\mathrm{U}$ reaction. The symmetry axis of$^{238}\mathrm{U}$ is aligned along the x-, y-, and z-axes.Since
$^{238}\mathrm{U}$ is axially symmetric, the initial orientation is specified by the direction of its symmetry axis in the reaction coordinate system. The z axis is chosen along the beam direction, the x axis along the impact-parameter direction, and the y axis perpendicular to the reaction plane. The x, y, and z orientations therefore correspond to the symmetry axis of$^{238}\mathrm{U}$ being aligned along the x, y, and z directions, respectively. For each orientation, events are generated under the same collision conditions, allowing a direct comparison of the resulting observables. -
The initial nuclei are generated in coordinate and momentum spaces. In coordinate space, nucleons are sampled according to the ground-state density distributions. For deformed nuclei, the deformation parameters and initial orientation are specified explicitly. In momentum space, nucleons are sampled from a local Fermi distribution at
$T=0$ .The reaction
$^{64}\mathrm{Ni}+{}^{238}\mathrm{U}$ is simulated at$E_{\mathrm{c.m.}}= 301.05 \;\mathrm{MeV}$ . The total evolution time is set to$t= 5000 \;\mathrm{fm}/c$ , which is sufficient for most events to reach a reseparated configuration, allowing the fragment mass, charge, and relative-motion observables to be extracted.To examine the effect of target orientation, three representative entrance-channel configurations are considered, as illustrated in Fig. 2. The deformation parameters are taken from Ref. [43]. The quadrupole deformation of
$^{64}\mathrm{Ni}$ is small,$\beta_2=0.09$ , and the projectile is treated approximately as spherical. The target$^{238}\mathrm{U}$ is prolately deformed, with$\beta_2=0.23$ and$\beta_4=0.06$ .
Figure 2. (color online) Schematic illustration of the three initial orientations adopted for the
$^{64}\mathrm{Ni}+{}^{238}\mathrm{U}$ reaction. The symmetry axis of$^{238}\mathrm{U}$ is aligned along the x-, y-, and z-axes.Since
$^{238}\mathrm{U}$ is axially symmetric, the initial orientation is specified by the direction of its symmetry axis in the reaction coordinate system. The z axis is chosen along the beam direction, the x axis along the impact-parameter direction, and the y axis perpendicular to the reaction plane. The x, y, and z orientations therefore correspond to the symmetry axis of$^{238}\mathrm{U}$ being aligned along the x, y, and z directions, respectively. For each orientation, events are generated under the same collision conditions, allowing a direct comparison of the resulting observables. -
The initial nuclei are generated in coordinate and momentum spaces. In coordinate space, nucleons are sampled according to the ground-state density distributions. For deformed nuclei, the deformation parameters and initial orientation are specified explicitly. In momentum space, nucleons are sampled from a local Fermi distribution at
$T=0$ .The reaction
$^{64}\mathrm{Ni}+{}^{238}\mathrm{U}$ is simulated at$E_{\mathrm{c.m.}}= 301.05 \;\mathrm{MeV}$ . The total evolution time is set to$t= 5000 \;\mathrm{fm}/c$ , which is sufficient for most events to reach a reseparated configuration, allowing the fragment mass, charge, and relative-motion observables to be extracted.To examine the effect of target orientation, three representative entrance-channel configurations are considered, as illustrated in Fig. 2. The deformation parameters are taken from Ref. [43]. The quadrupole deformation of
$^{64}\mathrm{Ni}$ is small,$\beta_2=0.09$ , and the projectile is treated approximately as spherical. The target$^{238}\mathrm{U}$ is prolately deformed, with$\beta_2=0.23$ and$\beta_4=0.06$ .
Figure 2. (color online) Schematic illustration of the three initial orientations adopted for the
$^{64}\mathrm{Ni}+{}^{238}\mathrm{U}$ reaction. The symmetry axis of$^{238}\mathrm{U}$ is aligned along the x-, y-, and z-axes.Since
$^{238}\mathrm{U}$ is axially symmetric, the initial orientation is specified by the direction of its symmetry axis in the reaction coordinate system. The z axis is chosen along the beam direction, the x axis along the impact-parameter direction, and the y axis perpendicular to the reaction plane. The x, y, and z orientations therefore correspond to the symmetry axis of$^{238}\mathrm{U}$ being aligned along the x, y, and z directions, respectively. For each orientation, events are generated under the same collision conditions, allowing a direct comparison of the resulting observables. -
We begin by illustrating the event-classification procedure based on the time evolution of the window structure. Figure 3 shows the line density at the window position for two representative events. The line density is obtained by integrating the local density over the plane perpendicular to the principal axis of the dinuclear system and therefore provides a direct measure of the formation, persistence, and rupture of the neck. The same window definition was used in our previous BUU studies [40, 44]. For the present
$^{64}\mathrm{Ni}+{}^{238}\mathrm{U}$ system at$E_{\mathrm{c.m.}}=301.05 \;\mathrm{MeV}$ , no events are classified as fusion within the present identification criterion and evolution time; therefore, only typical QF and QE cases are shown.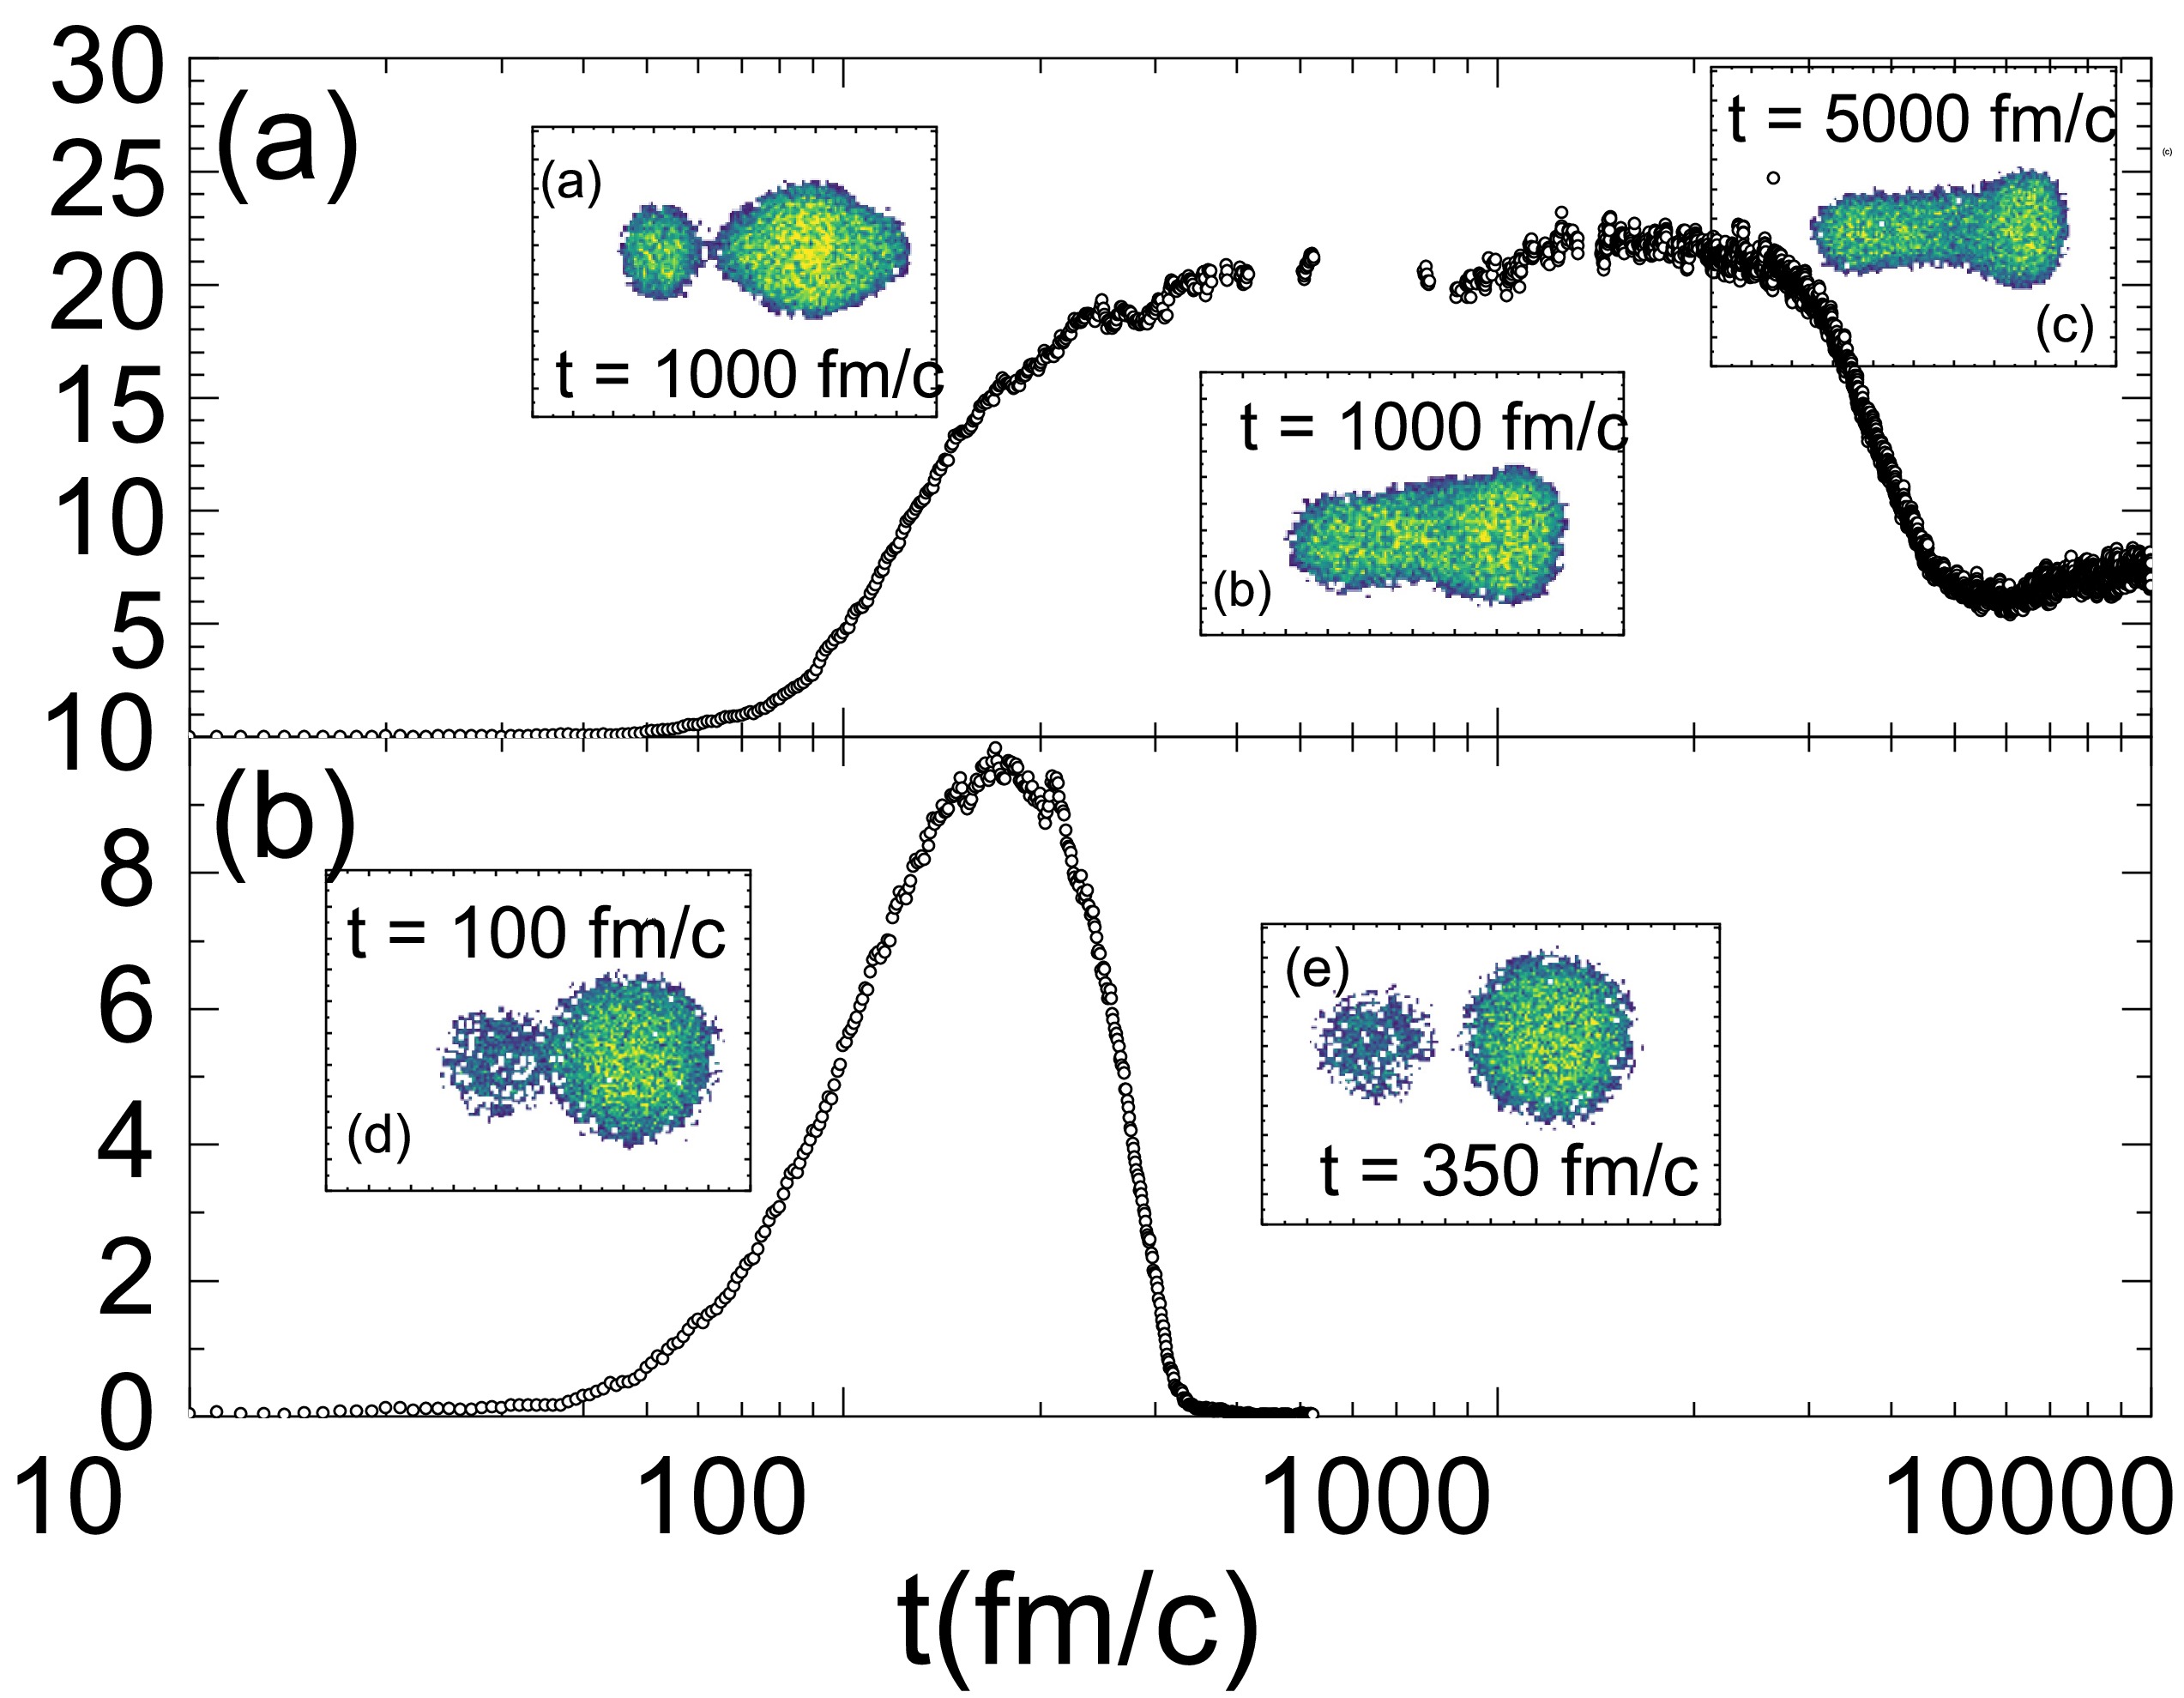
Figure 3. (color online) Time evolution of the line density at the window position for the
$^{64}\mathrm{Ni}+{}^{238}\mathrm{U}$ reaction at$E_{\mathrm{c.m.}}=301.05 \;\mathrm{MeV}$ : (a) a typical quasifission (QF) event and (b) a typical quasielastic (QE) event. The horizontal axis denotes time t (fm/c), and the vertical axis shows the line density at the window position (fm−1).For the QF event in Fig. 3(a), the line density begins to increase at
$t\approx 50 \;\mathrm{fm}/c$ , reaches a plateau at approximately$t\approx 300 \;\mathrm{fm}/c$ , and then decreases gradually after$t\approx 3000 \;\mathrm{fm}/c$ . This pattern indicates the formation of a persistent dinuclear configuration, followed by long-lived dissipation and nucleon exchange before reseparation. By contrast, the QE event in Fig. 3(b) exhibits only a short-lived increase in the line density, which disappears by approximately$t\approx 300 \;\mathrm{fm}/c$ . This behavior indicates transient contact followed by rapid reseparation. Accordingly, events with only a short-lived window signal are classified as QE, whereas events with a persistent neck and a clear plateau structure are classified as QF. This classification provides a process-based basis for connecting the final-state observables to the underlying contact-stage dynamics.To assess the ability of the BUU model to describe near-barrier dissipative collisions in this system, we first compare the calculated fragment mass distribution with the available experimental data. Among the 8000 simulated events used for the overall comparison,
$43.45$ % are classified as QF and the remaining events as QE; no fusion events are identified within the present criterion. The theoretical distribution shown below is therefore obtained after excluding the QE component and is dominated by QF. The comparison is intended primarily to test the overall shape of the mass distribution, the positions of the main peaks, and the relative population of the symmetric-mass region, rather than to achieve point-by-point quantitative agreement.As shown in Fig. 4, the experimental distribution exhibits a pronounced double-peaked structure, with the main yields concentrated around
$A\approx 80$ and$A\approx 220$ , and only a weak population near the nearly symmetric region$A\approx 150$ . This behavior is characteristic of a QF-dominated reaction, in which the system undergoes nucleon exchange and kinetic-energy dissipation during a finite contact time but reseparates before full mass and shape equilibration is reached. The BUU result reproduces this overall trend reasonably well. It also yields a double-peaked distribution and a continuous population over a broad mass range. In particular, around$A\approx 150$ , the calculated yield is of the same order of magnitude as the experimental value, namely$\sim 10^{-3}$ . This indicates that the BUU model captures the dominant mass-distribution pattern of the near-barrier$^{64}\mathrm{Ni}+{}^{238}\mathrm{U}$ reaction and thus provides a reasonable basis for the subsequent analysis of orientation-dependent dissipation and nucleon transfer.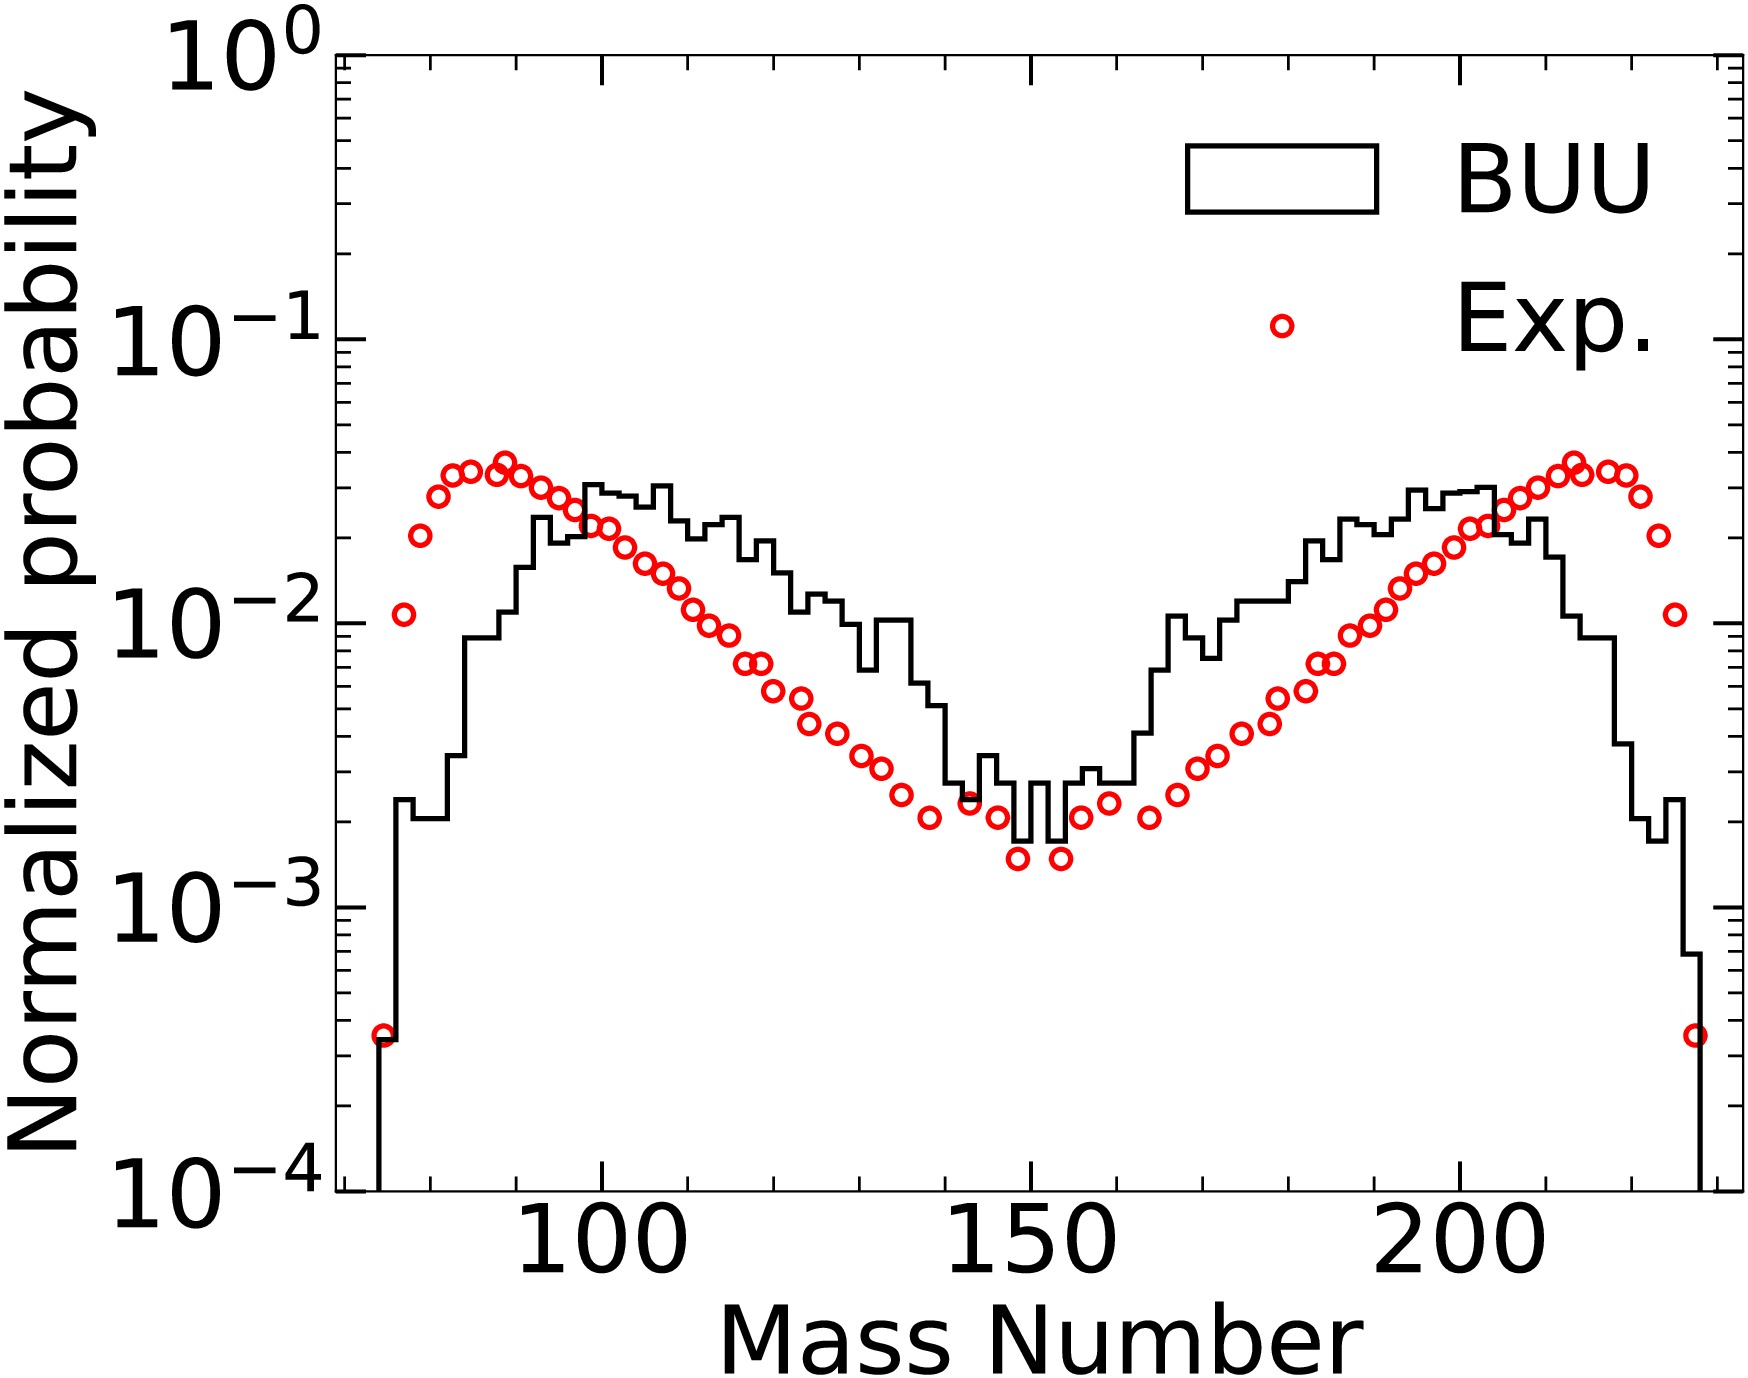
Figure 4. (color online) Mass-yield distribution of captured events for the
$^{64}\mathrm{Ni}+{}^{238}\mathrm{U}$ reaction at$E_{\mathrm{c.m.}}=301.05 \;\mathrm{MeV}$ , after excluding QE events. The black solid line denotes the BUU result, and the red circles represent the experimental data from Ref. [23]. The theoretical and experimental yields are normalized using the same procedure.It should be noted that the calculated mass distribution corresponds to primary fragments at the end of the BUU evolution, whereas the experimental data include secondary fragments after statistical de-excitation. For excited QF fragments, neutron evaporation and, to a lesser extent, light charged-particle emission are expected to shift the final masses slightly toward lower values and may also broaden the mass distribution. Therefore, a point-by-point comparison of the peak positions should be made with caution. The present comparison is intended mainly to examine the global mass-yield pattern, including the double-humped structure and the weak yield near mass symmetry. Because these features are primarily determined by the dynamical mass drift before reseparation, the omission of the evaporation stage is not expected to alter the qualitative conclusions regarding the QF-dominated character of the reaction.
We next compare the mass–angle distribution (MAD), which probes the correlation between mass relaxation and angular deflection and is widely used to distinguish QE, deep-inelastic, and QF trajectories [6, 19, 45]. Figure 5 presents the MAD for the
$^{64}\mathrm{Ni}+{}^{238}\mathrm{U}$ reaction in a combined form, with the BUU result at$E_{\mathrm{c.m.}}\approx 301.05 \;\mathrm{MeV}$ shown as a color-density map and the experimental distribution at$E_{\mathrm{c.m.}}\approx 302.62 \;\mathrm{MeV}$ overlaid as contour lines. Because the MAD is sensitive to beam energy and event-selection conditions, we focus primarily on the agreement in the global correlation pattern rather than on detailed point-by-point correspondence.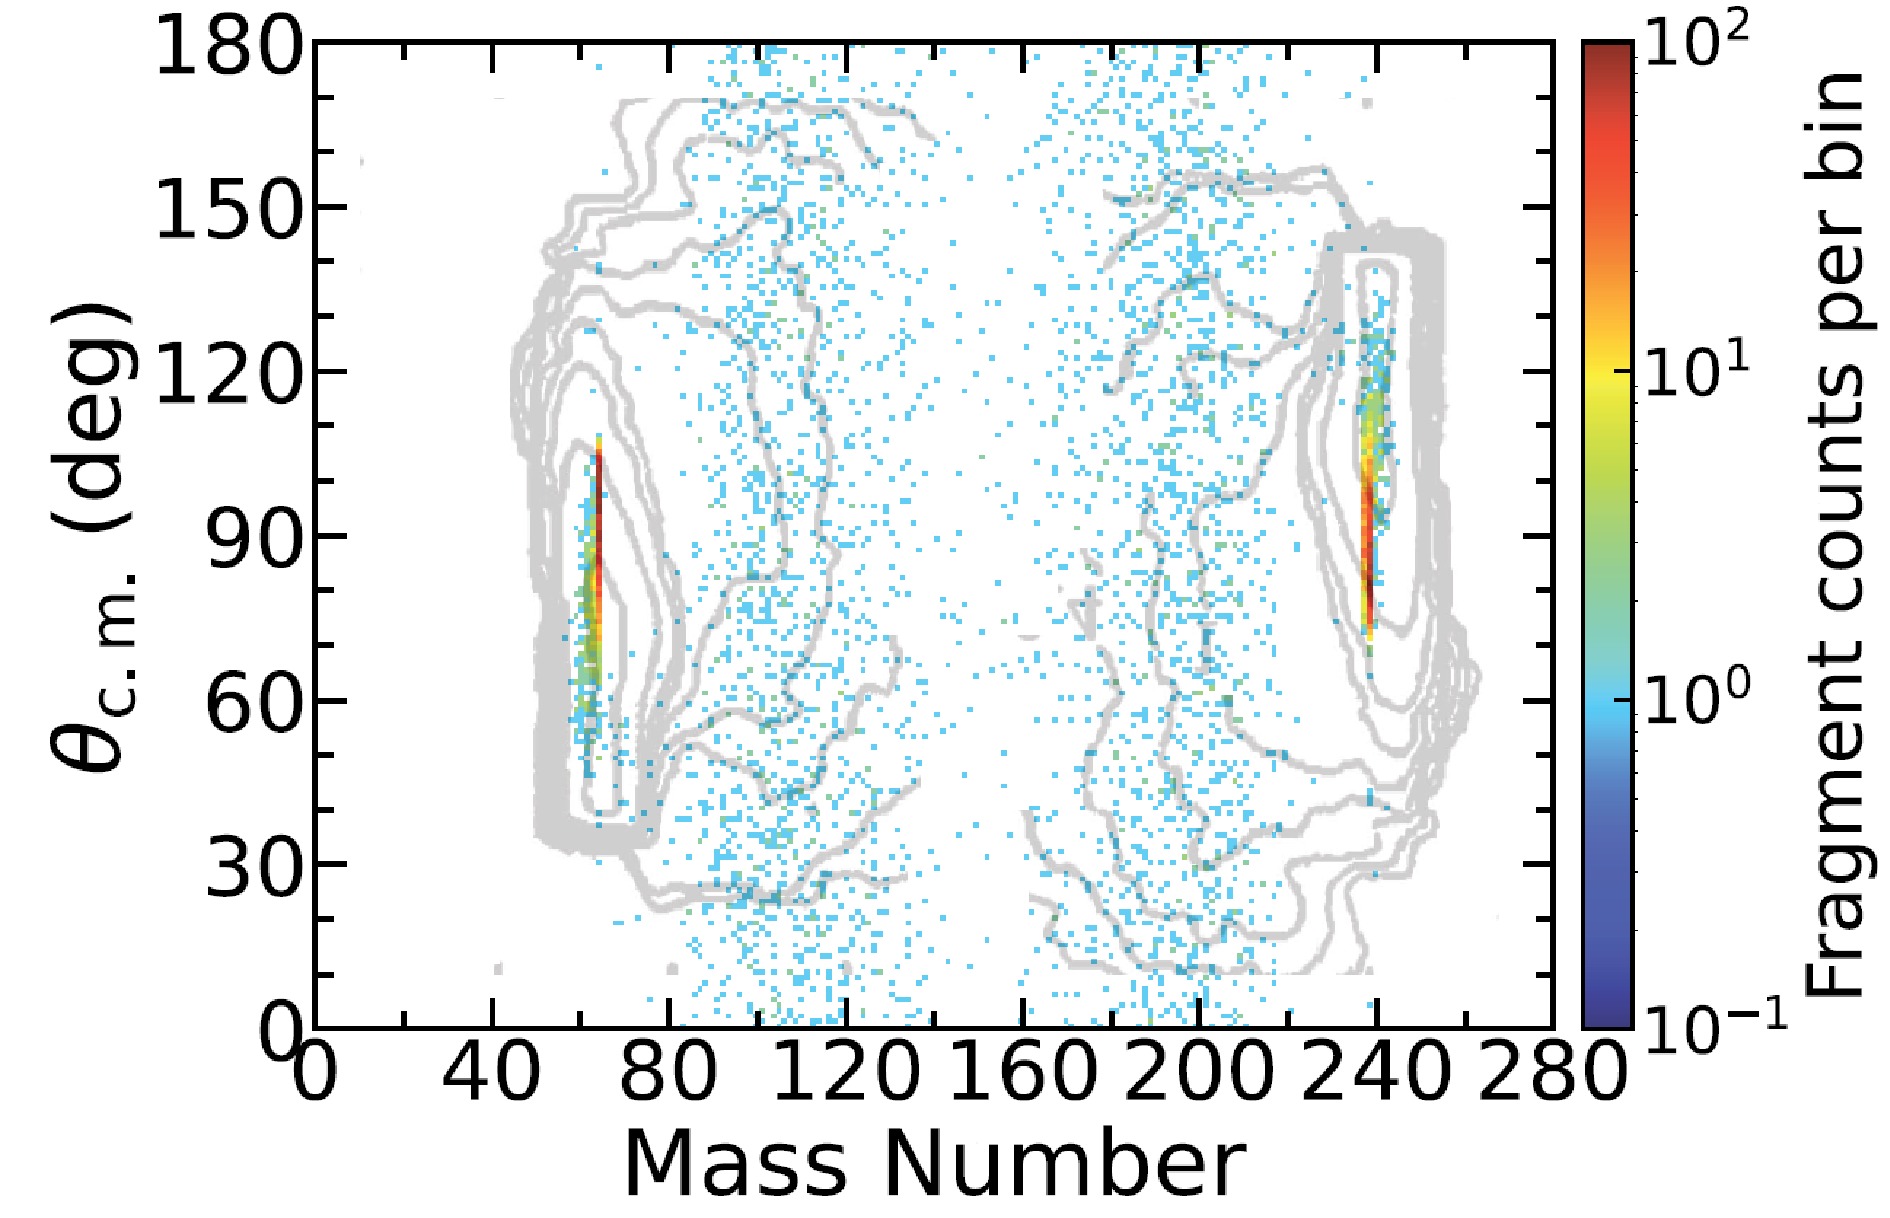
Figure 5. (color online) Mass-angle distributions (MADs) for the
$^{64}\mathrm{Ni}+{}^{238}\mathrm{U}$ reaction. The color map shows the BUU result at$E_{\mathrm{c.m.}}\approx 301.05 \;\mathrm{MeV}$ , whereas the contour lines represent the experimental distribution for the same system at$E_{\mathrm{c.m.}}\approx $ $ 302.62 \;\mathrm{MeV}$ . The horizontal axis denotes the fragment mass number A, and the vertical axis denotes the center-of-mass scattering angle$\theta_{\mathrm{c.m.}}$ .Both the BUU result and the experimental distribution exhibit a clear mass–angle correlation rather than an approximately isotropic emission pattern around
$\theta_{\mathrm{c.m.}}=90 ^\circ$ . This indicates that the system retains substantial memory of the entrance channel at reseparation. On both the light- and heavy-fragment sides, the distributions display tails extending from the entrance-channel masses toward the intermediate-mass region, reflecting the gradual transition from QE to more strongly dissipative trajectories. As the contact evolution becomes longer, nucleon exchange and mass drift accumulate, and the system undergoes greater angular deflection before reseparation. The BUU calculation reproduces the main high-density region near the entrance-channel masses and the extension toward intermediate masses reasonably well. However, the calculated distribution is somewhat more concentrated than the experimental one, particularly in the angular coverage and low-density tails, indicating that an average transport description still has limitations in representing broader event-by-event fluctuations. This may reflect the limited treatment of fluctuations in the semiclassical transport approach. Even so, the global mass–angle correlation is captured satisfactorily.The mass–TKE distribution provides a complementary probe of dissipative dynamics by correlating mass relaxation with kinetic-energy loss [23, 46]. Figure 6 shows the BUU result for the
$^{64}\mathrm{Ni}+{}^{238}\mathrm{U}$ reaction at$E_{\mathrm{c.m.}}\approx 301.05 \;\mathrm{MeV}$ . The corresponding experimental distribution from Ref. [23] is used as a reference for comparison. The discussion therefore focuses on whether the BUU calculation reproduces the main global correlations between fragment mass and total kinetic energy.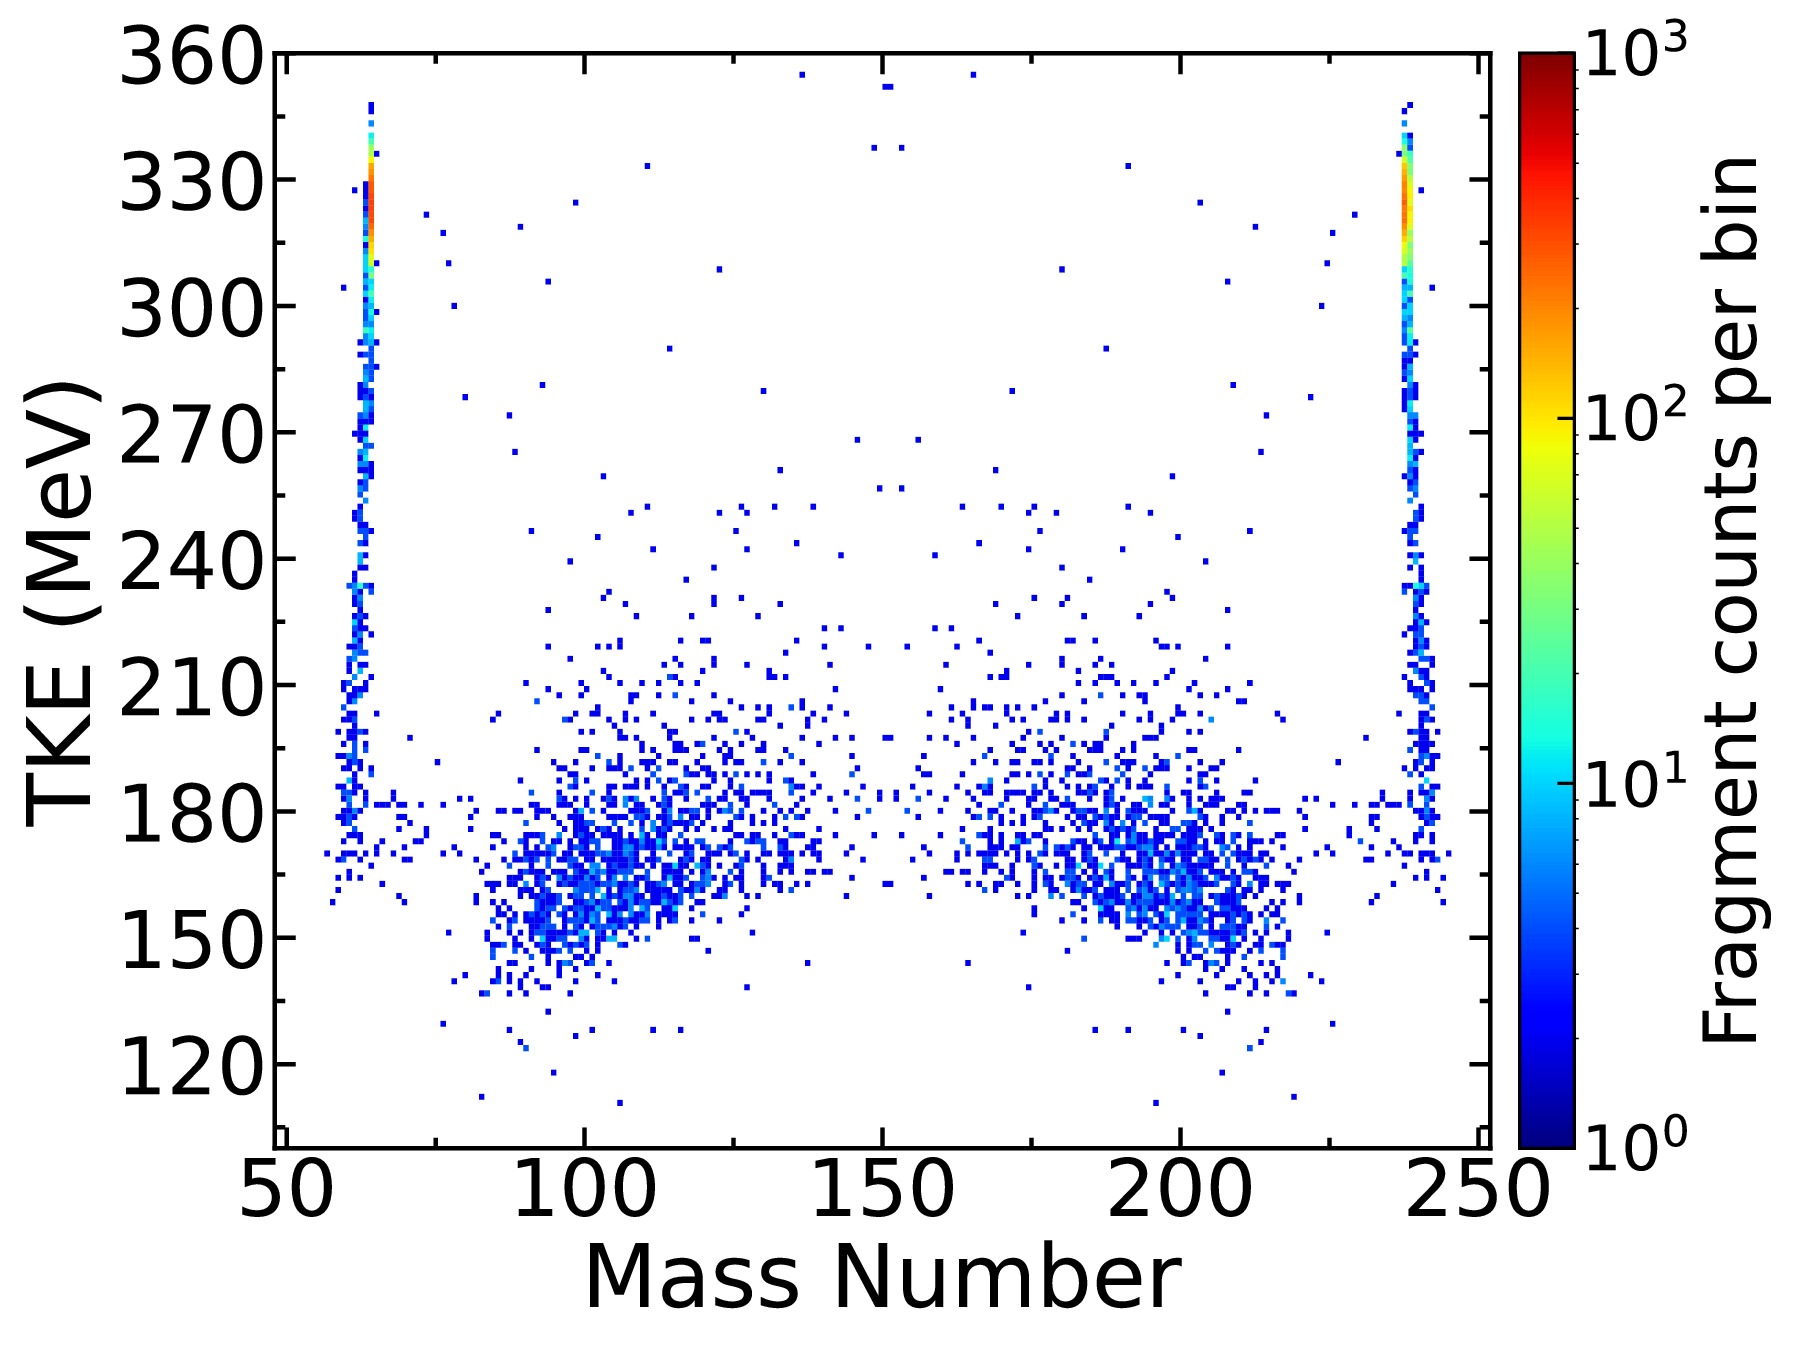
Figure 6. (color online) Mass–TKE distribution calculated with the BUU model for the
$^{64}\mathrm{Ni}+{}^{238}\mathrm{U}$ reaction at$E_{\mathrm{c.m.}}\approx $ $ 301.05 \;\mathrm{MeV}$ . The horizontal axis denotes the fragment mass number A, and the vertical axis shows the total kinetic energy, TKE (MeV). The corresponding experimental mass–TKE distribution for the same system and energy, used for comparison in the present work, was reported in Ref. [23].The BUU result exhibits a pronounced double-peaked mass structure, with dominant yields near the entrance-channel masses and a weak population near mass symmetry. A high-TKE component is concentrated near the entrance-channel region and is associated mainly with elastic and weakly dissipative QE trajectories, whereas an extension toward lower TKE in the intermediate-mass region reflects increased energy dissipation accompanying mass drift. This overall pattern is consistent with the experimental trend reported in Ref. [23].
Some discrepancies are nevertheless observed. The calculated high-TKE component appears somewhat more concentrated, and the low-TKE spread in portions of the intermediate-mass region is narrower than in the experimental distribution. In addition, a small number of isolated high-TKE events are present in the BUU result, which may be related to the fragment-recognition procedure and the reconstruction of Coulomb energy at the separation stage. These features are not expected to affect the overall correlation pattern.
Together with the comparisons of the mass-yield distribution and the MAD, the present results indicate that the BUU model reproduces the global features of the near-barrier
$^{64}\mathrm{Ni}+{}^{238}\mathrm{U}$ reaction. In particular, it captures the QF-dominated double-peaked mass structure and the main correlations between mass, scattering angle, and total kinetic energy. This provides a consistent basis for the subsequent analysis of orientation-dependent dynamics.We now examine the orientation dependence of the reaction dynamics. Figure 7 shows the relative fractions of QE and QF events for the x, y, and z orientations. No fusion events are identified under the present identification criterion and evolution time. For the x orientation, the QE and QF fractions are
$38.93$ % and$61.07$ %, respectively. For the z orientation, the corresponding fractions are$43.65$ % and$56.35$ %. In contrast, the y orientation is strongly dominated by QE events, with$81.53$ % QE and only$18.47$ % QF. These results indicate that the orientation affects not only the properties of individual dissipative trajectories but also the overall branching between weakly and strongly dissipative reaction paths.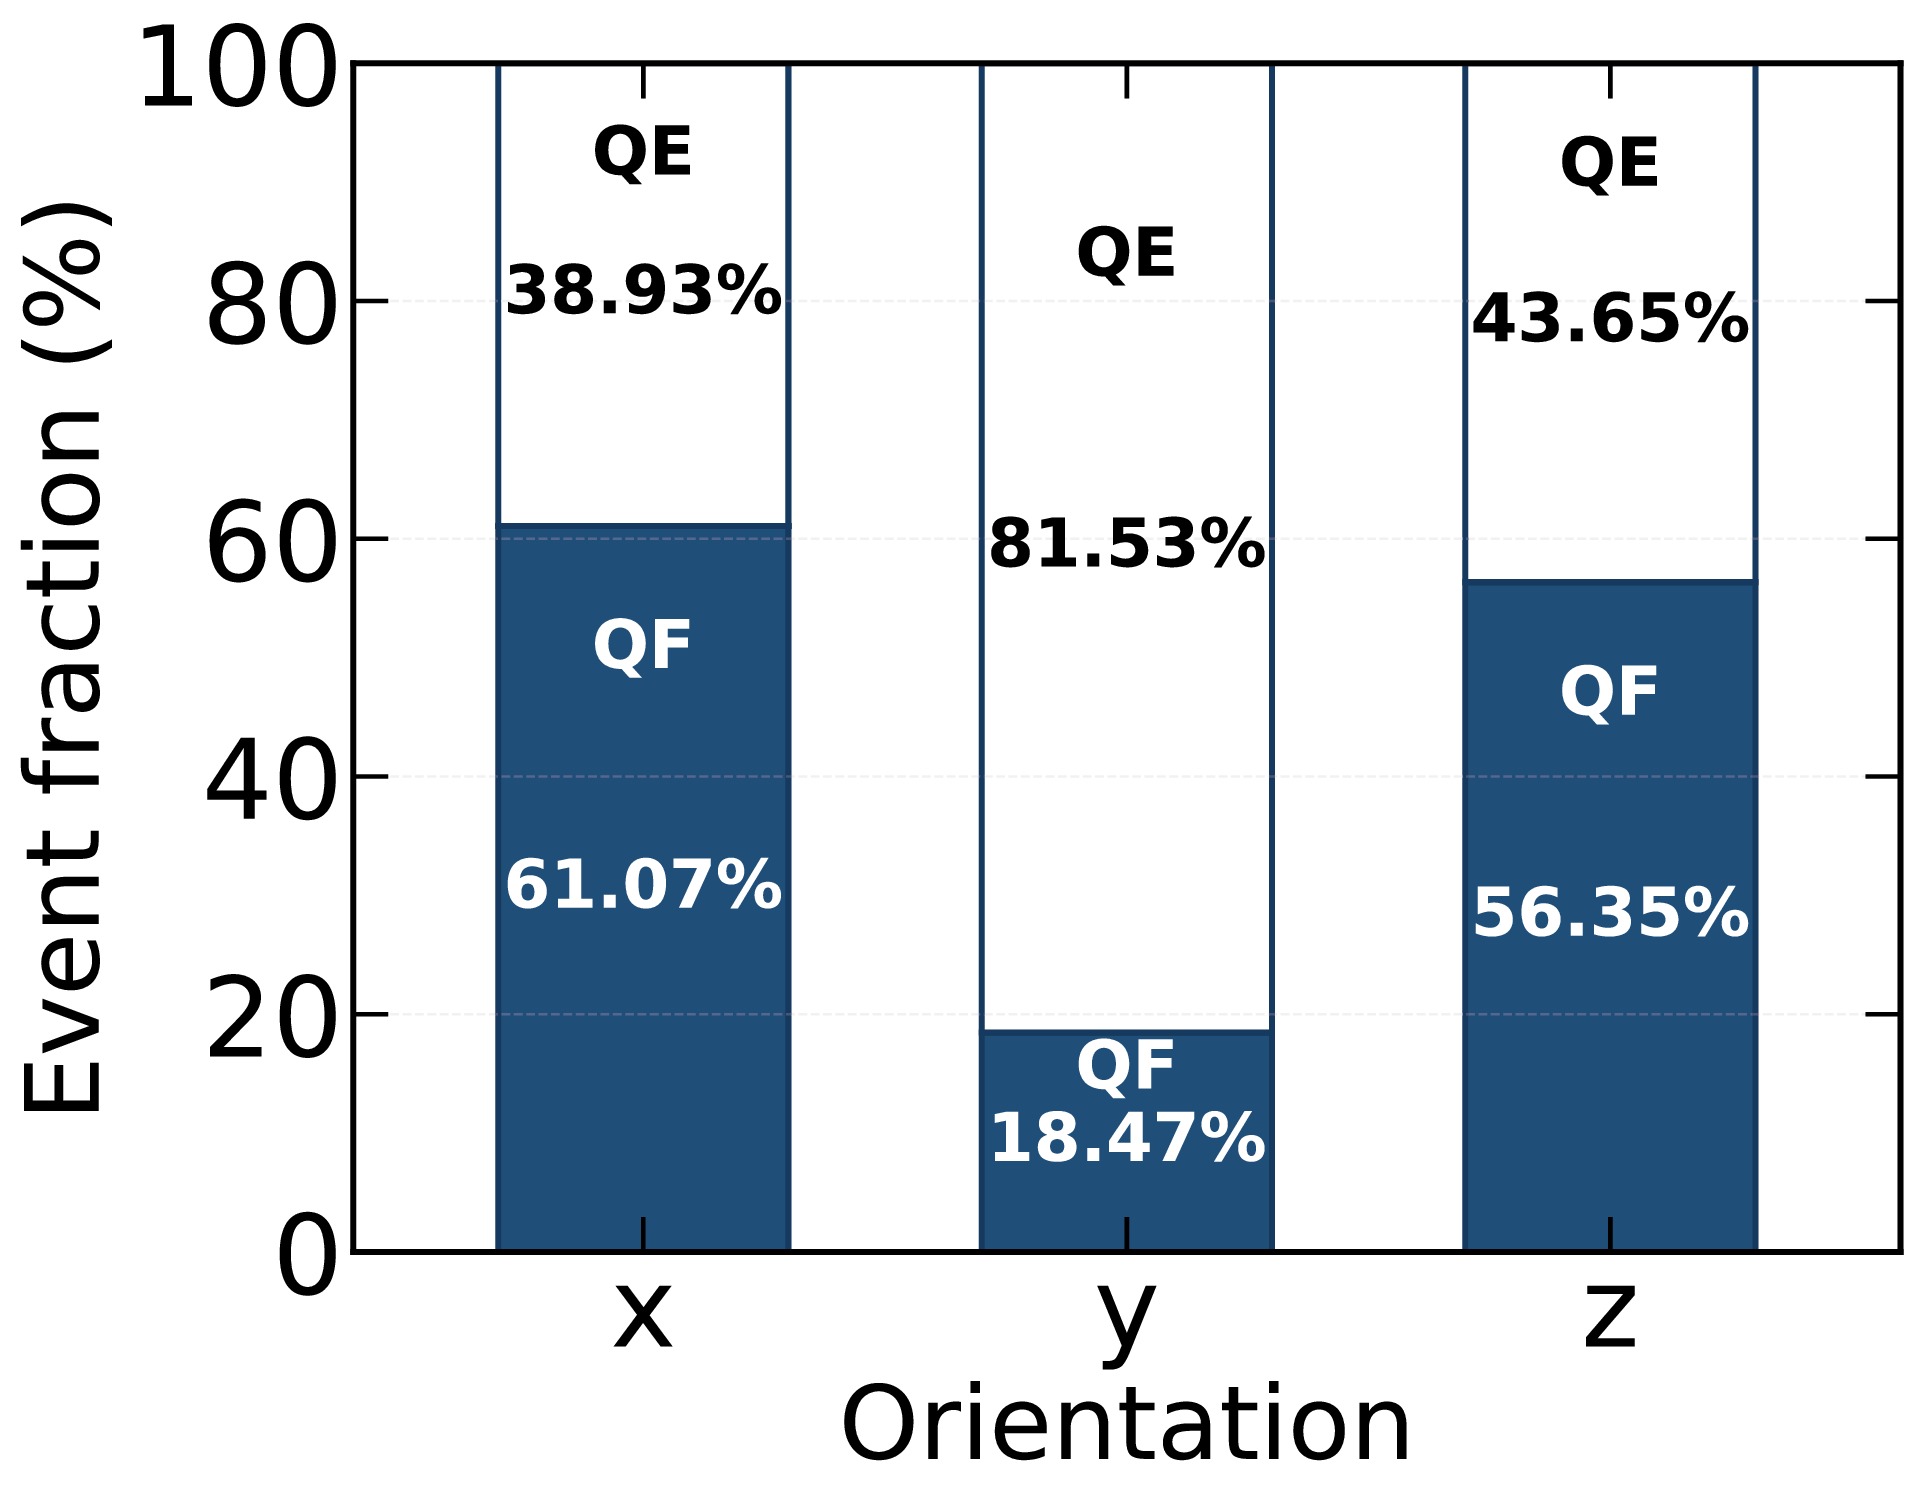
Figure 7. (color online) Relative fractions of quasielastic (QE) and quasifission (QF) events for the
$^{64}\mathrm{Ni}+{}^{238}\mathrm{U}$ reaction at$E_{\mathrm{c.m.}}= 301.05 \;\mathrm{MeV}$ for the three initial orientations. The classification is based on the time evolution of the window structure.Figure 8 shows the fragment mass distributions for the three initial orientations, where all simulated events are included. Consistent with the event fractions shown in Fig. 7, the x orientation exhibits the broadest distribution and the strongest extension toward the central-mass region, the z orientation shows an intermediate behavior, whereas the y orientation is dominated by the entrance-channel peaks. This indicates that the tendency toward mass relaxation and strongly dissipative QF-like evolution follows the ordering (x > z > y).
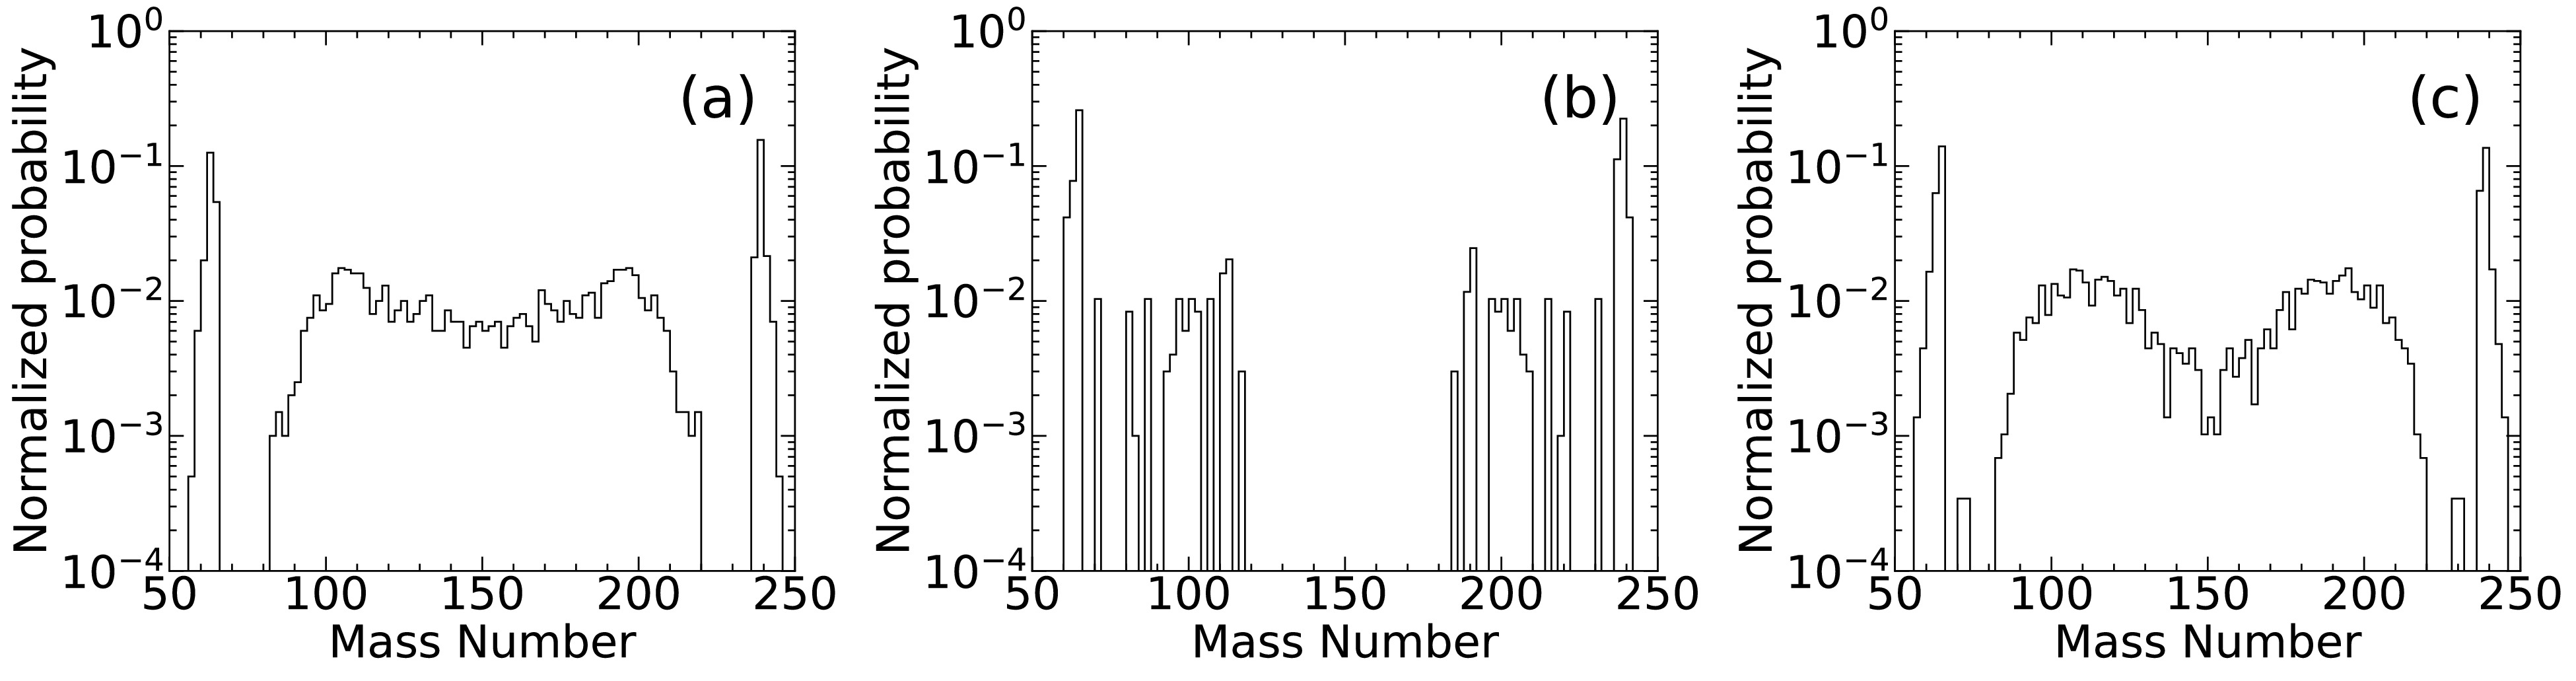
Figure 8. Fragment mass distributions for the
$^{64}\mathrm{Ni}+{}^{238}\mathrm{U}$ reaction at$E_{\mathrm{c.m.}}\approx 301.05\,\;\mathrm{MeV}$ for three initial orientations. Unlike Fig. 4, the present figure includes all simulated events. (a) x orientation, (b) y orientation, and (c) z orientation.The same orientation dependence is also visible in the MADs shown in Fig. 9, where the present BUU results are compared directly with the TDHF mass–angle correlations digitized from Ref. [47] for the same
$^{64}\mathrm{Ni}+{}^{238}\mathrm{U}$ reaction. In the BUU results, all three orientations exhibit a QE band near the entrance channel, with high-yield ridges around$A\simeq 64$ and$A\simeq 238$ , corresponding to weakly dissipative trajectories with only limited nucleon exchange. Beyond this QE band, all three cases show a clear mass–angle correlation, which is typical of deep-inelastic and QF dynamics and reflects incomplete rotational and mass equilibration before reseparation.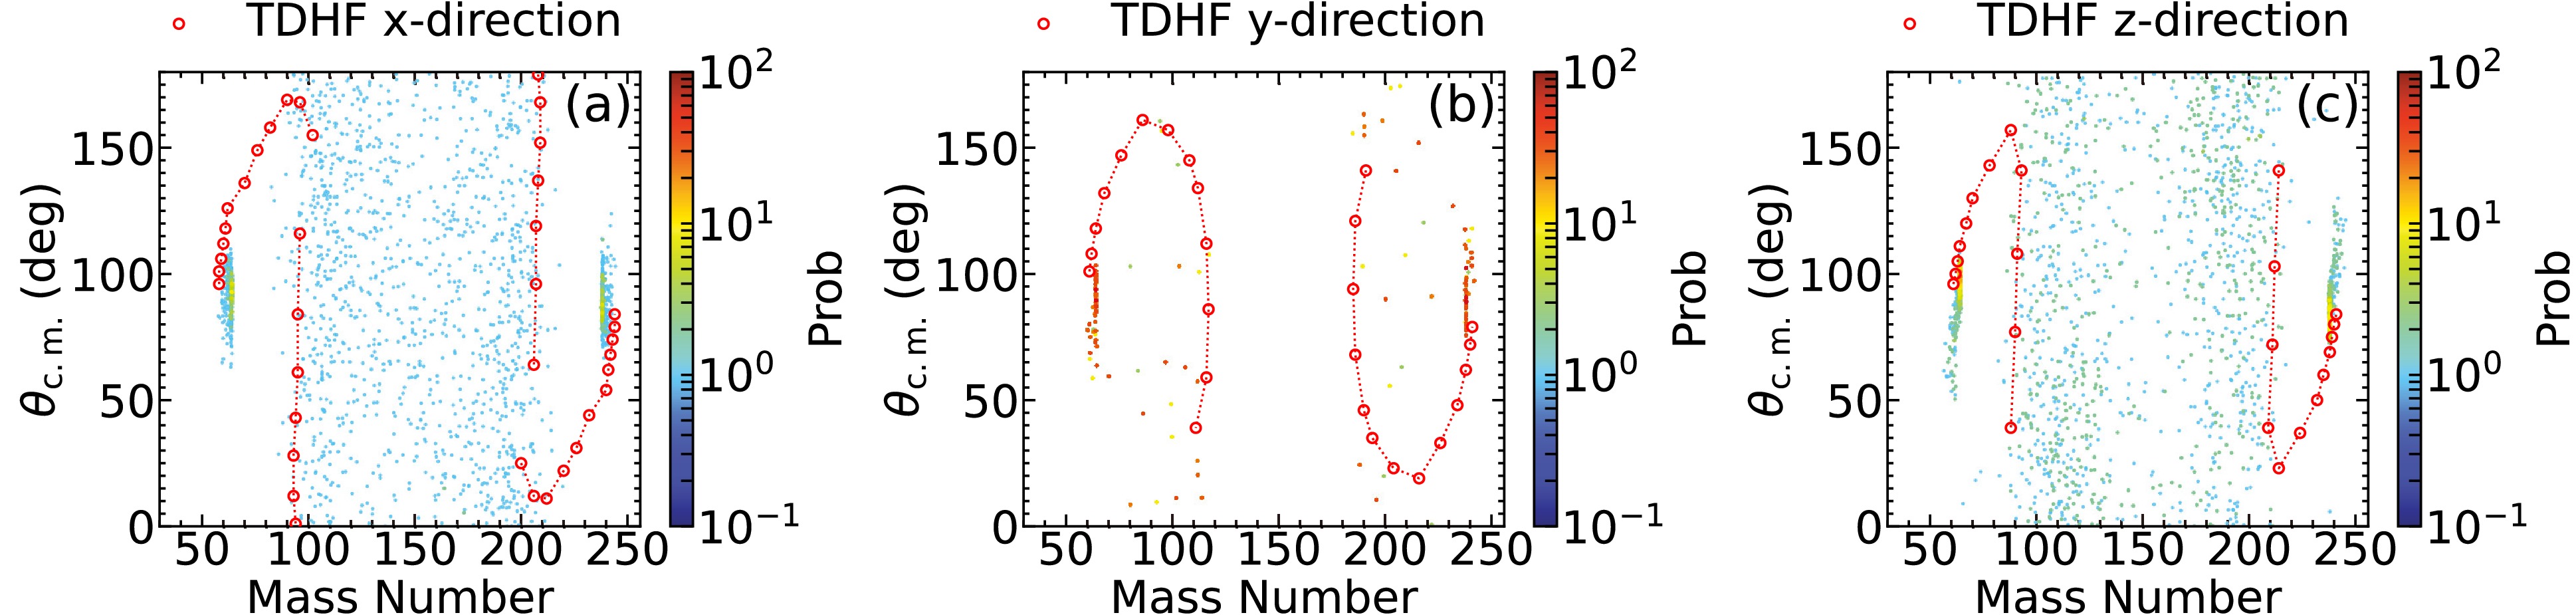
Figure 9. (color online) Comparison of mass–angle distributions (MADs) for the
$^{64}\mathrm{Ni}+{}^{238}\mathrm{U}$ reaction at a near-barrier energy for three representative orientations of the deformed$^{238}\mathrm{U}$ target: (a) x-orientation, (b) y-orientation, and (c) z-orientation. In each panel, the present BUU result at$E_{\mathrm{c.m.}}\approx 301.05 \;\mathrm{MeV}$ is compared directly with the TDHF result digitized from Ref. [47]. The horizontal axis represents the fragment mass number A, and the vertical axis represents the center-of-mass scattering angle$\theta_ {\rm{c.m.}} $ .The main differences lie in the relative weight of the strongly dissipative component and in the extent of its spread toward the symmetric-mass region and larger rotation angles. The x orientation shows the broadest MAD and the strongest extension toward symmetry, indicating the largest fraction of long-lived dissipative trajectories. The z orientation is intermediate. By contrast, the y orientation is much more strongly dominated by the QE ridge, while the deep-inelastic and QF component is clearly weaker and the mass–angle correlation remains more pronounced. This indicates that, in the y orientation, more events undergo rapid reseparation after only a short contact, whereas the x orientation is more favorable for longer sticking and stronger mass drift.
The direct comparison with TDHF in Fig. 9 provides a useful microscopic reference for this orientation dependence. TDHF describes the reaction through the self-consistent microscopic evolution of single-particle wave functions and has shown that the orientation of the deformed
$^{238}\mathrm{U}$ target can strongly affect multinucleon transfer, contact evolution, mass drift, and quasifission dynamics [15, 20, 47]. The TDHF results likewise show clear orientation dependence: different initial orientations lead to different degrees of mass migration away from the entrance-channel masses and different angular deflections. This behavior is qualitatively consistent with the present BUU result, in which the x and z orientations exhibit stronger evolution toward the QF region, whereas the y orientation remains dominated by quasielastic or weakly dissipative trajectories.Figure 10 gives the corresponding mass–TKE correlations for the three orientations, again in direct comparison with the TDHF results digitized from Ref. [47]. In the BUU results, all three panels show a high-TKE band near the entrance-channel masses, associated with elastic and QE trajectories, and a lower-TKE component extending into the intermediate-mass region, associated with more dissipative deep-inelastic and QF events. The main scale of the TKE for two-body reseparation is governed by the competition among charge partition, dissipation strength, and separation geometry, and may be viewed approximately in terms of the Coulomb scaling
$\mathrm{TKE}\propto Z_1Z_2/R_{\rm{sc}}$ [46].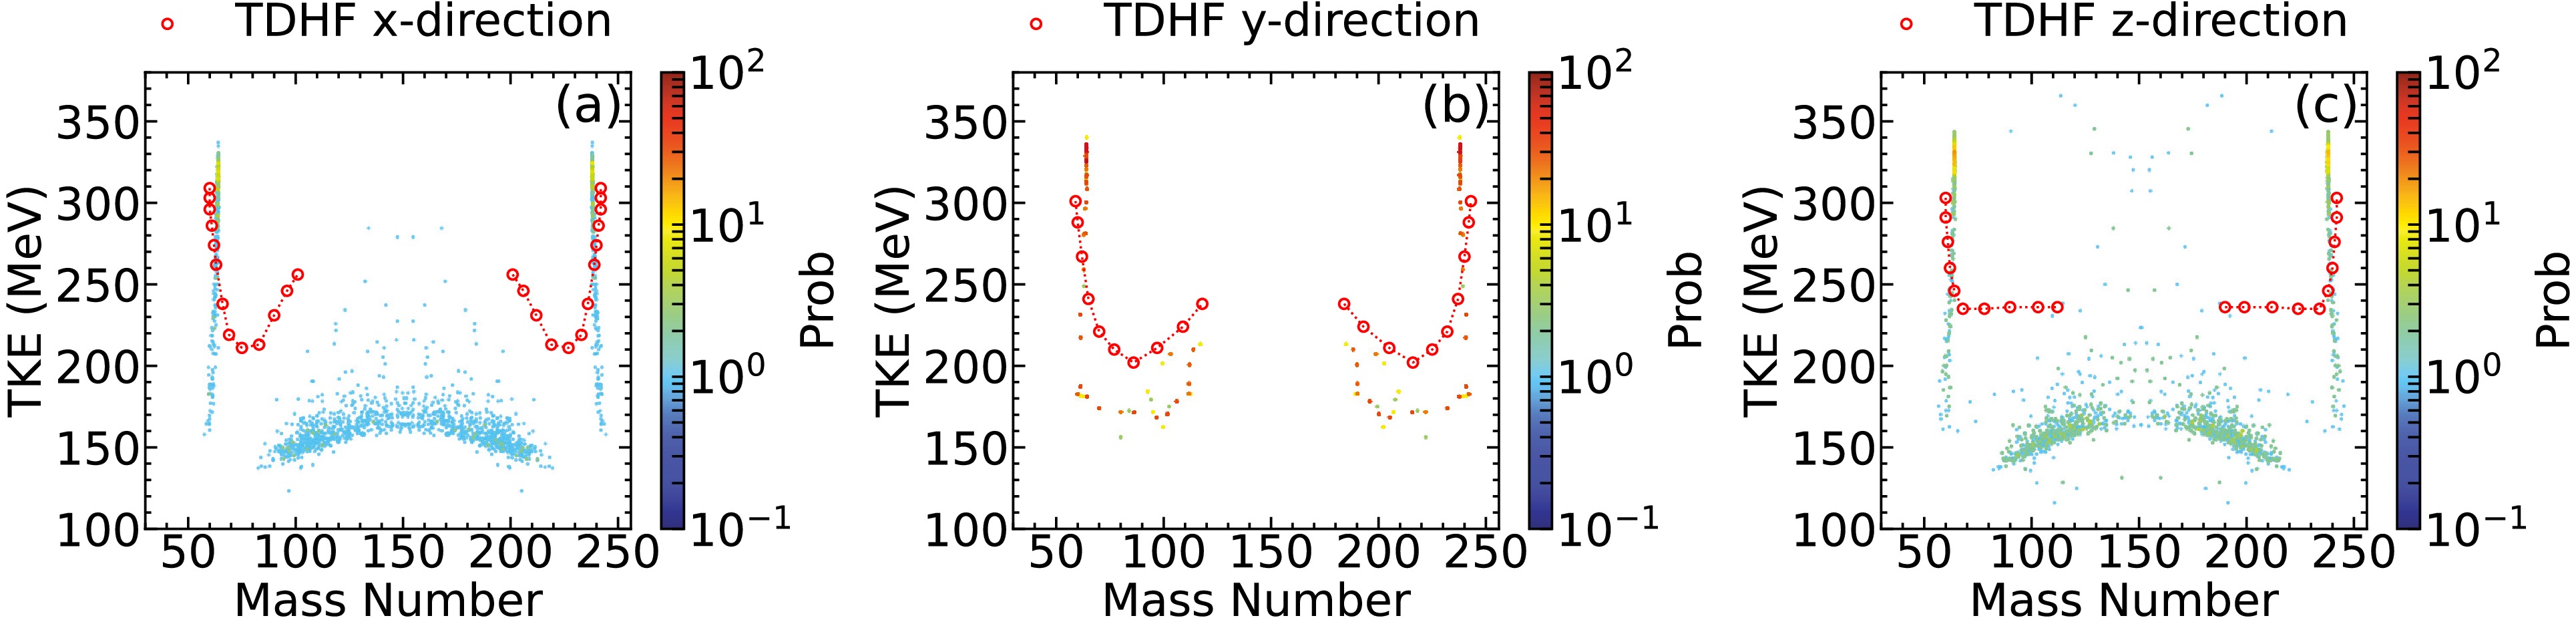
Figure 10. (color online) Comparison of mass–TKE distributions for the
$^{64}\mathrm{Ni}+{}^{238}\mathrm{U}$ reaction at near-barrier energy for three representative orientations of the deformed$^{238}\mathrm{U}$ target: (a) x orientation, (b) y orientation, and (c) z orientation. In each panel, the present BUU result at$E_{\mathrm{c.m.}}\approx 301.05 \;\mathrm{MeV}$ is compared directly with the TDHF result digitized from Ref. [47]. The horizontal axis denotes the fragment mass number A, and the vertical axis denotes the total kinetic energy (TKE).The orientation dependence again follows the same trend. The x orientation exhibits the strongest extension toward the central-mass region together with a more prominent low-TKE component, indicating longer-lived contact configurations and stronger dissipation. The y orientation shows the strongest high-TKE entrance-channel band and the weakest low-TKE symmetric-mass component, indicating rapid reseparation and limited dissipation. The z orientation lies between the two. The TDHF mass–TKE correlations show a qualitatively similar orientation-dependent pattern, in which the amount of mass drift and the associated kinetic-energy dissipation depend strongly on the initial orientation. Thus, the mass distributions, MADs, and mass–TKE correlations consistently indicate that the x orientation is most favorable for strongly dissipative QF-like evolution, the z orientation is somewhat less so, and the y orientation is least favorable.
At the same time, the comparison with TDHF also highlights the difference between the two descriptions. In TDHF, each calculation follows a self-consistent mean-field trajectory for a given initial condition. Therefore, TDHF provides a microscopic description of the average evolution associated with each orientation, but event-by-event fluctuations are not explicitly sampled in the standard framework. In contrast, the present BUU calculation follows the event-by-event evolution of the one-body phase-space distribution and provides direct access to contact-stage observables such as
$P_{\rm{cont}}(b)$ ,$T_{\rm{cont}}$ , and the correlation between nucleon transfer and contact duration. These process-oriented quantities allow the entrance-channel geometry and contact-stage dynamics to be directly connected with the final fragment mass distribution, mass–angle distribution, and mass–TKE correlation. For example, the weaker mass drift in the y orientation can be directly related in BUU to its smaller QF fraction and the more rapid reduction of contact probability and contact time at intermediate impact parameters.The DNS model provides another complementary viewpoint. It treats the reaction as the evolution of two interacting fragments on a potential-energy surface and emphasizes the influence of entrance-channel deformation and orientation on capture probability, mass-asymmetry evolution, fusion probability, and QF competition [48−50]. A more specific study of the
$^{64}\mathrm{Ni}+{}^{238}\mathrm{U}$ system was reported in Ref. [51], where the GRAZING and DNS models were compared for multinucleon transfer at$E_{\mathrm{c.m.}}\approx 307.5 \;\mathrm{MeV}$ . That work showed that the GRAZING and DNS components correspond to different transfer mechanisms: the GRAZING contribution mainly describes transfer in the grazing regime, whereas the DNS contribution becomes important for more deeply overlapped configurations after contact. It was further shown that, for the$^{64}\mathrm{Ni}+{}^{238}\mathrm{U}$ reaction, the DNS component makes a more important contribution to channels with larger proton transfer, while the combined GRAZING+DNS calculation improves the description of measured isotopic production cross sections [51].Although the DNS study focuses mainly on isotopic production cross sections rather than on the mass–angle or mass–TKE correlations discussed here, it supports the same general physical picture that multinucleon transfer in the
$^{64}\mathrm{Ni}+{}^{238}\mathrm{U}$ reaction contains contributions from different dynamical regimes. In this respect, the present BUU analysis provides a complementary viewpoint: instead of describing only the average mean-field evolution as in TDHF, or the post-capture mass-asymmetry evolution on a potential-energy surface as in DNS, BUU gives an event-resolved transport description that directly links the dynamical process to the final observables. Therefore, BUU, TDHF, and DNS provide complementary viewpoints, and their qualitative consistency supports the conclusion that the deformation and orientation of$^{238}\mathrm{U}$ are essential for understanding multinucleon transfer, mass relaxation, and QF competition in the$^{64}\mathrm{Ni}+{}^{238}\mathrm{U}$ reaction.Figure 11(a) shows the contact probability
$P_{\rm{cont}}(b)$ as a function of the impact parameter for the three representative orientations of the deformed$^{238}\mathrm{U}$ target, together with an additional reference calculation using an artificially spherical$^{238}\mathrm{U}$ density distribution. At small impact parameters ($b\lesssim3 \;\mathrm{fm}$ ), all configurations exhibit contact probabilities close to unity, indicating that central collisions almost always lead to the formation of a contact configuration.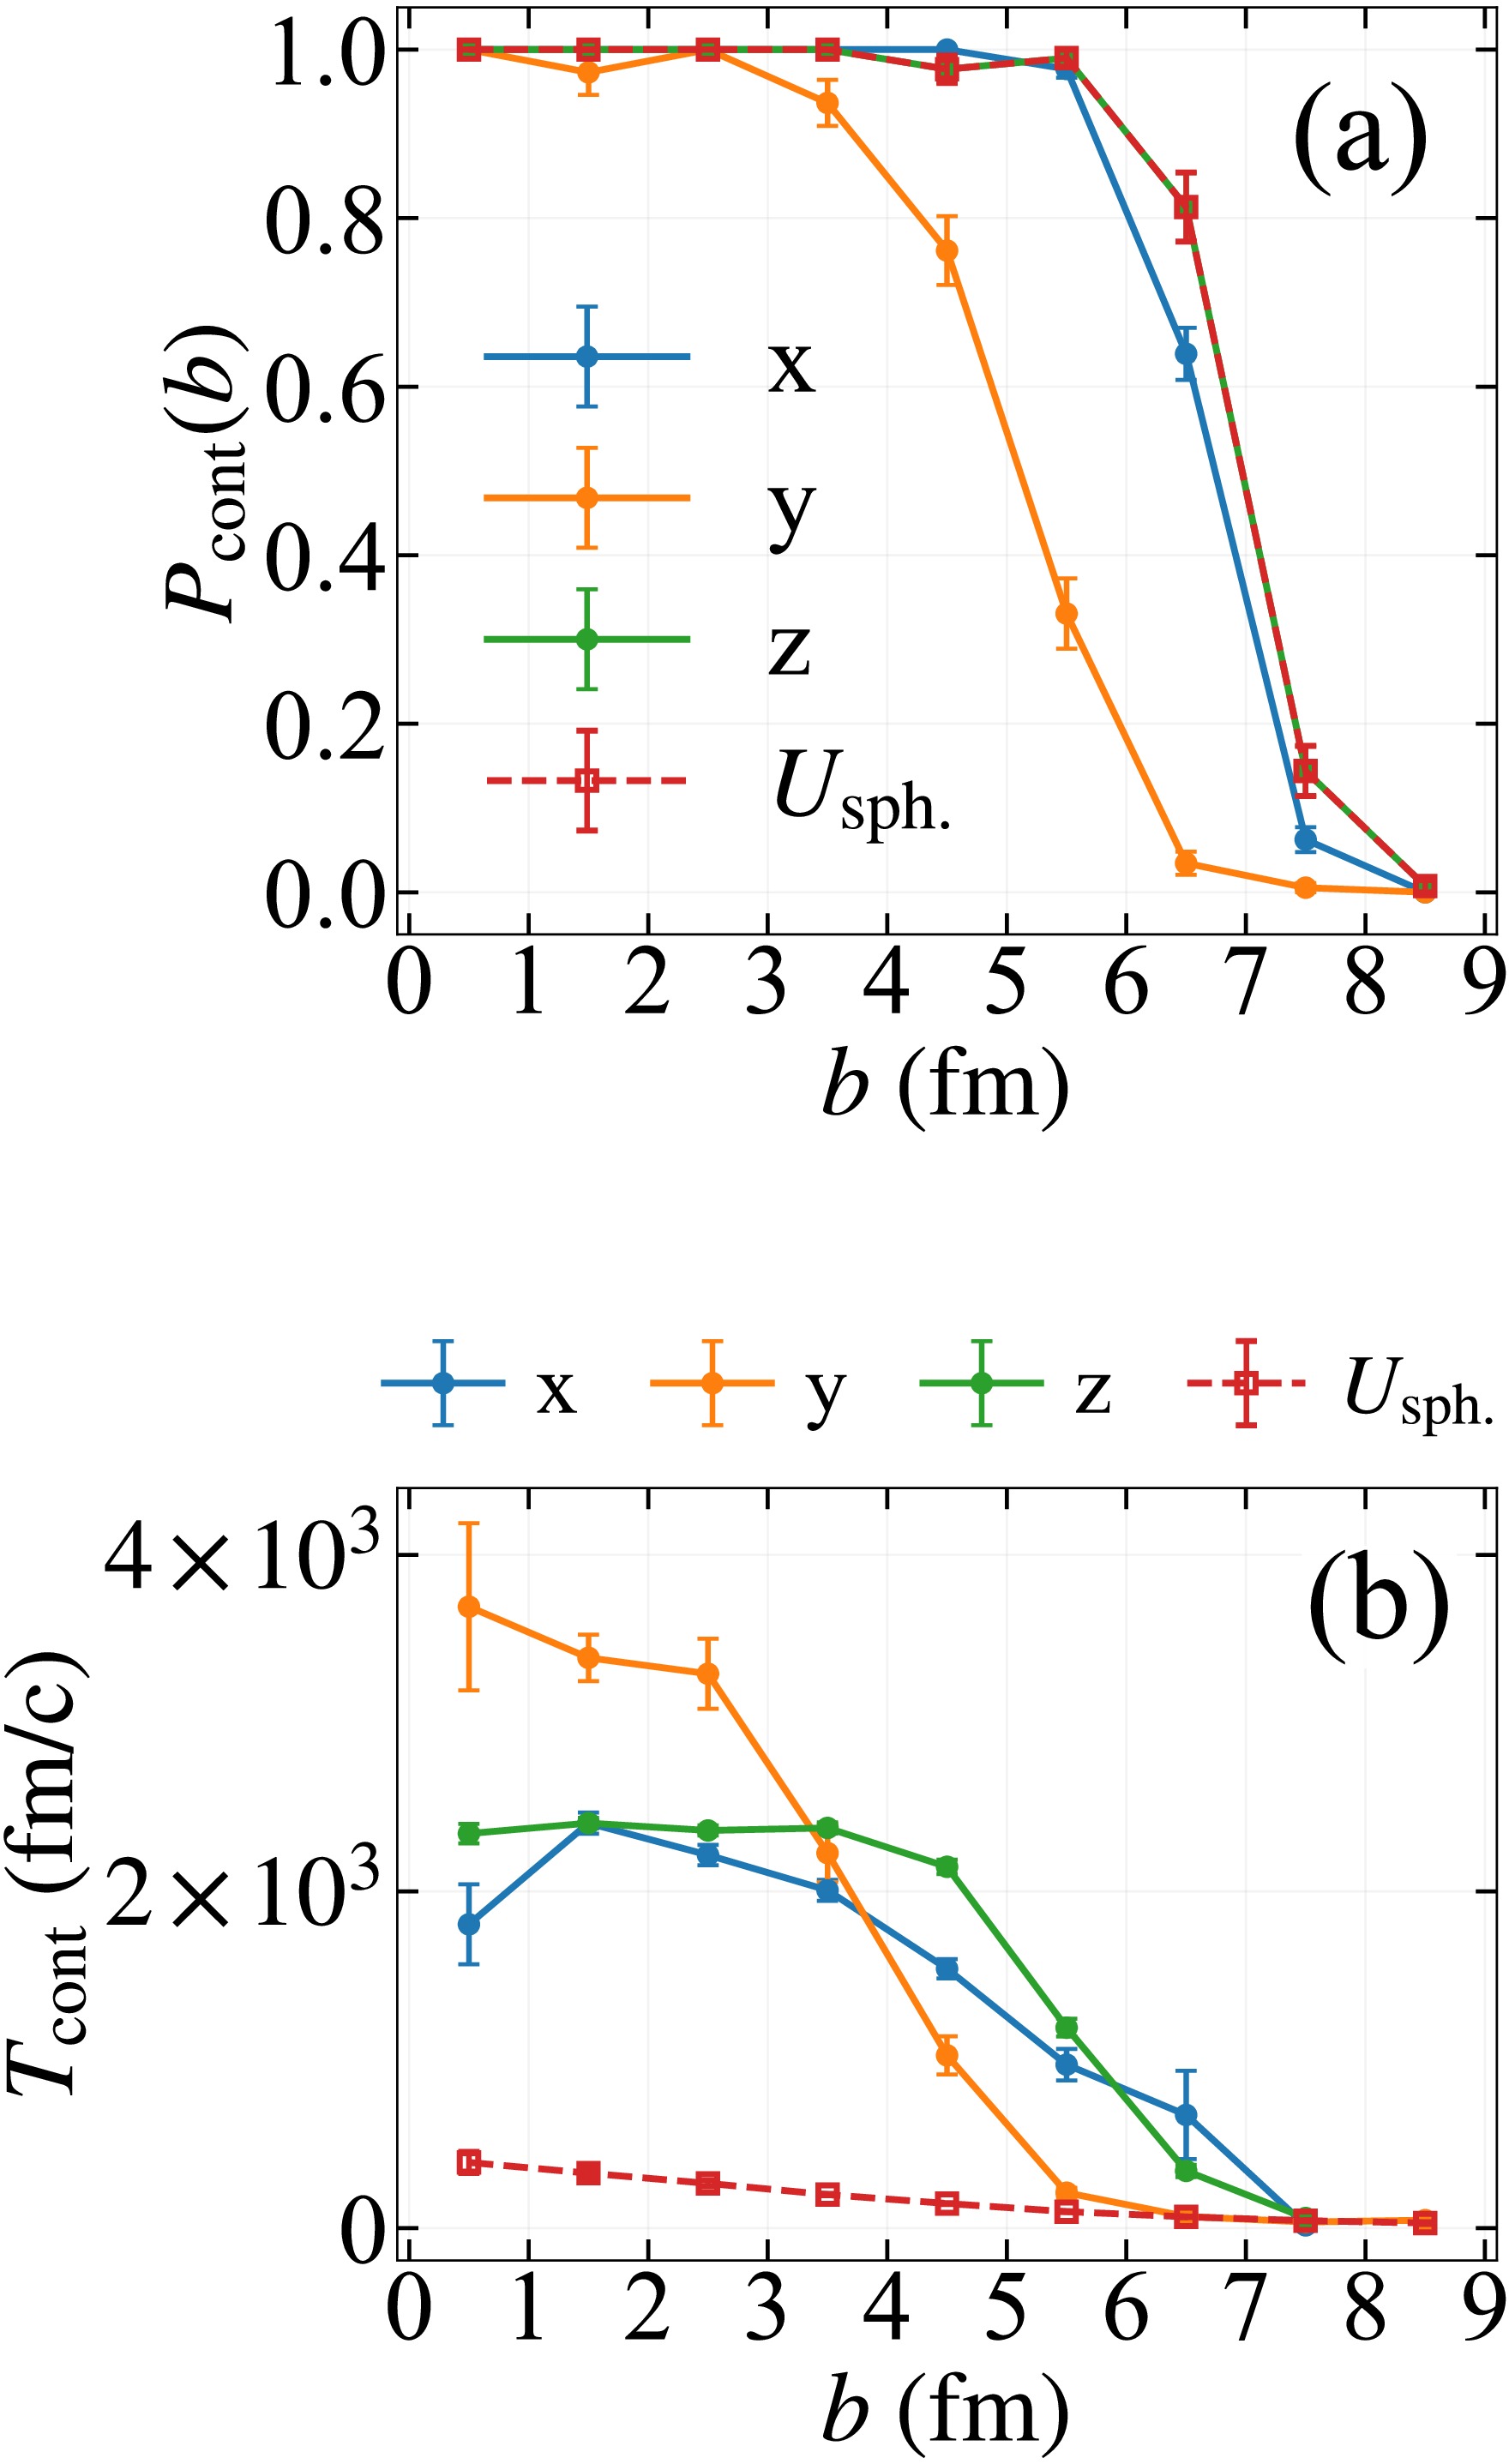
Figure 11. (color online) Process-oriented observables as functions of the impact parameter b for the
$^{64}\mathrm{Ni}+{}^{238}\mathrm{U}$ reaction at$E_{\mathrm{c.m.}}= 301.05 \;\mathrm{MeV}$ . Results are shown for three representative orientations of the deformed$^{238}\mathrm{U}$ target (x, y, and z), together with an artificially spherical$^{238}\mathrm{U}$ density distribution, denoted by$U_{\text{sph.}}$ . (a) Contact probability$P_{\rm{cont}}(b)$ ; (b) contact time$T_{\rm{cont}}$ . Both quantities are extracted using the same neck line-density threshold,$\rho_{\rm{th}}=14$ . The quantity$T_{\rm{cont}}$ is averaged over events satisfying the contact criterion within each b bin, and the error bars indicate the corresponding statistical uncertainties.As the impact parameter increases, a pronounced orientation dependence emerges. The y orientation shows the earliest and strongest reduction of
$P_{\rm{cont}}(b)$ , whereas the x and z orientations remain significantly larger over a broad range of impact parameters. Near the grazing region, the ordering tends to follow$y<x<z$ , although statistical fluctuations remain visible. The spherical reference calculation exhibits contact probabilities comparable to those of the x and z orientations and substantially larger than those of the y orientation. This behavior indicates that the probability of forming a contact configuration is not determined solely by the presence of deformation, but is strongly influenced by the orientation-dependent touching geometry and the corresponding interaction barrier [11, 14−18, 20].A markedly different behavior is observed for the contact time
$T_{\rm{cont}}$ shown in Fig. 11(b). For the three deformed configurations, long-lived contact states with$T_{\rm{cont}}\sim10^{3}-4\times10^{3} \;\mathrm{fm}/c$ can be sustained over a wide impact-parameter range. At small impact parameters, the y orientation even exhibits contact times that are slightly longer than those of the x and z orientations, possibly because the compact dinuclear configuration formed in this geometry is more resistant to early neck rupture. However, in the intermediate impact-parameter region ($b\approx3$ –$5 \;\mathrm{fm}$ ), the y orientation undergoes the most rapid reduction of$T_{\rm{cont}}$ , whereas the x and z orientations still retain substantial contact durations.In contrast, the spherical reference calculation exhibits much shorter contact times, typically below
$5\times10^{2} \;\mathrm{fm}/c$ , even though its contact probability remains close to unity over a large impact-parameter interval. This result demonstrates that the formation of a contact configuration alone is not sufficient to generate strong dissipation and mass transport. Instead, the deformation of$^{238}\mathrm{U}$ plays a crucial role in stabilizing the dinuclear system and prolonging the contact stage once contact has been established. Similar connections between contact lifetime, angular deflection, mass relaxation, and QF dynamics have been emphasized in previous experimental and theoretical studies of heavy-ion reactions [6, 19, 45].At the same time, contact time alone is not sufficient to determine the final degree of mass drift, since the exchange efficiency through the neck region and the contact geometry also play important roles. The combined behavior of
$P_{\rm{cont}}(b)$ and$T_{\rm{cont}}$ therefore provides a natural explanation for why the y orientation is less favorable for strongly dissipative trajectories, whereas the x and z orientations more readily evolve toward the QF region.The comparison with the spherical reference calculation further provides a useful baseline for assessing the role of deformation. Although the spherical system can still reach contact with a high probability, its contact lifetime is dramatically reduced. Therefore, the main effect of the deformation of
$^{238}\mathrm{U}$ in the present near-barrier reaction is not merely to facilitate contact formation, but rather to sustain the dinuclear configuration and promote the development of long-lived dissipative trajectories associated with QF. This interpretation is also consistent with previous event-by-event window analyses in BUU calculations, where process-oriented quantities during the contact stage were shown to provide a direct link between the reaction dynamics and the final fragment observables [40, 44].Figure 11(a) shows the contact probability
$P_{\rm{cont}}(b)$ as a function of the impact parameter for the three representative orientations of the deformed$^{238}\mathrm{U}$ target together with an additional reference calculation using an artificially spherical$^{238}\mathrm{U}$ density distribution. At small impact parameters ($b\lesssim3 \;\mathrm{fm}$ ), all configurations exhibit contact probabilities close to unity, indicating that central collisions almost always lead to the formation of a contact configuration.As the impact parameter increases, a pronounced orientation dependence emerges. The y orientation shows the earliest and strongest reduction of
$P_{\rm{cont}}(b)$ , whereas the x and z orientations remain significantly larger over a broad range of impact parameters. Near the grazing region, the ordering tends to follow$y<x<z$ , although statistical fluctuations remain visible.Interestingly, the spherical reference calculation exhibits contact probabilities comparable to those of the x and z orientations and substantially larger than those of the y orientation. This behavior indicates that the probability of forming a contact configuration is not determined solely by the presence of deformation, but is strongly influenced by the orientation-dependent touching geometry and the corresponding interaction barrier.
A markedly different behavior is observed for the contact time
$T_{\rm{cont}}$ shown in Fig. 11(b). For the three deformed configurations, long-lived contact states with$T_{\rm{cont}}\sim10^{3}$ –$4\times10^{3} \;\mathrm{fm}/c$ can be sustained over a wide impact-parameter range. At small impact parameters, the y orientation even exhibits contact times that are slightly longer than those of the x and z orientations, possibly because the compact dinuclear configuration formed in this geometry is more resistant to early neck rupture. However, in the intermediate impact-parameter region ($b\approx3$ –$5 \;\mathrm{fm}$ ), the y orientation undergoes the most rapid reduction of$T_{\rm{cont}}$ , whereas the x and z orientations still retain substantial contact durations.In contrast, the spherical reference calculation exhibits much shorter contact times, typically below
$5\times10^{2} \;\mathrm{fm}/c$ , even though its contact probability remains close to unity over a large impact-parameter interval. This result demonstrates that the formation of a contact configuration alone is not sufficient to generate strong dissipation and mass transport. Instead, the deformation of$^{238}\mathrm{U}$ plays a crucial role in stabilizing the dinuclear system and prolonging the contact stage once contact has been established.Similar connections between contact lifetime, angular deflection, mass relaxation, and QF dynamics have been emphasized in previous experimental and theoretical studies of heavy-ion reactions [6, 19, 45].
At the same time, the contact time alone is not sufficient to determine the final degree of mass drift, since the exchange efficiency through the neck region and the contact geometry also play important roles. The combined behavior of
$P_{\rm{cont}}(b)$ and$T_{\rm{cont}}$ therefore provides a natural explanation for why the y orientation is less favorable for strongly dissipative trajectories, while the x and z orientations more readily evolve toward the QF region.The comparison with the spherical reference calculation further provides a useful baseline for assessing the role of deformation. Although the spherical system can still reach contact with a high probability, its contact lifetime is dramatically reduced. Therefore, the main effect of the deformation of
$^{238}\mathrm{U}$ in the present near-barrier reaction is not merely to facilitate contact formation, but rather to sustain the dinuclear configuration and promote the development of long-lived dissipative trajectories associated with QF.This interpretation is also consistent with previous event-by-event window analyses in BUU calculations, where process-oriented quantities during the contact stage were shown to provide a direct link between the reaction dynamics and the final fragment observables [40, 44].
Figures 12 and 13 show the event-by-event correlations between the contact time
$T_{\rm{cont}}$ and the composition of the heavier fragment, including its proton number$Z_H$ , neutron number$N_H$ , and isospin ratio$N/Z$ , for the z and y orientations, respectively. These observables provide direct information on the extent of nucleon exchange and isospin transport during the contact stage. Similar relationships among contact dynamics, nucleon exchange, and QF evolution have been discussed in microscopic transport and TDHF studies of near-barrier heavy-ion reactions [52, 53].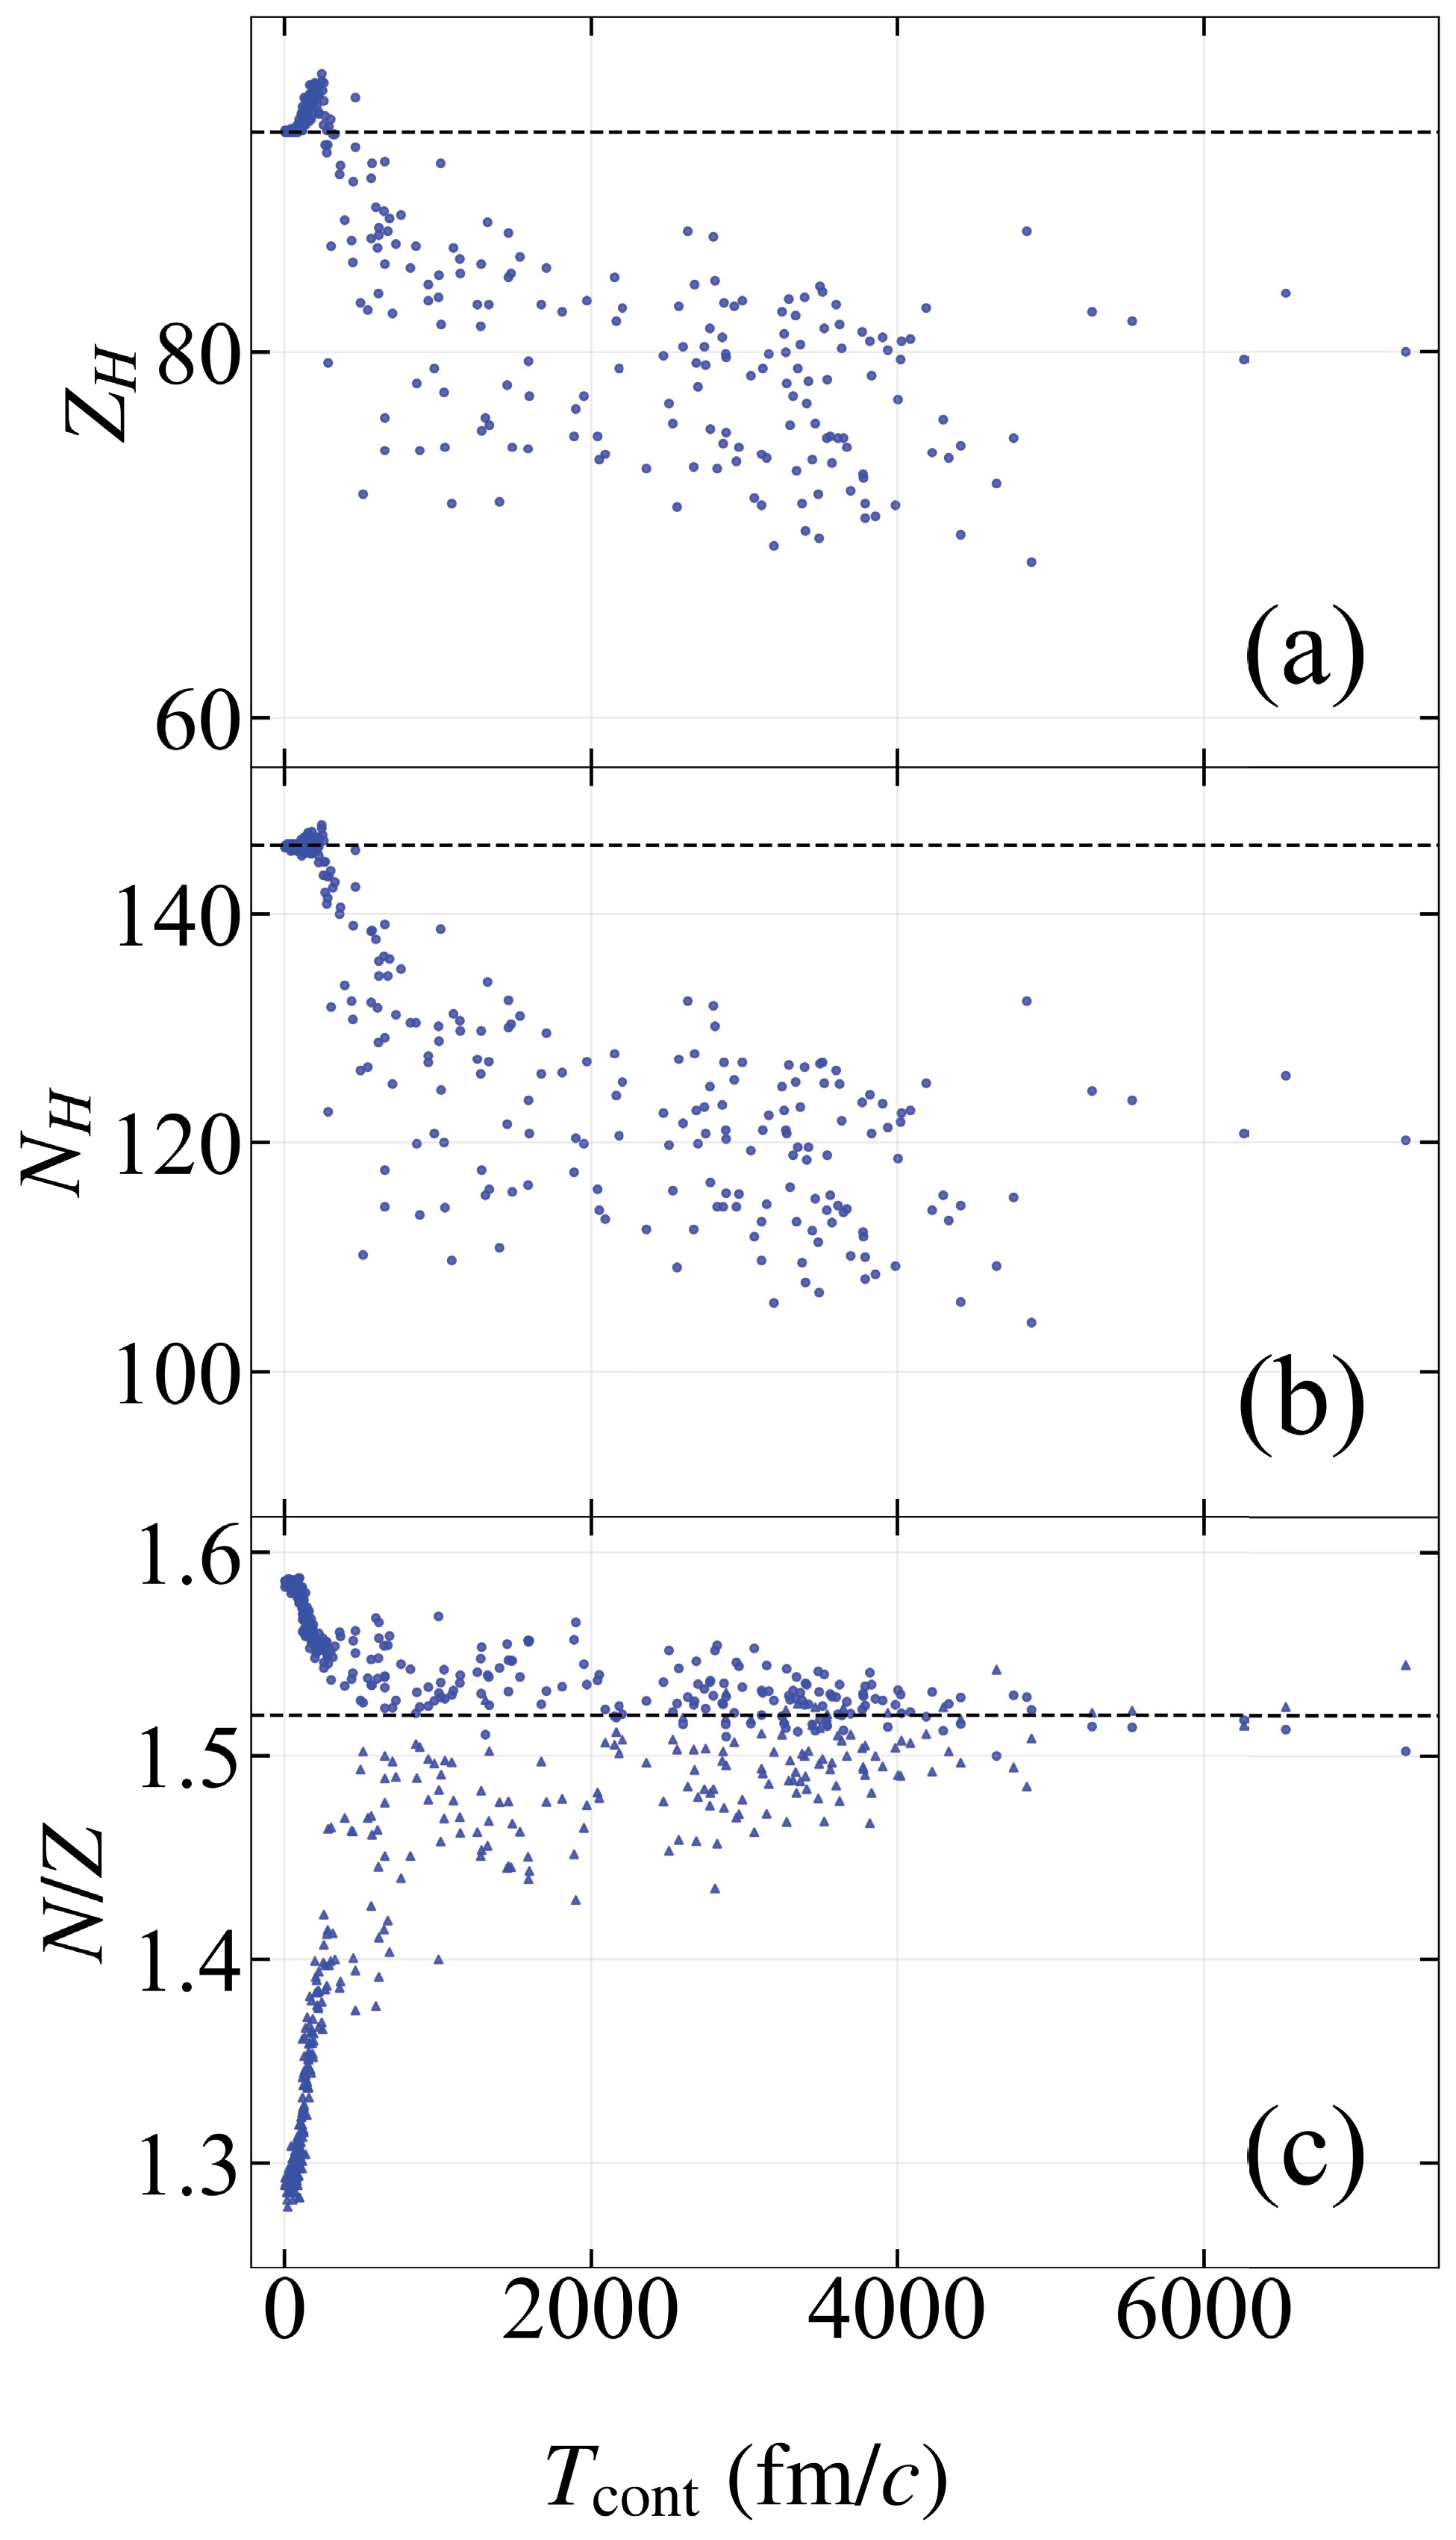
Figure 12. (color online) Event-by-event correlations between the composition of the heavier fragment and the contact time
$T_{\rm{cont}}$ for the$^{64}\mathrm{Ni}+{}^{238}\mathrm{U}$ reaction at a center-of-mass energy of$E_{\mathrm{c.m.}}= 301.05 \;\mathrm{MeV}$ for the z orientation. The three panels show (a) the proton number of the heavier fragment$Z_H$ , (b) the neutron number of the heavier fragment$N_H$ , and (c) the isospin ratio$N/Z$ of the heavier fragment. Each point corresponds to a single simulated event, while the dashed lines indicate the entrance-channel reference values.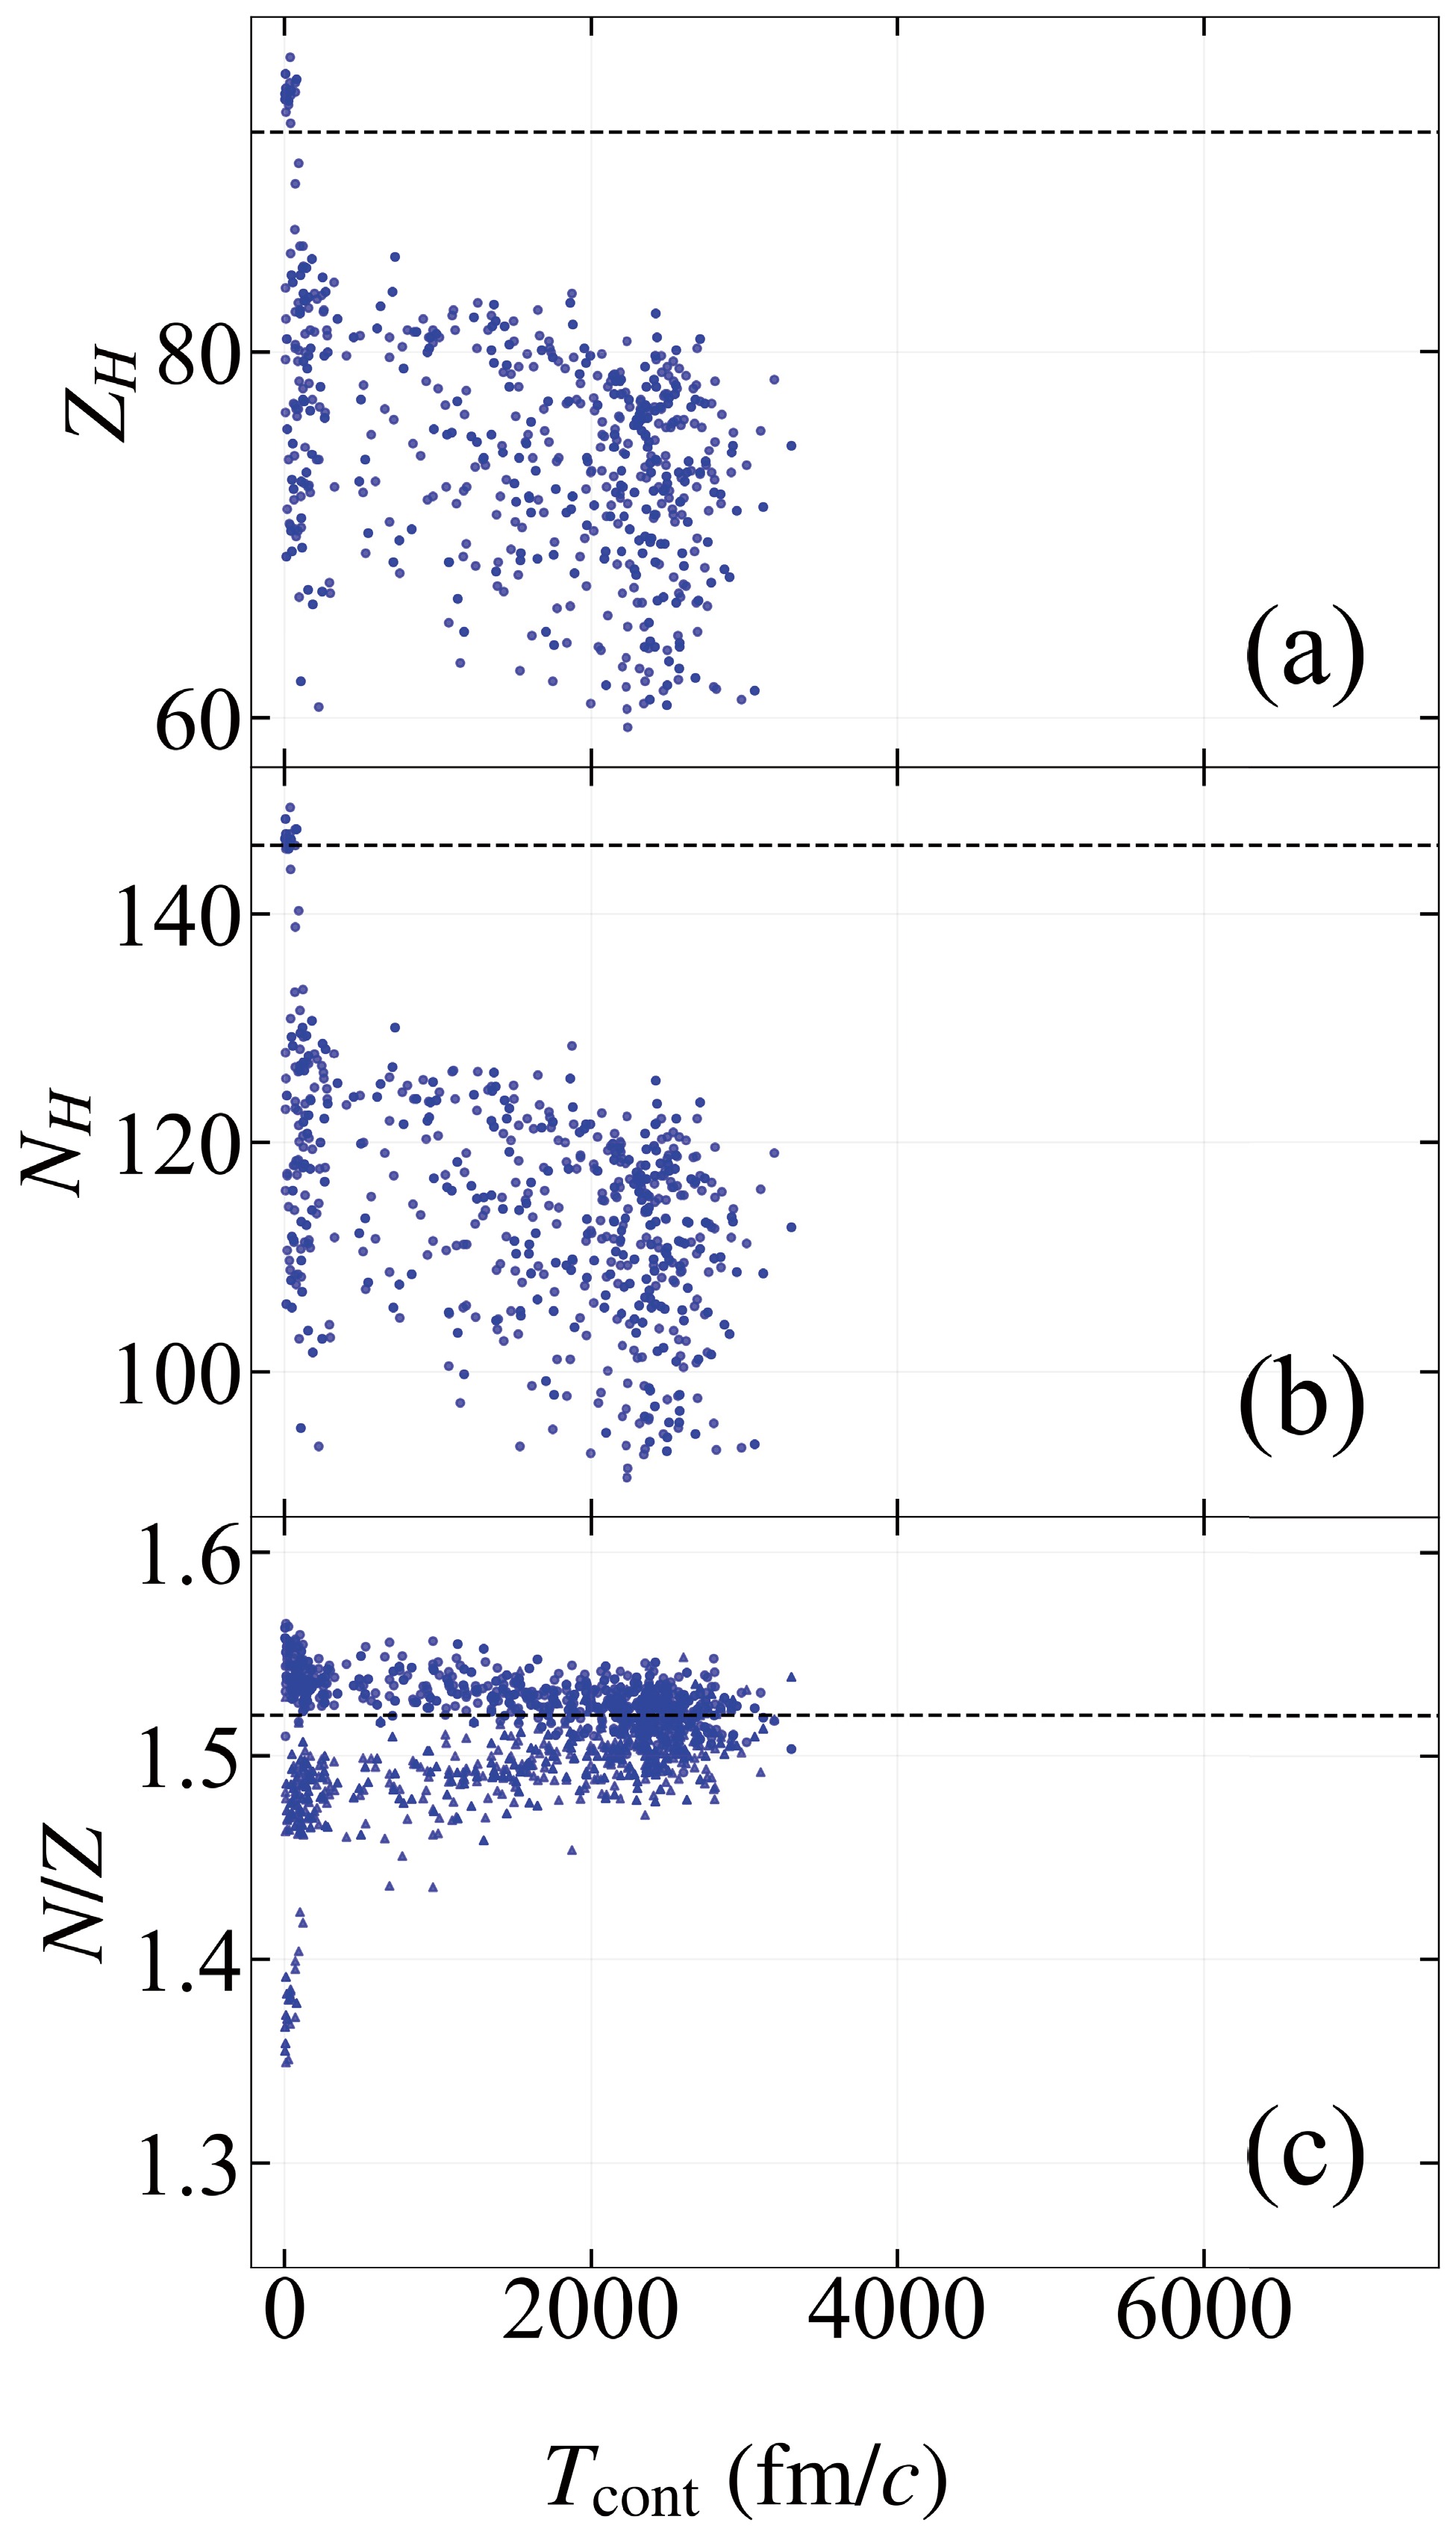
Figure 13. (color online) Same as Fig. 12, but for the y-orientation of the reaction.
A comparison of the two figures shows that, for similar contact durations, the extent of nucleon transfer differs between the two orientations. As
$T_{\rm{cont}}$ increases, the heavier fragment tends, on average, to lose both protons and neutrons, as reflected by the deviations of$Z_H$ and$N_H$ from the entrance-channel reference values. Meanwhile, the fragment$N/Z$ ratio approaches intermediate values, indicating the development of isospin equilibration during the contact stage. The relationship among contact time, mass relaxation, and QF dynamics has also been emphasized in experimental analyses of QF time scales and mass equilibration [6, 54].At short contact times (
$T_{\rm{cont}}\lesssim100 \;\mathrm{fm}/c$ ), both the y and z orientations exhibit transient inverse-transfer behavior, in which the early nucleon flow is opposite to the long-time trend toward mass equilibration. This suggests that the initial exchange process is influenced by transient neck formation and local single-particle dynamics, rather than by the monotonic mass drift associated with long-lived dissipative QF trajectories. Such sensitivity of nucleon transfer to the instantaneous contact geometry and single-particle dynamics is consistent with microscopic descriptions of multinucleon transfer and QF [15].These results indicate that the amount of matter exchanged is controlled not only by the contact time, but also by the orientation-dependent contact geometry and the associated exchange efficiency through the neck region. Similar conclusions regarding the importance of nucleon transfer, mass drift, and angular distributions in near-barrier multinucleon-transfer dynamics have also been obtained in DNS-based studies [24−26, 55]. Even for relatively long
$T_{\rm{cont}}$ , the deviations of$Z_H$ and$N_H$ may remain limited if exchange through the neck is inefficient. In addition, the$N/Z$ ratio approaches its equilibrium value on a shorter timescale than full mass equilibration, suggesting a separation between isospin and mass relaxation time scales [56, 57]. -
We begin by illustrating the event-classification procedure based on the time evolution of the window structure. Figure 3 shows the line density at the window position for two representative events. The line density is obtained by integrating the local density over the plane perpendicular to the principal axis of the dinuclear system and therefore provides a direct measure of the formation, persistence, and rupture of the neck. The same window definition was used in our previous BUU studies [40, 44]. For the present
$^{64}\mathrm{Ni}+{}^{238}\mathrm{U}$ system at$E_{\mathrm{c.m.}}=301.05 \;\mathrm{MeV}$ , no events are classified as fusion within the present identification criterion and evolution time; therefore, only typical QF and QE cases are shown.
Figure 3. (color online) Time evolution of the line density at the window position for the
$^{64}\mathrm{Ni}+{}^{238}\mathrm{U}$ reaction at$E_{\mathrm{c.m.}}=301.05 \;\mathrm{MeV}$ : (a) a typical quasifission (QF) event and (b) a typical quasielastic (QE) event. The horizontal axis denotes time t (fm/c), and the vertical axis shows the line density at the window position (fm−1).For the QF event in Fig. 3(a), the line density begins to increase at
$t\approx 50 \;\mathrm{fm}/c$ , reaches a plateau at approximately$t\approx 300 \;\mathrm{fm}/c$ , and then decreases gradually after$t\approx 3000 \;\mathrm{fm}/c$ . This pattern indicates the formation of a persistent dinuclear configuration, followed by long-lived dissipation and nucleon exchange before reseparation. By contrast, the QE event in Fig. 3(b) exhibits only a short-lived increase in the line density, which disappears by approximately$t\approx 300 \;\mathrm{fm}/c$ . This behavior indicates transient contact followed by rapid reseparation. Accordingly, events with only a short-lived window signal are classified as QE, whereas events with a persistent neck and a clear plateau structure are classified as QF. This classification provides a process-based basis for connecting the final-state observables to the underlying contact-stage dynamics.To assess the ability of the BUU model to describe near-barrier dissipative collisions in this system, we first compare the calculated fragment mass distribution with the available experimental data. Among the 8000 simulated events used for the overall comparison,
$43.45$ % are classified as QF and the remaining events as QE; no fusion events are identified within the present criterion. The theoretical distribution shown below is therefore obtained after excluding the QE component and is dominated by QF. The comparison is intended primarily to test the overall shape of the mass distribution, the positions of the main peaks, and the relative population of the symmetric-mass region, rather than to achieve point-by-point quantitative agreement.As shown in Fig. 4, the experimental distribution exhibits a pronounced double-peaked structure, with the main yields concentrated around
$A\approx 80$ and$A\approx 220$ , and only a weak population near the nearly symmetric region$A\approx 150$ . This behavior is characteristic of a QF-dominated reaction, in which the system undergoes nucleon exchange and kinetic-energy dissipation during a finite contact time but reseparates before full mass and shape equilibration is reached. The BUU result reproduces this overall trend reasonably well. It also yields a double-peaked distribution and a continuous population over a broad mass range. In particular, around$A\approx 150$ , the calculated yield is of the same order of magnitude as the experimental value, namely$\sim 10^{-3}$ . This indicates that the BUU model captures the dominant mass-distribution pattern of the near-barrier$^{64}\mathrm{Ni}+{}^{238}\mathrm{U}$ reaction and thus provides a reasonable basis for the subsequent analysis of orientation-dependent dissipation and nucleon transfer.
Figure 4. (color online) Mass-yield distribution of captured events for the
$^{64}\mathrm{Ni}+{}^{238}\mathrm{U}$ reaction at$E_{\mathrm{c.m.}}=301.05 \;\mathrm{MeV}$ , after excluding QE events. The black solid line denotes the BUU result, and the red circles represent the experimental data from Ref. [23]. The theoretical and experimental yields are normalized using the same procedure.It should be noted that the calculated mass distribution corresponds to primary fragments at the end of the BUU evolution, whereas the experimental data include secondary fragments after statistical de-excitation. For excited QF fragments, neutron evaporation and, to a lesser extent, light charged-particle emission are expected to shift the final masses slightly toward lower values and may also broaden the mass distribution. Therefore, a point-by-point comparison of the peak positions should be made with caution. The present comparison is intended mainly to examine the global mass-yield pattern, including the double-humped structure and the weak yield near mass symmetry. Because these features are primarily determined by the dynamical mass drift before reseparation, the omission of the evaporation stage is not expected to alter the qualitative conclusions regarding the QF-dominated character of the reaction.
We next compare the mass–angle distribution (MAD), which probes the correlation between mass relaxation and angular deflection and is widely used to distinguish QE, deep-inelastic, and QF trajectories [6, 19, 45]. Figure 5 presents the MAD for the
$^{64}\mathrm{Ni}+{}^{238}\mathrm{U}$ reaction in a combined form, with the BUU result at$E_{\mathrm{c.m.}}\approx 301.05 \;\mathrm{MeV}$ shown as a color-density map and the experimental distribution at$E_{\mathrm{c.m.}}\approx 302.62 \;\mathrm{MeV}$ overlaid as contour lines. Because the MAD is sensitive to beam energy and event-selection conditions, we focus primarily on the agreement in the global correlation pattern rather than on detailed point-by-point correspondence.
Figure 5. (color online) Mass-angle distributions (MADs) for the
$^{64}\mathrm{Ni}+{}^{238}\mathrm{U}$ reaction. The color map shows the BUU result at$E_{\mathrm{c.m.}}\approx 301.05 \;\mathrm{MeV}$ , whereas the contour lines represent the experimental distribution for the same system at$E_{\mathrm{c.m.}}\approx $ $ 302.62 \;\mathrm{MeV}$ . The horizontal axis denotes the fragment mass number A, and the vertical axis denotes the center-of-mass scattering angle$\theta_{\mathrm{c.m.}}$ .Both the BUU result and the experimental distribution exhibit a clear mass–angle correlation rather than an approximately isotropic emission pattern around
$\theta_{\mathrm{c.m.}}=90 ^\circ$ . This indicates that the system retains substantial memory of the entrance channel at reseparation. On both the light- and heavy-fragment sides, the distributions display tails extending from the entrance-channel masses toward the intermediate-mass region, reflecting the gradual transition from QE to more strongly dissipative trajectories. As the contact evolution becomes longer, nucleon exchange and mass drift accumulate, and the system undergoes greater angular deflection before reseparation. The BUU calculation reproduces the main high-density region near the entrance-channel masses and the extension toward intermediate masses reasonably well. However, the calculated distribution is somewhat more concentrated than the experimental one, particularly in the angular coverage and low-density tails, indicating that an average transport description still has limitations in representing broader event-by-event fluctuations. This may reflect the limited treatment of fluctuations in the semiclassical transport approach. Even so, the global mass–angle correlation is captured satisfactorily.The mass–TKE distribution provides a complementary probe of dissipative dynamics by correlating mass relaxation with kinetic-energy loss [23, 46]. Figure 6 shows the BUU result for the
$^{64}\mathrm{Ni}+{}^{238}\mathrm{U}$ reaction at$E_{\mathrm{c.m.}}\approx 301.05 \;\mathrm{MeV}$ . The corresponding experimental distribution from Ref. [23] is used as a reference for comparison. The discussion therefore focuses on whether the BUU calculation reproduces the main global correlations between fragment mass and total kinetic energy.
Figure 6. (color online) Mass–TKE distribution calculated with the BUU model for the
$^{64}\mathrm{Ni}+{}^{238}\mathrm{U}$ reaction at$E_{\mathrm{c.m.}}\approx $ $ 301.05 \;\mathrm{MeV}$ . The horizontal axis denotes the fragment mass number A, and the vertical axis shows the total kinetic energy, TKE (MeV). The corresponding experimental mass–TKE distribution for the same system and energy, used for comparison in the present work, was reported in Ref. [23].The BUU result exhibits a pronounced double-peaked mass structure, with dominant yields near the entrance-channel masses and a weak population near mass symmetry. A high-TKE component is concentrated near the entrance-channel region and is associated mainly with elastic and weakly dissipative QE trajectories, whereas an extension toward lower TKE in the intermediate-mass region reflects increased energy dissipation accompanying mass drift. This overall pattern is consistent with the experimental trend reported in Ref. [23].
Some discrepancies are nevertheless observed. The calculated high-TKE component appears somewhat more concentrated, and the low-TKE spread in portions of the intermediate-mass region is narrower than in the experimental distribution. In addition, a small number of isolated high-TKE events are present in the BUU result, which may be related to the fragment-recognition procedure and the reconstruction of Coulomb energy at the separation stage. These features are not expected to affect the overall correlation pattern.
Together with the comparisons of the mass-yield distribution and the MAD, the present results indicate that the BUU model reproduces the global features of the near-barrier
$^{64}\mathrm{Ni}+{}^{238}\mathrm{U}$ reaction. In particular, it captures the QF-dominated double-peaked mass structure and the main correlations between mass, scattering angle, and total kinetic energy. This provides a consistent basis for the subsequent analysis of orientation-dependent dynamics.We now examine the orientation dependence of the reaction dynamics. Figure 7 shows the relative fractions of QE and QF events for the x, y, and z orientations. No fusion events are identified under the present identification criterion and evolution time. For the x orientation, the QE and QF fractions are
$38.93$ % and$61.07$ %, respectively. For the z orientation, the corresponding fractions are$43.65$ % and$56.35$ %. In contrast, the y orientation is strongly dominated by QE events, with$81.53$ % QE and only$18.47$ % QF. These results indicate that the orientation affects not only the properties of individual dissipative trajectories but also the overall branching between weakly and strongly dissipative reaction paths.
Figure 7. (color online) Relative fractions of quasielastic (QE) and quasifission (QF) events for the
$^{64}\mathrm{Ni}+{}^{238}\mathrm{U}$ reaction at$E_{\mathrm{c.m.}}= 301.05 \;\mathrm{MeV}$ for the three initial orientations. The classification is based on the time evolution of the window structure.Figure 8 shows the fragment mass distributions for the three initial orientations, where all simulated events are included. Consistent with the event fractions shown in Fig. 7, the x orientation exhibits the broadest distribution and the strongest extension toward the central-mass region, the z orientation shows an intermediate behavior, whereas the y orientation is dominated by the entrance-channel peaks. This indicates that the tendency toward mass relaxation and strongly dissipative QF-like evolution follows the ordering (x > z > y).
Figure 8. Fragment mass distributions for the
$^{64}\mathrm{Ni}+{}^{238}\mathrm{U}$ reaction at$E_{\mathrm{c.m.}}\approx 301.05\,\;\mathrm{MeV}$ for three initial orientations. Unlike Fig. 4, the present figure includes all simulated events. (a) x orientation, (b) y orientation, and (c) z orientation.The same orientation dependence is also visible in the MADs shown in Fig. 9, where the present BUU results are compared directly with the TDHF mass–angle correlations digitized from Ref. [47] for the same
$^{64}\mathrm{Ni}+{}^{238}\mathrm{U}$ reaction. In the BUU results, all three orientations exhibit a QE band near the entrance channel, with high-yield ridges around$A\simeq 64$ and$A\simeq 238$ , corresponding to weakly dissipative trajectories with only limited nucleon exchange. Beyond this QE band, all three cases show a clear mass–angle correlation, which is typical of deep-inelastic and QF dynamics and reflects incomplete rotational and mass equilibration before reseparation.
Figure 9. (color online) Comparison of mass–angle distributions (MADs) for the
$^{64}\mathrm{Ni}+{}^{238}\mathrm{U}$ reaction at a near-barrier energy for three representative orientations of the deformed$^{238}\mathrm{U}$ target: (a) x-orientation, (b) y-orientation, and (c) z-orientation. In each panel, the present BUU result at$E_{\mathrm{c.m.}}\approx 301.05 \;\mathrm{MeV}$ is compared directly with the TDHF result digitized from Ref. [47]. The horizontal axis represents the fragment mass number A, and the vertical axis represents the center-of-mass scattering angle$\theta_ {\rm{c.m.}} $ .The main differences lie in the relative weight of the strongly dissipative component and in the extent of its spread toward the symmetric-mass region and larger rotation angles. The x orientation shows the broadest MAD and the strongest extension toward symmetry, indicating the largest fraction of long-lived dissipative trajectories. The z orientation is intermediate. By contrast, the y orientation is much more strongly dominated by the QE ridge, while the deep-inelastic and QF component is clearly weaker and the mass–angle correlation remains more pronounced. This indicates that, in the y orientation, more events undergo rapid reseparation after only a short contact, whereas the x orientation is more favorable for longer sticking and stronger mass drift.
The direct comparison with TDHF in Fig. 9 provides a useful microscopic reference for this orientation dependence. TDHF describes the reaction through the self-consistent microscopic evolution of single-particle wave functions and has shown that the orientation of the deformed
$^{238}\mathrm{U}$ target can strongly affect multinucleon transfer, contact evolution, mass drift, and quasifission dynamics [15, 20, 47]. The TDHF results likewise show clear orientation dependence: different initial orientations lead to different degrees of mass migration away from the entrance-channel masses and different angular deflections. This behavior is qualitatively consistent with the present BUU result, in which the x and z orientations exhibit stronger evolution toward the QF region, whereas the y orientation remains dominated by quasielastic or weakly dissipative trajectories.Figure 10 gives the corresponding mass–TKE correlations for the three orientations, again in direct comparison with the TDHF results digitized from Ref. [47]. In the BUU results, all three panels show a high-TKE band near the entrance-channel masses, associated with elastic and QE trajectories, and a lower-TKE component extending into the intermediate-mass region, associated with more dissipative deep-inelastic and QF events. The main scale of the TKE for two-body reseparation is governed by the competition among charge partition, dissipation strength, and separation geometry, and may be viewed approximately in terms of the Coulomb scaling
$\mathrm{TKE}\propto Z_1Z_2/R_{\rm{sc}}$ [46].
Figure 10. (color online) Comparison of mass–TKE distributions for the
$^{64}\mathrm{Ni}+{}^{238}\mathrm{U}$ reaction at near-barrier energy for three representative orientations of the deformed$^{238}\mathrm{U}$ target: (a) x orientation, (b) y orientation, and (c) z orientation. In each panel, the present BUU result at$E_{\mathrm{c.m.}}\approx 301.05 \;\mathrm{MeV}$ is compared directly with the TDHF result digitized from Ref. [47]. The horizontal axis denotes the fragment mass number A, and the vertical axis denotes the total kinetic energy (TKE).The orientation dependence again follows the same trend. The x orientation exhibits the strongest extension toward the central-mass region together with a more prominent low-TKE component, indicating longer-lived contact configurations and stronger dissipation. The y orientation shows the strongest high-TKE entrance-channel band and the weakest low-TKE symmetric-mass component, indicating rapid reseparation and limited dissipation. The z orientation lies between the two. The TDHF mass–TKE correlations show a qualitatively similar orientation-dependent pattern, in which the amount of mass drift and the associated kinetic-energy dissipation depend strongly on the initial orientation. Thus, the mass distributions, MADs, and mass–TKE correlations consistently indicate that the x orientation is most favorable for strongly dissipative QF-like evolution, the z orientation is somewhat less so, and the y orientation is least favorable.
At the same time, the comparison with TDHF also highlights the difference between the two descriptions. In TDHF, each calculation follows a self-consistent mean-field trajectory for a given initial condition. Therefore, TDHF provides a microscopic description of the average evolution associated with each orientation, but event-by-event fluctuations are not explicitly sampled in the standard framework. In contrast, the present BUU calculation follows the event-by-event evolution of the one-body phase-space distribution and provides direct access to contact-stage observables such as
$P_{\rm{cont}}(b)$ ,$T_{\rm{cont}}$ , and the correlation between nucleon transfer and contact duration. These process-oriented quantities allow the entrance-channel geometry and contact-stage dynamics to be directly connected with the final fragment mass distribution, mass–angle distribution, and mass–TKE correlation. For example, the weaker mass drift in the y orientation can be directly related in BUU to its smaller QF fraction and the more rapid reduction of contact probability and contact time at intermediate impact parameters.The DNS model provides another complementary viewpoint. It treats the reaction as the evolution of two interacting fragments on a potential-energy surface and emphasizes the influence of entrance-channel deformation and orientation on capture probability, mass-asymmetry evolution, fusion probability, and QF competition [48−50]. A more specific study of the
$^{64}\mathrm{Ni}+{}^{238}\mathrm{U}$ system was reported in Ref. [51], where the GRAZING and DNS models were compared for multinucleon transfer at$E_{\mathrm{c.m.}}\approx 307.5 \;\mathrm{MeV}$ . That work showed that the GRAZING and DNS components correspond to different transfer mechanisms: the GRAZING contribution mainly describes transfer in the grazing regime, whereas the DNS contribution becomes important for more deeply overlapped configurations after contact. It was further shown that, for the$^{64}\mathrm{Ni}+{}^{238}\mathrm{U}$ reaction, the DNS component makes a more important contribution to channels with larger proton transfer, while the combined GRAZING+DNS calculation improves the description of measured isotopic production cross sections [51].Although the DNS study focuses mainly on isotopic production cross sections rather than on the mass–angle or mass–TKE correlations discussed here, it supports the same general physical picture that multinucleon transfer in the
$^{64}\mathrm{Ni}+{}^{238}\mathrm{U}$ reaction contains contributions from different dynamical regimes. In this respect, the present BUU analysis provides a complementary viewpoint: instead of describing only the average mean-field evolution as in TDHF, or the post-capture mass-asymmetry evolution on a potential-energy surface as in DNS, BUU gives an event-resolved transport description that directly links the dynamical process to the final observables. Therefore, BUU, TDHF, and DNS provide complementary viewpoints, and their qualitative consistency supports the conclusion that the deformation and orientation of$^{238}\mathrm{U}$ are essential for understanding multinucleon transfer, mass relaxation, and QF competition in the$^{64}\mathrm{Ni}+{}^{238}\mathrm{U}$ reaction.Figure 11(a) shows the contact probability
$P_{\rm{cont}}(b)$ as a function of the impact parameter for the three representative orientations of the deformed$^{238}\mathrm{U}$ target, together with an additional reference calculation using an artificially spherical$^{238}\mathrm{U}$ density distribution. At small impact parameters ($b\lesssim3 \;\mathrm{fm}$ ), all configurations exhibit contact probabilities close to unity, indicating that central collisions almost always lead to the formation of a contact configuration.
Figure 11. (color online) Process-oriented observables as functions of the impact parameter b for the
$^{64}\mathrm{Ni}+{}^{238}\mathrm{U}$ reaction at$E_{\mathrm{c.m.}}= 301.05 \;\mathrm{MeV}$ . Results are shown for three representative orientations of the deformed$^{238}\mathrm{U}$ target (x, y, and z), together with an artificially spherical$^{238}\mathrm{U}$ density distribution, denoted by$U_{\text{sph.}}$ . (a) Contact probability$P_{\rm{cont}}(b)$ ; (b) contact time$T_{\rm{cont}}$ . Both quantities are extracted using the same neck line-density threshold,$\rho_{\rm{th}}=14$ . The quantity$T_{\rm{cont}}$ is averaged over events satisfying the contact criterion within each b bin, and the error bars indicate the corresponding statistical uncertainties.As the impact parameter increases, a pronounced orientation dependence emerges. The y orientation shows the earliest and strongest reduction of
$P_{\rm{cont}}(b)$ , whereas the x and z orientations remain significantly larger over a broad range of impact parameters. Near the grazing region, the ordering tends to follow$y<x<z$ , although statistical fluctuations remain visible. The spherical reference calculation exhibits contact probabilities comparable to those of the x and z orientations and substantially larger than those of the y orientation. This behavior indicates that the probability of forming a contact configuration is not determined solely by the presence of deformation, but is strongly influenced by the orientation-dependent touching geometry and the corresponding interaction barrier [11, 14−18, 20].A markedly different behavior is observed for the contact time
$T_{\rm{cont}}$ shown in Fig. 11(b). For the three deformed configurations, long-lived contact states with$T_{\rm{cont}}\sim10^{3}-4\times10^{3} \;\mathrm{fm}/c$ can be sustained over a wide impact-parameter range. At small impact parameters, the y orientation even exhibits contact times that are slightly longer than those of the x and z orientations, possibly because the compact dinuclear configuration formed in this geometry is more resistant to early neck rupture. However, in the intermediate impact-parameter region ($b\approx3$ –$5 \;\mathrm{fm}$ ), the y orientation undergoes the most rapid reduction of$T_{\rm{cont}}$ , whereas the x and z orientations still retain substantial contact durations.In contrast, the spherical reference calculation exhibits much shorter contact times, typically below
$5\times10^{2} \;\mathrm{fm}/c$ , even though its contact probability remains close to unity over a large impact-parameter interval. This result demonstrates that the formation of a contact configuration alone is not sufficient to generate strong dissipation and mass transport. Instead, the deformation of$^{238}\mathrm{U}$ plays a crucial role in stabilizing the dinuclear system and prolonging the contact stage once contact has been established. Similar connections between contact lifetime, angular deflection, mass relaxation, and QF dynamics have been emphasized in previous experimental and theoretical studies of heavy-ion reactions [6, 19, 45].At the same time, contact time alone is not sufficient to determine the final degree of mass drift, since the exchange efficiency through the neck region and the contact geometry also play important roles. The combined behavior of
$P_{\rm{cont}}(b)$ and$T_{\rm{cont}}$ therefore provides a natural explanation for why the y orientation is less favorable for strongly dissipative trajectories, whereas the x and z orientations more readily evolve toward the QF region.The comparison with the spherical reference calculation further provides a useful baseline for assessing the role of deformation. Although the spherical system can still reach contact with a high probability, its contact lifetime is dramatically reduced. Therefore, the main effect of the deformation of
$^{238}\mathrm{U}$ in the present near-barrier reaction is not merely to facilitate contact formation, but rather to sustain the dinuclear configuration and promote the development of long-lived dissipative trajectories associated with QF. This interpretation is also consistent with previous event-by-event window analyses in BUU calculations, where process-oriented quantities during the contact stage were shown to provide a direct link between the reaction dynamics and the final fragment observables [40, 44].Figure 11(a) shows the contact probability
$P_{\rm{cont}}(b)$ as a function of the impact parameter for the three representative orientations of the deformed$^{238}\mathrm{U}$ target together with an additional reference calculation using an artificially spherical$^{238}\mathrm{U}$ density distribution. At small impact parameters ($b\lesssim3 \;\mathrm{fm}$ ), all configurations exhibit contact probabilities close to unity, indicating that central collisions almost always lead to the formation of a contact configuration.As the impact parameter increases, a pronounced orientation dependence emerges. The y orientation shows the earliest and strongest reduction of
$P_{\rm{cont}}(b)$ , whereas the x and z orientations remain significantly larger over a broad range of impact parameters. Near the grazing region, the ordering tends to follow$y<x<z$ , although statistical fluctuations remain visible.Interestingly, the spherical reference calculation exhibits contact probabilities comparable to those of the x and z orientations and substantially larger than those of the y orientation. This behavior indicates that the probability of forming a contact configuration is not determined solely by the presence of deformation, but is strongly influenced by the orientation-dependent touching geometry and the corresponding interaction barrier.
A markedly different behavior is observed for the contact time
$T_{\rm{cont}}$ shown in Fig. 11(b). For the three deformed configurations, long-lived contact states with$T_{\rm{cont}}\sim10^{3}$ –$4\times10^{3} \;\mathrm{fm}/c$ can be sustained over a wide impact-parameter range. At small impact parameters, the y orientation even exhibits contact times that are slightly longer than those of the x and z orientations, possibly because the compact dinuclear configuration formed in this geometry is more resistant to early neck rupture. However, in the intermediate impact-parameter region ($b\approx3$ –$5 \;\mathrm{fm}$ ), the y orientation undergoes the most rapid reduction of$T_{\rm{cont}}$ , whereas the x and z orientations still retain substantial contact durations.In contrast, the spherical reference calculation exhibits much shorter contact times, typically below
$5\times10^{2} \;\mathrm{fm}/c$ , even though its contact probability remains close to unity over a large impact-parameter interval. This result demonstrates that the formation of a contact configuration alone is not sufficient to generate strong dissipation and mass transport. Instead, the deformation of$^{238}\mathrm{U}$ plays a crucial role in stabilizing the dinuclear system and prolonging the contact stage once contact has been established.Similar connections between contact lifetime, angular deflection, mass relaxation, and QF dynamics have been emphasized in previous experimental and theoretical studies of heavy-ion reactions [6, 19, 45].
At the same time, the contact time alone is not sufficient to determine the final degree of mass drift, since the exchange efficiency through the neck region and the contact geometry also play important roles. The combined behavior of
$P_{\rm{cont}}(b)$ and$T_{\rm{cont}}$ therefore provides a natural explanation for why the y orientation is less favorable for strongly dissipative trajectories, while the x and z orientations more readily evolve toward the QF region.The comparison with the spherical reference calculation further provides a useful baseline for assessing the role of deformation. Although the spherical system can still reach contact with a high probability, its contact lifetime is dramatically reduced. Therefore, the main effect of the deformation of
$^{238}\mathrm{U}$ in the present near-barrier reaction is not merely to facilitate contact formation, but rather to sustain the dinuclear configuration and promote the development of long-lived dissipative trajectories associated with QF.This interpretation is also consistent with previous event-by-event window analyses in BUU calculations, where process-oriented quantities during the contact stage were shown to provide a direct link between the reaction dynamics and the final fragment observables [40, 44].
Figures 12 and 13 show the event-by-event correlations between the contact time
$T_{\rm{cont}}$ and the composition of the heavier fragment, including its proton number$Z_H$ , neutron number$N_H$ , and isospin ratio$N/Z$ , for the z and y orientations, respectively. These observables provide direct information on the extent of nucleon exchange and isospin transport during the contact stage. Similar relationships among contact dynamics, nucleon exchange, and QF evolution have been discussed in microscopic transport and TDHF studies of near-barrier heavy-ion reactions [52, 53].
Figure 12. (color online) Event-by-event correlations between the composition of the heavier fragment and the contact time
$T_{\rm{cont}}$ for the$^{64}\mathrm{Ni}+{}^{238}\mathrm{U}$ reaction at a center-of-mass energy of$E_{\mathrm{c.m.}}= 301.05 \;\mathrm{MeV}$ for the z orientation. The three panels show (a) the proton number of the heavier fragment$Z_H$ , (b) the neutron number of the heavier fragment$N_H$ , and (c) the isospin ratio$N/Z$ of the heavier fragment. Each point corresponds to a single simulated event, while the dashed lines indicate the entrance-channel reference values.
Figure 13. (color online) Same as Fig. 12, but for the y-orientation of the reaction.
A comparison of the two figures shows that, for similar contact durations, the extent of nucleon transfer differs between the two orientations. As
$T_{\rm{cont}}$ increases, the heavier fragment tends, on average, to lose both protons and neutrons, as reflected by the deviations of$Z_H$ and$N_H$ from the entrance-channel reference values. Meanwhile, the fragment$N/Z$ ratio approaches intermediate values, indicating the development of isospin equilibration during the contact stage. The relationship among contact time, mass relaxation, and QF dynamics has also been emphasized in experimental analyses of QF time scales and mass equilibration [6, 54].At short contact times (
$T_{\rm{cont}}\lesssim100 \;\mathrm{fm}/c$ ), both the y and z orientations exhibit transient inverse-transfer behavior, in which the early nucleon flow is opposite to the long-time trend toward mass equilibration. This suggests that the initial exchange process is influenced by transient neck formation and local single-particle dynamics, rather than by the monotonic mass drift associated with long-lived dissipative QF trajectories. Such sensitivity of nucleon transfer to the instantaneous contact geometry and single-particle dynamics is consistent with microscopic descriptions of multinucleon transfer and QF [15].These results indicate that the amount of matter exchanged is controlled not only by the contact time, but also by the orientation-dependent contact geometry and the associated exchange efficiency through the neck region. Similar conclusions regarding the importance of nucleon transfer, mass drift, and angular distributions in near-barrier multinucleon-transfer dynamics have also been obtained in DNS-based studies [24−26, 55]. Even for relatively long
$T_{\rm{cont}}$ , the deviations of$Z_H$ and$N_H$ may remain limited if exchange through the neck is inefficient. In addition, the$N/Z$ ratio approaches its equilibrium value on a shorter timescale than full mass equilibration, suggesting a separation between isospin and mass relaxation time scales [56, 57]. -
We begin by illustrating the event-classification procedure based on the time evolution of the window structure. Figure 3 shows the line density at the window position for two representative events. The line density is obtained by integrating the local density over the plane perpendicular to the principal axis of the dinuclear system and therefore provides a direct measure of the formation, persistence, and rupture of the neck. The same window definition was used in our previous BUU studies [40, 44]. For the present
$^{64}\mathrm{Ni}+{}^{238}\mathrm{U}$ system at$E_{\mathrm{c.m.}}=301.05 \;\mathrm{MeV}$ , no events are classified as fusion within the present identification criterion and evolution time; therefore, only typical QF and QE cases are shown.
Figure 3. (color online) Time evolution of the line density at the window position for the
$^{64}\mathrm{Ni}+{}^{238}\mathrm{U}$ reaction at$E_{\mathrm{c.m.}}=301.05 \;\mathrm{MeV}$ : (a) a typical quasifission (QF) event and (b) a typical quasielastic (QE) event. The horizontal axis denotes time t (fm/c), and the vertical axis shows the line density at the window position (fm−1).For the QF event in Fig. 3(a), the line density begins to increase at
$t\approx 50 \;\mathrm{fm}/c$ , reaches a plateau at approximately$t\approx 300 \;\mathrm{fm}/c$ , and then decreases gradually after$t\approx 3000 \;\mathrm{fm}/c$ . This pattern indicates the formation of a persistent dinuclear configuration, followed by long-lived dissipation and nucleon exchange before reseparation. By contrast, the QE event in Fig. 3(b) exhibits only a short-lived increase in the line density, which disappears by approximately$t\approx 300 \;\mathrm{fm}/c$ . This behavior indicates transient contact followed by rapid reseparation. Accordingly, events with only a short-lived window signal are classified as QE, whereas events with a persistent neck and a clear plateau structure are classified as QF. This classification provides a process-based basis for connecting the final-state observables to the underlying contact-stage dynamics.To assess the ability of the BUU model to describe near-barrier dissipative collisions in this system, we first compare the calculated fragment mass distribution with the available experimental data. Among the 8000 simulated events used for the overall comparison,
$43.45$ % are classified as QF and the remaining events as QE; no fusion events are identified within the present criterion. The theoretical distribution shown below is therefore obtained after excluding the QE component and is dominated by QF. The comparison is intended primarily to test the overall shape of the mass distribution, the positions of the main peaks, and the relative population of the symmetric-mass region, rather than to achieve point-by-point quantitative agreement.As shown in Fig. 4, the experimental distribution exhibits a pronounced double-peaked structure, with the main yields concentrated around
$A\approx 80$ and$A\approx 220$ , and only a weak population near the nearly symmetric region$A\approx 150$ . This behavior is characteristic of a QF-dominated reaction, in which the system undergoes nucleon exchange and kinetic-energy dissipation during a finite contact time but reseparates before full mass and shape equilibration is reached. The BUU result reproduces this overall trend reasonably well. It also yields a double-peaked distribution and a continuous population over a broad mass range. In particular, around$A\approx 150$ , the calculated yield is of the same order of magnitude as the experimental value, namely$\sim 10^{-3}$ . This indicates that the BUU model captures the dominant mass-distribution pattern of the near-barrier$^{64}\mathrm{Ni}+{}^{238}\mathrm{U}$ reaction and thus provides a reasonable basis for the subsequent analysis of orientation-dependent dissipation and nucleon transfer.
Figure 4. (color online) Mass-yield distribution of captured events for the
$^{64}\mathrm{Ni}+{}^{238}\mathrm{U}$ reaction at$E_{\mathrm{c.m.}}=301.05 \;\mathrm{MeV}$ , after excluding QE events. The black solid line denotes the BUU result, and the red circles represent the experimental data from Ref. [23]. The theoretical and experimental yields are normalized using the same procedure.It should be noted that the calculated mass distribution corresponds to primary fragments at the end of the BUU evolution, whereas the experimental data include secondary fragments after statistical de-excitation. For excited QF fragments, neutron evaporation and, to a lesser extent, light charged-particle emission are expected to shift the final masses slightly toward lower values and may also broaden the mass distribution. Therefore, a point-by-point comparison of the peak positions should be made with caution. The present comparison is intended mainly to examine the global mass-yield pattern, including the double-humped structure and the weak yield near mass symmetry. Because these features are primarily determined by the dynamical mass drift before reseparation, the omission of the evaporation stage is not expected to alter the qualitative conclusions regarding the QF-dominated character of the reaction.
We next compare the mass–angle distribution (MAD), which probes the correlation between mass relaxation and angular deflection and is widely used to distinguish QE, deep-inelastic, and QF trajectories [6, 19, 45]. Figure 5 presents the MAD for the
$^{64}\mathrm{Ni}+{}^{238}\mathrm{U}$ reaction in a combined form, with the BUU result at$E_{\mathrm{c.m.}}\approx 301.05 \;\mathrm{MeV}$ shown as a color-density map and the experimental distribution at$E_{\mathrm{c.m.}}\approx 302.62 \;\mathrm{MeV}$ overlaid as contour lines. Because the MAD is sensitive to beam energy and event-selection conditions, we focus primarily on the agreement in the global correlation pattern rather than on detailed point-by-point correspondence.
Figure 5. (color online) Mass-angle distributions (MADs) for the
$^{64}\mathrm{Ni}+{}^{238}\mathrm{U}$ reaction. The color map shows the BUU result at$E_{\mathrm{c.m.}}\approx 301.05 \;\mathrm{MeV}$ , whereas the contour lines represent the experimental distribution for the same system at$E_{\mathrm{c.m.}}\approx $ $ 302.62 \;\mathrm{MeV}$ . The horizontal axis denotes the fragment mass number A, and the vertical axis denotes the center-of-mass scattering angle$\theta_{\mathrm{c.m.}}$ .Both the BUU result and the experimental distribution exhibit a clear mass–angle correlation rather than an approximately isotropic emission pattern around
$\theta_{\mathrm{c.m.}}=90 ^\circ$ . This indicates that the system retains substantial memory of the entrance channel at reseparation. On both the light- and heavy-fragment sides, the distributions display tails extending from the entrance-channel masses toward the intermediate-mass region, reflecting the gradual transition from QE to more strongly dissipative trajectories. As the contact evolution becomes longer, nucleon exchange and mass drift accumulate, and the system undergoes greater angular deflection before reseparation. The BUU calculation reproduces the main high-density region near the entrance-channel masses and the extension toward intermediate masses reasonably well. However, the calculated distribution is somewhat more concentrated than the experimental one, particularly in the angular coverage and low-density tails, indicating that an average transport description still has limitations in representing broader event-by-event fluctuations. This may reflect the limited treatment of fluctuations in the semiclassical transport approach. Even so, the global mass–angle correlation is captured satisfactorily.The mass–TKE distribution provides a complementary probe of dissipative dynamics by correlating mass relaxation with kinetic-energy loss [23, 46]. Figure 6 shows the BUU result for the
$^{64}\mathrm{Ni}+{}^{238}\mathrm{U}$ reaction at$E_{\mathrm{c.m.}}\approx 301.05 \;\mathrm{MeV}$ . The corresponding experimental distribution from Ref. [23] is used as a reference for comparison. The discussion therefore focuses on whether the BUU calculation reproduces the main global correlations between fragment mass and total kinetic energy.
Figure 6. (color online) Mass–TKE distribution calculated with the BUU model for the
$^{64}\mathrm{Ni}+{}^{238}\mathrm{U}$ reaction at$E_{\mathrm{c.m.}}\approx $ $ 301.05 \;\mathrm{MeV}$ . The horizontal axis denotes the fragment mass number A, and the vertical axis shows the total kinetic energy, TKE (MeV). The corresponding experimental mass–TKE distribution for the same system and energy, used for comparison in the present work, was reported in Ref. [23].The BUU result exhibits a pronounced double-peaked mass structure, with dominant yields near the entrance-channel masses and a weak population near mass symmetry. A high-TKE component is concentrated near the entrance-channel region and is associated mainly with elastic and weakly dissipative QE trajectories, whereas an extension toward lower TKE in the intermediate-mass region reflects increased energy dissipation accompanying mass drift. This overall pattern is consistent with the experimental trend reported in Ref. [23].
Some discrepancies are nevertheless observed. The calculated high-TKE component appears somewhat more concentrated, and the low-TKE spread in portions of the intermediate-mass region is narrower than in the experimental distribution. In addition, a small number of isolated high-TKE events are present in the BUU result, which may be related to the fragment-recognition procedure and the reconstruction of Coulomb energy at the separation stage. These features are not expected to affect the overall correlation pattern.
Together with the comparisons of the mass-yield distribution and the MAD, the present results indicate that the BUU model reproduces the global features of the near-barrier
$^{64}\mathrm{Ni}+{}^{238}\mathrm{U}$ reaction. In particular, it captures the QF-dominated double-peaked mass structure and the main correlations between mass, scattering angle, and total kinetic energy. This provides a consistent basis for the subsequent analysis of orientation-dependent dynamics.We now examine the orientation dependence of the reaction dynamics. Figure 7 shows the relative fractions of QE and QF events for the x, y, and z orientations. No fusion events are identified under the present identification criterion and evolution time. For the x orientation, the QE and QF fractions are
$38.93$ % and$61.07$ %, respectively. For the z orientation, the corresponding fractions are$43.65$ % and$56.35$ %. In contrast, the y orientation is strongly dominated by QE events, with$81.53$ % QE and only$18.47$ % QF. These results indicate that the orientation affects not only the properties of individual dissipative trajectories but also the overall branching between weakly and strongly dissipative reaction paths.
Figure 7. (color online) Relative fractions of quasielastic (QE) and quasifission (QF) events for the
$^{64}\mathrm{Ni}+{}^{238}\mathrm{U}$ reaction at$E_{\mathrm{c.m.}}= 301.05 \;\mathrm{MeV}$ for the three initial orientations. The classification is based on the time evolution of the window structure.Figure 8 shows the fragment mass distributions for the three initial orientations, where all simulated events are included. Consistent with the event fractions shown in Fig. 7, the x orientation exhibits the broadest distribution and the strongest extension toward the central-mass region, the z orientation shows an intermediate behavior, whereas the y orientation is dominated by the entrance-channel peaks. This indicates that the tendency toward mass relaxation and strongly dissipative QF-like evolution follows the ordering (x > z > y).
Figure 8. Fragment mass distributions for the
$^{64}\mathrm{Ni}+{}^{238}\mathrm{U}$ reaction at$E_{\mathrm{c.m.}}\approx 301.05\,\;\mathrm{MeV}$ for three initial orientations. Unlike Fig. 4, the present figure includes all simulated events. (a) x orientation, (b) y orientation, and (c) z orientation.The same orientation dependence is also visible in the MADs shown in Fig. 9, where the present BUU results are compared directly with the TDHF mass–angle correlations digitized from Ref. [47] for the same
$^{64}\mathrm{Ni}+{}^{238}\mathrm{U}$ reaction. In the BUU results, all three orientations exhibit a QE band near the entrance channel, with high-yield ridges around$A\simeq 64$ and$A\simeq 238$ , corresponding to weakly dissipative trajectories with only limited nucleon exchange. Beyond this QE band, all three cases show a clear mass–angle correlation, which is typical of deep-inelastic and QF dynamics and reflects incomplete rotational and mass equilibration before reseparation.
Figure 9. (color online) Comparison of mass–angle distributions (MADs) for the
$^{64}\mathrm{Ni}+{}^{238}\mathrm{U}$ reaction at a near-barrier energy for three representative orientations of the deformed$^{238}\mathrm{U}$ target: (a) x-orientation, (b) y-orientation, and (c) z-orientation. In each panel, the present BUU result at$E_{\mathrm{c.m.}}\approx 301.05 \;\mathrm{MeV}$ is compared directly with the TDHF result digitized from Ref. [47]. The horizontal axis represents the fragment mass number A, and the vertical axis represents the center-of-mass scattering angle$\theta_ {\rm{c.m.}} $ .The main differences lie in the relative weight of the strongly dissipative component and in the extent of its spread toward the symmetric-mass region and larger rotation angles. The x orientation shows the broadest MAD and the strongest extension toward symmetry, indicating the largest fraction of long-lived dissipative trajectories. The z orientation is intermediate. By contrast, the y orientation is much more strongly dominated by the QE ridge, while the deep-inelastic and QF component is clearly weaker and the mass–angle correlation remains more pronounced. This indicates that, in the y orientation, more events undergo rapid reseparation after only a short contact, whereas the x orientation is more favorable for longer sticking and stronger mass drift.
The direct comparison with TDHF in Fig. 9 provides a useful microscopic reference for this orientation dependence. TDHF describes the reaction through the self-consistent microscopic evolution of single-particle wave functions and has shown that the orientation of the deformed
$^{238}\mathrm{U}$ target can strongly affect multinucleon transfer, contact evolution, mass drift, and quasifission dynamics [15, 20, 47]. The TDHF results likewise show clear orientation dependence: different initial orientations lead to different degrees of mass migration away from the entrance-channel masses and different angular deflections. This behavior is qualitatively consistent with the present BUU result, in which the x and z orientations exhibit stronger evolution toward the QF region, whereas the y orientation remains dominated by quasielastic or weakly dissipative trajectories.Figure 10 gives the corresponding mass–TKE correlations for the three orientations, again in direct comparison with the TDHF results digitized from Ref. [47]. In the BUU results, all three panels show a high-TKE band near the entrance-channel masses, associated with elastic and QE trajectories, and a lower-TKE component extending into the intermediate-mass region, associated with more dissipative deep-inelastic and QF events. The main scale of the TKE for two-body reseparation is governed by the competition among charge partition, dissipation strength, and separation geometry, and may be viewed approximately in terms of the Coulomb scaling
$\mathrm{TKE}\propto Z_1Z_2/R_{\rm{sc}}$ [46].
Figure 10. (color online) Comparison of mass–TKE distributions for the
$^{64}\mathrm{Ni}+{}^{238}\mathrm{U}$ reaction at near-barrier energy for three representative orientations of the deformed$^{238}\mathrm{U}$ target: (a) x orientation, (b) y orientation, and (c) z orientation. In each panel, the present BUU result at$E_{\mathrm{c.m.}}\approx 301.05 \;\mathrm{MeV}$ is compared directly with the TDHF result digitized from Ref. [47]. The horizontal axis denotes the fragment mass number A, and the vertical axis denotes the total kinetic energy (TKE).The orientation dependence again follows the same trend. The x orientation exhibits the strongest extension toward the central-mass region together with a more prominent low-TKE component, indicating longer-lived contact configurations and stronger dissipation. The y orientation shows the strongest high-TKE entrance-channel band and the weakest low-TKE symmetric-mass component, indicating rapid reseparation and limited dissipation. The z orientation lies between the two. The TDHF mass–TKE correlations show a qualitatively similar orientation-dependent pattern, in which the amount of mass drift and the associated kinetic-energy dissipation depend strongly on the initial orientation. Thus, the mass distributions, MADs, and mass–TKE correlations consistently indicate that the x orientation is most favorable for strongly dissipative QF-like evolution, the z orientation is somewhat less so, and the y orientation is least favorable.
At the same time, the comparison with TDHF also highlights the difference between the two descriptions. In TDHF, each calculation follows a self-consistent mean-field trajectory for a given initial condition. Therefore, TDHF provides a microscopic description of the average evolution associated with each orientation, but event-by-event fluctuations are not explicitly sampled in the standard framework. In contrast, the present BUU calculation follows the event-by-event evolution of the one-body phase-space distribution and provides direct access to contact-stage observables such as
$P_{\rm{cont}}(b)$ ,$T_{\rm{cont}}$ , and the correlation between nucleon transfer and contact duration. These process-oriented quantities allow the entrance-channel geometry and contact-stage dynamics to be directly connected with the final fragment mass distribution, mass–angle distribution, and mass–TKE correlation. For example, the weaker mass drift in the y orientation can be directly related in BUU to its smaller QF fraction and the more rapid reduction of contact probability and contact time at intermediate impact parameters.The DNS model provides another complementary viewpoint. It treats the reaction as the evolution of two interacting fragments on a potential-energy surface and emphasizes the influence of entrance-channel deformation and orientation on capture probability, mass-asymmetry evolution, fusion probability, and QF competition [48−50]. A more specific study of the
$^{64}\mathrm{Ni}+{}^{238}\mathrm{U}$ system was reported in Ref. [51], where the GRAZING and DNS models were compared for multinucleon transfer at$E_{\mathrm{c.m.}}\approx 307.5 \;\mathrm{MeV}$ . That work showed that the GRAZING and DNS components correspond to different transfer mechanisms: the GRAZING contribution mainly describes transfer in the grazing regime, whereas the DNS contribution becomes important for more deeply overlapped configurations after contact. It was further shown that, for the$^{64}\mathrm{Ni}+{}^{238}\mathrm{U}$ reaction, the DNS component makes a more important contribution to channels with larger proton transfer, while the combined GRAZING+DNS calculation improves the description of measured isotopic production cross sections [51].Although the DNS study focuses mainly on isotopic production cross sections rather than on the mass–angle or mass–TKE correlations discussed here, it supports the same general physical picture that multinucleon transfer in the
$^{64}\mathrm{Ni}+{}^{238}\mathrm{U}$ reaction contains contributions from different dynamical regimes. In this respect, the present BUU analysis provides a complementary viewpoint: instead of describing only the average mean-field evolution as in TDHF, or the post-capture mass-asymmetry evolution on a potential-energy surface as in DNS, BUU gives an event-resolved transport description that directly links the dynamical process to the final observables. Therefore, BUU, TDHF, and DNS provide complementary viewpoints, and their qualitative consistency supports the conclusion that the deformation and orientation of$^{238}\mathrm{U}$ are essential for understanding multinucleon transfer, mass relaxation, and QF competition in the$^{64}\mathrm{Ni}+{}^{238}\mathrm{U}$ reaction.Figure 11(a) shows the contact probability
$P_{\rm{cont}}(b)$ as a function of the impact parameter for the three representative orientations of the deformed$^{238}\mathrm{U}$ target, together with an additional reference calculation using an artificially spherical$^{238}\mathrm{U}$ density distribution. At small impact parameters ($b\lesssim3 \;\mathrm{fm}$ ), all configurations exhibit contact probabilities close to unity, indicating that central collisions almost always lead to the formation of a contact configuration.
Figure 11. (color online) Process-oriented observables as functions of the impact parameter b for the
$^{64}\mathrm{Ni}+{}^{238}\mathrm{U}$ reaction at$E_{\mathrm{c.m.}}= 301.05 \;\mathrm{MeV}$ . Results are shown for three representative orientations of the deformed$^{238}\mathrm{U}$ target (x, y, and z), together with an artificially spherical$^{238}\mathrm{U}$ density distribution, denoted by$U_{\text{sph.}}$ . (a) Contact probability$P_{\rm{cont}}(b)$ ; (b) contact time$T_{\rm{cont}}$ . Both quantities are extracted using the same neck line-density threshold,$\rho_{\rm{th}}=14$ . The quantity$T_{\rm{cont}}$ is averaged over events satisfying the contact criterion within each b bin, and the error bars indicate the corresponding statistical uncertainties.As the impact parameter increases, a pronounced orientation dependence emerges. The y orientation shows the earliest and strongest reduction of
$P_{\rm{cont}}(b)$ , whereas the x and z orientations remain significantly larger over a broad range of impact parameters. Near the grazing region, the ordering tends to follow$y<x<z$ , although statistical fluctuations remain visible. The spherical reference calculation exhibits contact probabilities comparable to those of the x and z orientations and substantially larger than those of the y orientation. This behavior indicates that the probability of forming a contact configuration is not determined solely by the presence of deformation, but is strongly influenced by the orientation-dependent touching geometry and the corresponding interaction barrier [11, 14−18, 20].A markedly different behavior is observed for the contact time
$T_{\rm{cont}}$ shown in Fig. 11(b). For the three deformed configurations, long-lived contact states with$T_{\rm{cont}}\sim10^{3}-4\times10^{3} \;\mathrm{fm}/c$ can be sustained over a wide impact-parameter range. At small impact parameters, the y orientation even exhibits contact times that are slightly longer than those of the x and z orientations, possibly because the compact dinuclear configuration formed in this geometry is more resistant to early neck rupture. However, in the intermediate impact-parameter region ($b\approx3$ –$5 \;\mathrm{fm}$ ), the y orientation undergoes the most rapid reduction of$T_{\rm{cont}}$ , whereas the x and z orientations still retain substantial contact durations.In contrast, the spherical reference calculation exhibits much shorter contact times, typically below
$5\times10^{2} \;\mathrm{fm}/c$ , even though its contact probability remains close to unity over a large impact-parameter interval. This result demonstrates that the formation of a contact configuration alone is not sufficient to generate strong dissipation and mass transport. Instead, the deformation of$^{238}\mathrm{U}$ plays a crucial role in stabilizing the dinuclear system and prolonging the contact stage once contact has been established. Similar connections between contact lifetime, angular deflection, mass relaxation, and QF dynamics have been emphasized in previous experimental and theoretical studies of heavy-ion reactions [6, 19, 45].At the same time, contact time alone is not sufficient to determine the final degree of mass drift, since the exchange efficiency through the neck region and the contact geometry also play important roles. The combined behavior of
$P_{\rm{cont}}(b)$ and$T_{\rm{cont}}$ therefore provides a natural explanation for why the y orientation is less favorable for strongly dissipative trajectories, whereas the x and z orientations more readily evolve toward the QF region.The comparison with the spherical reference calculation further provides a useful baseline for assessing the role of deformation. Although the spherical system can still reach contact with a high probability, its contact lifetime is dramatically reduced. Therefore, the main effect of the deformation of
$^{238}\mathrm{U}$ in the present near-barrier reaction is not merely to facilitate contact formation, but rather to sustain the dinuclear configuration and promote the development of long-lived dissipative trajectories associated with QF. This interpretation is also consistent with previous event-by-event window analyses in BUU calculations, where process-oriented quantities during the contact stage were shown to provide a direct link between the reaction dynamics and the final fragment observables [40, 44].Figure 11(a) shows the contact probability
$P_{\rm{cont}}(b)$ as a function of the impact parameter for the three representative orientations of the deformed$^{238}\mathrm{U}$ target together with an additional reference calculation using an artificially spherical$^{238}\mathrm{U}$ density distribution. At small impact parameters ($b\lesssim3 \;\mathrm{fm}$ ), all configurations exhibit contact probabilities close to unity, indicating that central collisions almost always lead to the formation of a contact configuration.As the impact parameter increases, a pronounced orientation dependence emerges. The y orientation shows the earliest and strongest reduction of
$P_{\rm{cont}}(b)$ , whereas the x and z orientations remain significantly larger over a broad range of impact parameters. Near the grazing region, the ordering tends to follow$y<x<z$ , although statistical fluctuations remain visible.Interestingly, the spherical reference calculation exhibits contact probabilities comparable to those of the x and z orientations and substantially larger than those of the y orientation. This behavior indicates that the probability of forming a contact configuration is not determined solely by the presence of deformation, but is strongly influenced by the orientation-dependent touching geometry and the corresponding interaction barrier.
A markedly different behavior is observed for the contact time
$T_{\rm{cont}}$ shown in Fig. 11(b). For the three deformed configurations, long-lived contact states with$T_{\rm{cont}}\sim10^{3}$ –$4\times10^{3} \;\mathrm{fm}/c$ can be sustained over a wide impact-parameter range. At small impact parameters, the y orientation even exhibits contact times that are slightly longer than those of the x and z orientations, possibly because the compact dinuclear configuration formed in this geometry is more resistant to early neck rupture. However, in the intermediate impact-parameter region ($b\approx3$ –$5 \;\mathrm{fm}$ ), the y orientation undergoes the most rapid reduction of$T_{\rm{cont}}$ , whereas the x and z orientations still retain substantial contact durations.In contrast, the spherical reference calculation exhibits much shorter contact times, typically below
$5\times10^{2} \;\mathrm{fm}/c$ , even though its contact probability remains close to unity over a large impact-parameter interval. This result demonstrates that the formation of a contact configuration alone is not sufficient to generate strong dissipation and mass transport. Instead, the deformation of$^{238}\mathrm{U}$ plays a crucial role in stabilizing the dinuclear system and prolonging the contact stage once contact has been established.Similar connections between contact lifetime, angular deflection, mass relaxation, and QF dynamics have been emphasized in previous experimental and theoretical studies of heavy-ion reactions [6, 19, 45].
At the same time, the contact time alone is not sufficient to determine the final degree of mass drift, since the exchange efficiency through the neck region and the contact geometry also play important roles. The combined behavior of
$P_{\rm{cont}}(b)$ and$T_{\rm{cont}}$ therefore provides a natural explanation for why the y orientation is less favorable for strongly dissipative trajectories, while the x and z orientations more readily evolve toward the QF region.The comparison with the spherical reference calculation further provides a useful baseline for assessing the role of deformation. Although the spherical system can still reach contact with a high probability, its contact lifetime is dramatically reduced. Therefore, the main effect of the deformation of
$^{238}\mathrm{U}$ in the present near-barrier reaction is not merely to facilitate contact formation, but rather to sustain the dinuclear configuration and promote the development of long-lived dissipative trajectories associated with QF.This interpretation is also consistent with previous event-by-event window analyses in BUU calculations, where process-oriented quantities during the contact stage were shown to provide a direct link between the reaction dynamics and the final fragment observables [40, 44].
Figures 12 and 13 show the event-by-event correlations between the contact time
$T_{\rm{cont}}$ and the composition of the heavier fragment, including its proton number$Z_H$ , neutron number$N_H$ , and isospin ratio$N/Z$ , for the z and y orientations, respectively. These observables provide direct information on the extent of nucleon exchange and isospin transport during the contact stage. Similar relationships among contact dynamics, nucleon exchange, and QF evolution have been discussed in microscopic transport and TDHF studies of near-barrier heavy-ion reactions [52, 53].
Figure 12. (color online) Event-by-event correlations between the composition of the heavier fragment and the contact time
$T_{\rm{cont}}$ for the$^{64}\mathrm{Ni}+{}^{238}\mathrm{U}$ reaction at a center-of-mass energy of$E_{\mathrm{c.m.}}= 301.05 \;\mathrm{MeV}$ for the z orientation. The three panels show (a) the proton number of the heavier fragment$Z_H$ , (b) the neutron number of the heavier fragment$N_H$ , and (c) the isospin ratio$N/Z$ of the heavier fragment. Each point corresponds to a single simulated event, while the dashed lines indicate the entrance-channel reference values.
Figure 13. (color online) Same as Fig. 12, but for the y-orientation of the reaction.
A comparison of the two figures shows that, for similar contact durations, the extent of nucleon transfer differs between the two orientations. As
$T_{\rm{cont}}$ increases, the heavier fragment tends, on average, to lose both protons and neutrons, as reflected by the deviations of$Z_H$ and$N_H$ from the entrance-channel reference values. Meanwhile, the fragment$N/Z$ ratio approaches intermediate values, indicating the development of isospin equilibration during the contact stage. The relationship among contact time, mass relaxation, and QF dynamics has also been emphasized in experimental analyses of QF time scales and mass equilibration [6, 54].At short contact times (
$T_{\rm{cont}}\lesssim100 \;\mathrm{fm}/c$ ), both the y and z orientations exhibit transient inverse-transfer behavior, in which the early nucleon flow is opposite to the long-time trend toward mass equilibration. This suggests that the initial exchange process is influenced by transient neck formation and local single-particle dynamics, rather than by the monotonic mass drift associated with long-lived dissipative QF trajectories. Such sensitivity of nucleon transfer to the instantaneous contact geometry and single-particle dynamics is consistent with microscopic descriptions of multinucleon transfer and QF [15].These results indicate that the amount of matter exchanged is controlled not only by the contact time, but also by the orientation-dependent contact geometry and the associated exchange efficiency through the neck region. Similar conclusions regarding the importance of nucleon transfer, mass drift, and angular distributions in near-barrier multinucleon-transfer dynamics have also been obtained in DNS-based studies [24−26, 55]. Even for relatively long
$T_{\rm{cont}}$ , the deviations of$Z_H$ and$N_H$ may remain limited if exchange through the neck is inefficient. In addition, the$N/Z$ ratio approaches its equilibrium value on a shorter timescale than full mass equilibration, suggesting a separation between isospin and mass relaxation time scales [56, 57]. -
We begin by illustrating the event-classification procedure based on the time evolution of the window structure. Figure 3 shows the line density at the window position for two representative events. The line density is obtained by integrating the local density over the plane perpendicular to the principal axis of the dinuclear system and therefore provides a direct measure of the formation, persistence, and rupture of the neck. The same window definition was used in our previous BUU studies [40, 44]. For the present
$^{64}\mathrm{Ni}+{}^{238}\mathrm{U}$ system at$E_{\mathrm{c.m.}}=301.05 \;\mathrm{MeV}$ , no events are classified as fusion within the present identification criterion and evolution time; therefore, only typical QF and QE cases are shown.
Figure 3. (color online) Time evolution of the line density at the window position for the
$^{64}\mathrm{Ni}+{}^{238}\mathrm{U}$ reaction at$E_{\mathrm{c.m.}}=301.05 \;\mathrm{MeV}$ : (a) a typical quasifission (QF) event and (b) a typical quasielastic (QE) event. The horizontal axis denotes time t (fm/c), and the vertical axis shows the line density at the window position (fm−1).For the QF event in Fig. 3(a), the line density begins to increase at
$t\approx 50 \;\mathrm{fm}/c$ , reaches a plateau at approximately$t\approx 300 \;\mathrm{fm}/c$ , and then decreases gradually after$t\approx 3000 \;\mathrm{fm}/c$ . This pattern indicates the formation of a persistent dinuclear configuration, followed by long-lived dissipation and nucleon exchange before reseparation. By contrast, the QE event in Fig. 3(b) exhibits only a short-lived increase in the line density, which disappears by approximately$t\approx 300 \;\mathrm{fm}/c$ . This behavior indicates transient contact followed by rapid reseparation. Accordingly, events with only a short-lived window signal are classified as QE, whereas events with a persistent neck and a clear plateau structure are classified as QF. This classification provides a process-based basis for connecting the final-state observables to the underlying contact-stage dynamics.To assess the ability of the BUU model to describe near-barrier dissipative collisions in this system, we first compare the calculated fragment mass distribution with the available experimental data. Among the 8000 simulated events used for the overall comparison,
$43.45$ % are classified as QF and the remaining events as QE; no fusion events are identified within the present criterion. The theoretical distribution shown below is therefore obtained after excluding the QE component and is dominated by QF. The comparison is intended primarily to test the overall shape of the mass distribution, the positions of the main peaks, and the relative population of the symmetric-mass region, rather than to achieve point-by-point quantitative agreement.As shown in Fig. 4, the experimental distribution exhibits a pronounced double-peaked structure, with the main yields concentrated around
$A\approx 80$ and$A\approx 220$ , and only a weak population near the nearly symmetric region$A\approx 150$ . This behavior is characteristic of a QF-dominated reaction, in which the system undergoes nucleon exchange and kinetic-energy dissipation during a finite contact time but reseparates before full mass and shape equilibration is reached. The BUU result reproduces this overall trend reasonably well. It also yields a double-peaked distribution and a continuous population over a broad mass range. In particular, around$A\approx 150$ , the calculated yield is of the same order of magnitude as the experimental value, namely$\sim 10^{-3}$ . This indicates that the BUU model captures the dominant mass-distribution pattern of the near-barrier$^{64}\mathrm{Ni}+{}^{238}\mathrm{U}$ reaction and thus provides a reasonable basis for the subsequent analysis of orientation-dependent dissipation and nucleon transfer.
Figure 4. (color online) Mass-yield distribution of captured events for the
$^{64}\mathrm{Ni}+{}^{238}\mathrm{U}$ reaction at$E_{\mathrm{c.m.}}=301.05 \;\mathrm{MeV}$ , after excluding QE events. The black solid line denotes the BUU result, and the red circles represent the experimental data from Ref. [23]. The theoretical and experimental yields are normalized using the same procedure.It should be noted that the calculated mass distribution corresponds to primary fragments at the end of the BUU evolution, whereas the experimental data include secondary fragments after statistical de-excitation. For excited QF fragments, neutron evaporation and, to a lesser extent, light charged-particle emission are expected to shift the final masses slightly toward lower values and may also broaden the mass distribution. Therefore, a point-by-point comparison of the peak positions should be made with caution. The present comparison is intended mainly to examine the global mass-yield pattern, including the double-humped structure and the weak yield near mass symmetry. Because these features are primarily determined by the dynamical mass drift before reseparation, the omission of the evaporation stage is not expected to alter the qualitative conclusions regarding the QF-dominated character of the reaction.
We next compare the mass–angle distribution (MAD), which probes the correlation between mass relaxation and angular deflection and is widely used to distinguish QE, deep-inelastic, and QF trajectories [6, 19, 45]. Figure 5 presents the MAD for the
$^{64}\mathrm{Ni}+{}^{238}\mathrm{U}$ reaction in a combined form, with the BUU result at$E_{\mathrm{c.m.}}\approx 301.05 \;\mathrm{MeV}$ shown as a color-density map and the experimental distribution at$E_{\mathrm{c.m.}}\approx 302.62 \;\mathrm{MeV}$ overlaid as contour lines. Because the MAD is sensitive to beam energy and event-selection conditions, we focus primarily on the agreement in the global correlation pattern rather than on detailed point-by-point correspondence.
Figure 5. (color online) Mass-angle distributions (MADs) for the
$^{64}\mathrm{Ni}+{}^{238}\mathrm{U}$ reaction. The color map shows the BUU result at$E_{\mathrm{c.m.}}\approx 301.05 \;\mathrm{MeV}$ , whereas the contour lines represent the experimental distribution for the same system at$E_{\mathrm{c.m.}}\approx $ $ 302.62 \;\mathrm{MeV}$ . The horizontal axis denotes the fragment mass number A, and the vertical axis denotes the center-of-mass scattering angle$\theta_{\mathrm{c.m.}}$ .Both the BUU result and the experimental distribution exhibit a clear mass–angle correlation rather than an approximately isotropic emission pattern around
$\theta_{\mathrm{c.m.}}=90 ^\circ$ . This indicates that the system retains substantial memory of the entrance channel at reseparation. On both the light- and heavy-fragment sides, the distributions display tails extending from the entrance-channel masses toward the intermediate-mass region, reflecting the gradual transition from QE to more strongly dissipative trajectories. As the contact evolution becomes longer, nucleon exchange and mass drift accumulate, and the system undergoes greater angular deflection before reseparation. The BUU calculation reproduces the main high-density region near the entrance-channel masses and the extension toward intermediate masses reasonably well. However, the calculated distribution is somewhat more concentrated than the experimental one, particularly in the angular coverage and low-density tails, indicating that an average transport description still has limitations in representing broader event-by-event fluctuations. This may reflect the limited treatment of fluctuations in the semiclassical transport approach. Even so, the global mass–angle correlation is captured satisfactorily.The mass–TKE distribution provides a complementary probe of dissipative dynamics by correlating mass relaxation with kinetic-energy loss [23, 46]. Figure 6 shows the BUU result for the
$^{64}\mathrm{Ni}+{}^{238}\mathrm{U}$ reaction at$E_{\mathrm{c.m.}}\approx 301.05 \;\mathrm{MeV}$ . The corresponding experimental distribution from Ref. [23] is used as a reference for comparison. The discussion therefore focuses on whether the BUU calculation reproduces the main global correlations between fragment mass and total kinetic energy.
Figure 6. (color online) Mass–TKE distribution calculated with the BUU model for the
$^{64}\mathrm{Ni}+{}^{238}\mathrm{U}$ reaction at$E_{\mathrm{c.m.}}\approx $ $ 301.05 \;\mathrm{MeV}$ . The horizontal axis denotes the fragment mass number A, and the vertical axis shows the total kinetic energy, TKE (MeV). The corresponding experimental mass–TKE distribution for the same system and energy, used for comparison in the present work, was reported in Ref. [23].The BUU result exhibits a pronounced double-peaked mass structure, with dominant yields near the entrance-channel masses and a weak population near mass symmetry. A high-TKE component is concentrated near the entrance-channel region and is associated mainly with elastic and weakly dissipative QE trajectories, whereas an extension toward lower TKE in the intermediate-mass region reflects increased energy dissipation accompanying mass drift. This overall pattern is consistent with the experimental trend reported in Ref. [23].
Some discrepancies are nevertheless observed. The calculated high-TKE component appears somewhat more concentrated, and the low-TKE spread in portions of the intermediate-mass region is narrower than in the experimental distribution. In addition, a small number of isolated high-TKE events are present in the BUU result, which may be related to the fragment-recognition procedure and the reconstruction of Coulomb energy at the separation stage. These features are not expected to affect the overall correlation pattern.
Together with the comparisons of the mass-yield distribution and the MAD, the present results indicate that the BUU model reproduces the global features of the near-barrier
$^{64}\mathrm{Ni}+{}^{238}\mathrm{U}$ reaction. In particular, it captures the QF-dominated double-peaked mass structure and the main correlations between mass, scattering angle, and total kinetic energy. This provides a consistent basis for the subsequent analysis of orientation-dependent dynamics.We now examine the orientation dependence of the reaction dynamics. Figure 7 shows the relative fractions of QE and QF events for the x, y, and z orientations. No fusion events are identified under the present identification criterion and evolution time. For the x orientation, the QE and QF fractions are
$38.93$ % and$61.07$ %, respectively. For the z orientation, the corresponding fractions are$43.65$ % and$56.35$ %. In contrast, the y orientation is strongly dominated by QE events, with$81.53$ % QE and only$18.47$ % QF. These results indicate that the orientation affects not only the properties of individual dissipative trajectories but also the overall branching between weakly and strongly dissipative reaction paths.
Figure 7. (color online) Relative fractions of quasielastic (QE) and quasifission (QF) events for the
$^{64}\mathrm{Ni}+{}^{238}\mathrm{U}$ reaction at$E_{\mathrm{c.m.}}= 301.05 \;\mathrm{MeV}$ for the three initial orientations. The classification is based on the time evolution of the window structure.Figure 8 shows the fragment mass distributions for the three initial orientations, where all simulated events are included. Consistent with the event fractions shown in Fig. 7, the x orientation exhibits the broadest distribution and the strongest extension toward the central-mass region, the z orientation shows an intermediate behavior, whereas the y orientation is dominated by the entrance-channel peaks. This indicates that the tendency toward mass relaxation and strongly dissipative QF-like evolution follows the ordering (x > z > y).
Figure 8. Fragment mass distributions for the
$^{64}\mathrm{Ni}+{}^{238}\mathrm{U}$ reaction at$E_{\mathrm{c.m.}}\approx 301.05\,\;\mathrm{MeV}$ for three initial orientations. Unlike Fig. 4, the present figure includes all simulated events. (a) x orientation, (b) y orientation, and (c) z orientation.The same orientation dependence is also visible in the MADs shown in Fig. 9, where the present BUU results are compared directly with the TDHF mass–angle correlations digitized from Ref. [47] for the same
$^{64}\mathrm{Ni}+{}^{238}\mathrm{U}$ reaction. In the BUU results, all three orientations exhibit a QE band near the entrance channel, with high-yield ridges around$A\simeq 64$ and$A\simeq 238$ , corresponding to weakly dissipative trajectories with only limited nucleon exchange. Beyond this QE band, all three cases show a clear mass–angle correlation, which is typical of deep-inelastic and QF dynamics and reflects incomplete rotational and mass equilibration before reseparation.
Figure 9. (color online) Comparison of mass–angle distributions (MADs) for the
$^{64}\mathrm{Ni}+{}^{238}\mathrm{U}$ reaction at a near-barrier energy for three representative orientations of the deformed$^{238}\mathrm{U}$ target: (a) x-orientation, (b) y-orientation, and (c) z-orientation. In each panel, the present BUU result at$E_{\mathrm{c.m.}}\approx 301.05 \;\mathrm{MeV}$ is compared directly with the TDHF result digitized from Ref. [47]. The horizontal axis represents the fragment mass number A, and the vertical axis represents the center-of-mass scattering angle$\theta_ {\rm{c.m.}} $ .The main differences lie in the relative weight of the strongly dissipative component and in the extent of its spread toward the symmetric-mass region and larger rotation angles. The x orientation shows the broadest MAD and the strongest extension toward symmetry, indicating the largest fraction of long-lived dissipative trajectories. The z orientation is intermediate. By contrast, the y orientation is much more strongly dominated by the QE ridge, while the deep-inelastic and QF component is clearly weaker and the mass–angle correlation remains more pronounced. This indicates that, in the y orientation, more events undergo rapid reseparation after only a short contact, whereas the x orientation is more favorable for longer sticking and stronger mass drift.
The direct comparison with TDHF in Fig. 9 provides a useful microscopic reference for this orientation dependence. TDHF describes the reaction through the self-consistent microscopic evolution of single-particle wave functions and has shown that the orientation of the deformed
$^{238}\mathrm{U}$ target can strongly affect multinucleon transfer, contact evolution, mass drift, and quasifission dynamics [15, 20, 47]. The TDHF results likewise show clear orientation dependence: different initial orientations lead to different degrees of mass migration away from the entrance-channel masses and different angular deflections. This behavior is qualitatively consistent with the present BUU result, in which the x and z orientations exhibit stronger evolution toward the QF region, whereas the y orientation remains dominated by quasielastic or weakly dissipative trajectories.Figure 10 gives the corresponding mass–TKE correlations for the three orientations, again in direct comparison with the TDHF results digitized from Ref. [47]. In the BUU results, all three panels show a high-TKE band near the entrance-channel masses, associated with elastic and QE trajectories, and a lower-TKE component extending into the intermediate-mass region, associated with more dissipative deep-inelastic and QF events. The main scale of the TKE for two-body reseparation is governed by the competition among charge partition, dissipation strength, and separation geometry, and may be viewed approximately in terms of the Coulomb scaling
$\mathrm{TKE}\propto Z_1Z_2/R_{\rm{sc}}$ [46].
Figure 10. (color online) Comparison of mass–TKE distributions for the
$^{64}\mathrm{Ni}+{}^{238}\mathrm{U}$ reaction at near-barrier energy for three representative orientations of the deformed$^{238}\mathrm{U}$ target: (a) x orientation, (b) y orientation, and (c) z orientation. In each panel, the present BUU result at$E_{\mathrm{c.m.}}\approx 301.05 \;\mathrm{MeV}$ is compared directly with the TDHF result digitized from Ref. [47]. The horizontal axis denotes the fragment mass number A, and the vertical axis denotes the total kinetic energy (TKE).The orientation dependence again follows the same trend. The x orientation exhibits the strongest extension toward the central-mass region together with a more prominent low-TKE component, indicating longer-lived contact configurations and stronger dissipation. The y orientation shows the strongest high-TKE entrance-channel band and the weakest low-TKE symmetric-mass component, indicating rapid reseparation and limited dissipation. The z orientation lies between the two. The TDHF mass–TKE correlations show a qualitatively similar orientation-dependent pattern, in which the amount of mass drift and the associated kinetic-energy dissipation depend strongly on the initial orientation. Thus, the mass distributions, MADs, and mass–TKE correlations consistently indicate that the x orientation is most favorable for strongly dissipative QF-like evolution, the z orientation is somewhat less so, and the y orientation is least favorable.
At the same time, the comparison with TDHF also highlights the difference between the two descriptions. In TDHF, each calculation follows a self-consistent mean-field trajectory for a given initial condition. Therefore, TDHF provides a microscopic description of the average evolution associated with each orientation, but event-by-event fluctuations are not explicitly sampled in the standard framework. In contrast, the present BUU calculation follows the event-by-event evolution of the one-body phase-space distribution and provides direct access to contact-stage observables such as
$P_{\rm{cont}}(b)$ ,$T_{\rm{cont}}$ , and the correlation between nucleon transfer and contact duration. These process-oriented quantities allow the entrance-channel geometry and contact-stage dynamics to be directly connected with the final fragment mass distribution, mass–angle distribution, and mass–TKE correlation. For example, the weaker mass drift in the y orientation can be directly related in BUU to its smaller QF fraction and the more rapid reduction of contact probability and contact time at intermediate impact parameters.The DNS model provides another complementary viewpoint. It treats the reaction as the evolution of two interacting fragments on a potential-energy surface and emphasizes the influence of entrance-channel deformation and orientation on capture probability, mass-asymmetry evolution, fusion probability, and QF competition [48−50]. A more specific study of the
$^{64}\mathrm{Ni}+{}^{238}\mathrm{U}$ system was reported in Ref. [51], where the GRAZING and DNS models were compared for multinucleon transfer at$E_{\mathrm{c.m.}}\approx 307.5 \;\mathrm{MeV}$ . That work showed that the GRAZING and DNS components correspond to different transfer mechanisms: the GRAZING contribution mainly describes transfer in the grazing regime, whereas the DNS contribution becomes important for more deeply overlapped configurations after contact. It was further shown that, for the$^{64}\mathrm{Ni}+{}^{238}\mathrm{U}$ reaction, the DNS component makes a more important contribution to channels with larger proton transfer, while the combined GRAZING+DNS calculation improves the description of measured isotopic production cross sections [51].Although the DNS study focuses mainly on isotopic production cross sections rather than on the mass–angle or mass–TKE correlations discussed here, it supports the same general physical picture that multinucleon transfer in the
$^{64}\mathrm{Ni}+{}^{238}\mathrm{U}$ reaction contains contributions from different dynamical regimes. In this respect, the present BUU analysis provides a complementary viewpoint: instead of describing only the average mean-field evolution as in TDHF, or the post-capture mass-asymmetry evolution on a potential-energy surface as in DNS, BUU gives an event-resolved transport description that directly links the dynamical process to the final observables. Therefore, BUU, TDHF, and DNS provide complementary viewpoints, and their qualitative consistency supports the conclusion that the deformation and orientation of$^{238}\mathrm{U}$ are essential for understanding multinucleon transfer, mass relaxation, and QF competition in the$^{64}\mathrm{Ni}+{}^{238}\mathrm{U}$ reaction.Figure 11(a) shows the contact probability
$P_{\rm{cont}}(b)$ as a function of the impact parameter for the three representative orientations of the deformed$^{238}\mathrm{U}$ target, together with an additional reference calculation using an artificially spherical$^{238}\mathrm{U}$ density distribution. At small impact parameters ($b\lesssim3 \;\mathrm{fm}$ ), all configurations exhibit contact probabilities close to unity, indicating that central collisions almost always lead to the formation of a contact configuration.
Figure 11. (color online) Process-oriented observables as functions of the impact parameter b for the
$^{64}\mathrm{Ni}+{}^{238}\mathrm{U}$ reaction at$E_{\mathrm{c.m.}}= 301.05 \;\mathrm{MeV}$ . Results are shown for three representative orientations of the deformed$^{238}\mathrm{U}$ target (x, y, and z), together with an artificially spherical$^{238}\mathrm{U}$ density distribution, denoted by$U_{\text{sph.}}$ . (a) Contact probability$P_{\rm{cont}}(b)$ ; (b) contact time$T_{\rm{cont}}$ . Both quantities are extracted using the same neck line-density threshold,$\rho_{\rm{th}}=14$ . The quantity$T_{\rm{cont}}$ is averaged over events satisfying the contact criterion within each b bin, and the error bars indicate the corresponding statistical uncertainties.As the impact parameter increases, a pronounced orientation dependence emerges. The y orientation shows the earliest and strongest reduction of
$P_{\rm{cont}}(b)$ , whereas the x and z orientations remain significantly larger over a broad range of impact parameters. Near the grazing region, the ordering tends to follow$y<x<z$ , although statistical fluctuations remain visible. The spherical reference calculation exhibits contact probabilities comparable to those of the x and z orientations and substantially larger than those of the y orientation. This behavior indicates that the probability of forming a contact configuration is not determined solely by the presence of deformation, but is strongly influenced by the orientation-dependent touching geometry and the corresponding interaction barrier [11, 14−18, 20].A markedly different behavior is observed for the contact time
$T_{\rm{cont}}$ shown in Fig. 11(b). For the three deformed configurations, long-lived contact states with$T_{\rm{cont}}\sim10^{3}-4\times10^{3} \;\mathrm{fm}/c$ can be sustained over a wide impact-parameter range. At small impact parameters, the y orientation even exhibits contact times that are slightly longer than those of the x and z orientations, possibly because the compact dinuclear configuration formed in this geometry is more resistant to early neck rupture. However, in the intermediate impact-parameter region ($b\approx3$ –$5 \;\mathrm{fm}$ ), the y orientation undergoes the most rapid reduction of$T_{\rm{cont}}$ , whereas the x and z orientations still retain substantial contact durations.In contrast, the spherical reference calculation exhibits much shorter contact times, typically below
$5\times10^{2} \;\mathrm{fm}/c$ , even though its contact probability remains close to unity over a large impact-parameter interval. This result demonstrates that the formation of a contact configuration alone is not sufficient to generate strong dissipation and mass transport. Instead, the deformation of$^{238}\mathrm{U}$ plays a crucial role in stabilizing the dinuclear system and prolonging the contact stage once contact has been established. Similar connections between contact lifetime, angular deflection, mass relaxation, and QF dynamics have been emphasized in previous experimental and theoretical studies of heavy-ion reactions [6, 19, 45].At the same time, contact time alone is not sufficient to determine the final degree of mass drift, since the exchange efficiency through the neck region and the contact geometry also play important roles. The combined behavior of
$P_{\rm{cont}}(b)$ and$T_{\rm{cont}}$ therefore provides a natural explanation for why the y orientation is less favorable for strongly dissipative trajectories, whereas the x and z orientations more readily evolve toward the QF region.The comparison with the spherical reference calculation further provides a useful baseline for assessing the role of deformation. Although the spherical system can still reach contact with a high probability, its contact lifetime is dramatically reduced. Therefore, the main effect of the deformation of
$^{238}\mathrm{U}$ in the present near-barrier reaction is not merely to facilitate contact formation, but rather to sustain the dinuclear configuration and promote the development of long-lived dissipative trajectories associated with QF. This interpretation is also consistent with previous event-by-event window analyses in BUU calculations, where process-oriented quantities during the contact stage were shown to provide a direct link between the reaction dynamics and the final fragment observables [40, 44].Figure 11(a) shows the contact probability
$P_{\rm{cont}}(b)$ as a function of the impact parameter for the three representative orientations of the deformed$^{238}\mathrm{U}$ target together with an additional reference calculation using an artificially spherical$^{238}\mathrm{U}$ density distribution. At small impact parameters ($b\lesssim3 \;\mathrm{fm}$ ), all configurations exhibit contact probabilities close to unity, indicating that central collisions almost always lead to the formation of a contact configuration.As the impact parameter increases, a pronounced orientation dependence emerges. The y orientation shows the earliest and strongest reduction of
$P_{\rm{cont}}(b)$ , whereas the x and z orientations remain significantly larger over a broad range of impact parameters. Near the grazing region, the ordering tends to follow$y<x<z$ , although statistical fluctuations remain visible.Interestingly, the spherical reference calculation exhibits contact probabilities comparable to those of the x and z orientations and substantially larger than those of the y orientation. This behavior indicates that the probability of forming a contact configuration is not determined solely by the presence of deformation, but is strongly influenced by the orientation-dependent touching geometry and the corresponding interaction barrier.
A markedly different behavior is observed for the contact time
$T_{\rm{cont}}$ shown in Fig. 11(b). For the three deformed configurations, long-lived contact states with$T_{\rm{cont}}\sim10^{3}$ –$4\times10^{3} \;\mathrm{fm}/c$ can be sustained over a wide impact-parameter range. At small impact parameters, the y orientation even exhibits contact times that are slightly longer than those of the x and z orientations, possibly because the compact dinuclear configuration formed in this geometry is more resistant to early neck rupture. However, in the intermediate impact-parameter region ($b\approx3$ –$5 \;\mathrm{fm}$ ), the y orientation undergoes the most rapid reduction of$T_{\rm{cont}}$ , whereas the x and z orientations still retain substantial contact durations.In contrast, the spherical reference calculation exhibits much shorter contact times, typically below
$5\times10^{2} \;\mathrm{fm}/c$ , even though its contact probability remains close to unity over a large impact-parameter interval. This result demonstrates that the formation of a contact configuration alone is not sufficient to generate strong dissipation and mass transport. Instead, the deformation of$^{238}\mathrm{U}$ plays a crucial role in stabilizing the dinuclear system and prolonging the contact stage once contact has been established.Similar connections between contact lifetime, angular deflection, mass relaxation, and QF dynamics have been emphasized in previous experimental and theoretical studies of heavy-ion reactions [6, 19, 45].
At the same time, the contact time alone is not sufficient to determine the final degree of mass drift, since the exchange efficiency through the neck region and the contact geometry also play important roles. The combined behavior of
$P_{\rm{cont}}(b)$ and$T_{\rm{cont}}$ therefore provides a natural explanation for why the y orientation is less favorable for strongly dissipative trajectories, while the x and z orientations more readily evolve toward the QF region.The comparison with the spherical reference calculation further provides a useful baseline for assessing the role of deformation. Although the spherical system can still reach contact with a high probability, its contact lifetime is dramatically reduced. Therefore, the main effect of the deformation of
$^{238}\mathrm{U}$ in the present near-barrier reaction is not merely to facilitate contact formation, but rather to sustain the dinuclear configuration and promote the development of long-lived dissipative trajectories associated with QF.This interpretation is also consistent with previous event-by-event window analyses in BUU calculations, where process-oriented quantities during the contact stage were shown to provide a direct link between the reaction dynamics and the final fragment observables [40, 44].
Figures 12 and 13 show the event-by-event correlations between the contact time
$T_{\rm{cont}}$ and the composition of the heavier fragment, including its proton number$Z_H$ , neutron number$N_H$ , and isospin ratio$N/Z$ , for the z and y orientations, respectively. These observables provide direct information on the extent of nucleon exchange and isospin transport during the contact stage. Similar relationships among contact dynamics, nucleon exchange, and QF evolution have been discussed in microscopic transport and TDHF studies of near-barrier heavy-ion reactions [52, 53].
Figure 12. (color online) Event-by-event correlations between the composition of the heavier fragment and the contact time
$T_{\rm{cont}}$ for the$^{64}\mathrm{Ni}+{}^{238}\mathrm{U}$ reaction at a center-of-mass energy of$E_{\mathrm{c.m.}}= 301.05 \;\mathrm{MeV}$ for the z orientation. The three panels show (a) the proton number of the heavier fragment$Z_H$ , (b) the neutron number of the heavier fragment$N_H$ , and (c) the isospin ratio$N/Z$ of the heavier fragment. Each point corresponds to a single simulated event, while the dashed lines indicate the entrance-channel reference values.
Figure 13. (color online) Same as Fig. 12, but for the y-orientation of the reaction.
A comparison of the two figures shows that, for similar contact durations, the extent of nucleon transfer differs between the two orientations. As
$T_{\rm{cont}}$ increases, the heavier fragment tends, on average, to lose both protons and neutrons, as reflected by the deviations of$Z_H$ and$N_H$ from the entrance-channel reference values. Meanwhile, the fragment$N/Z$ ratio approaches intermediate values, indicating the development of isospin equilibration during the contact stage. The relationship among contact time, mass relaxation, and QF dynamics has also been emphasized in experimental analyses of QF time scales and mass equilibration [6, 54].At short contact times (
$T_{\rm{cont}}\lesssim100 \;\mathrm{fm}/c$ ), both the y and z orientations exhibit transient inverse-transfer behavior, in which the early nucleon flow is opposite to the long-time trend toward mass equilibration. This suggests that the initial exchange process is influenced by transient neck formation and local single-particle dynamics, rather than by the monotonic mass drift associated with long-lived dissipative QF trajectories. Such sensitivity of nucleon transfer to the instantaneous contact geometry and single-particle dynamics is consistent with microscopic descriptions of multinucleon transfer and QF [15].These results indicate that the amount of matter exchanged is controlled not only by the contact time, but also by the orientation-dependent contact geometry and the associated exchange efficiency through the neck region. Similar conclusions regarding the importance of nucleon transfer, mass drift, and angular distributions in near-barrier multinucleon-transfer dynamics have also been obtained in DNS-based studies [24−26, 55]. Even for relatively long
$T_{\rm{cont}}$ , the deviations of$Z_H$ and$N_H$ may remain limited if exchange through the neck is inefficient. In addition, the$N/Z$ ratio approaches its equilibrium value on a shorter timescale than full mass equilibration, suggesting a separation between isospin and mass relaxation time scales [56, 57]. -
The dynamical evolution and orientation dependence of the near-barrier
$ ^{64}\mathrm{Ni}+{}^{238}\mathrm{U} $ reaction at$ E_{\mathrm{c.m.}}= 301.05 \; \;\mathrm{MeV} $ have been investigated within the BUU transport framework. Final-state observables, including fragment mass distributions, MADs, and mass–TKE correlations, have been analyzed together with process-oriented quantities such as the contact probability$ P_{\rm{cont}}(b) $ and the contact time$ T_{\rm{cont}} $ , in order to establish a direct connection between contact-stage dynamics and the observed reaction outcomes.The calculations reproduce the main experimental features characteristic of QF-dominated dynamics, including the double-peaked mass distribution, the weak population near mass symmetry, and the principal correlations among mass, scattering angle, and total kinetic energy. Within the present identification scheme, the reaction is governed by the competition between QE and QF processes, and no fusion events are identified.
A pronounced dependence on the entrance-channel orientation is observed. The x orientation favors strongly dissipative trajectories with significant mass drift, the z orientation exhibits intermediate behavior, and the y orientation is dominated by QE processes. This ordering is consistently reflected in both the fragment distributions and the relative contributions of the different reaction mechanisms.
The analysis of process-oriented observables indicates that the orientation dependence originates from the coupled effects of the contact formation probability, contact lifetime, and nucleon-exchange efficiency through the neck region. While longer contact times generally promote nucleon transfer and mass relaxation, the extent of equilibration is also influenced by the contact geometry and the efficiency of matter transport across the window.
To further assess the role of deformation, an additional reference calculation using an artificially spherical
$ ^{238}\mathrm{U} $ nucleus was performed. The spherical system exhibits contact probabilities comparable to those of the x and z orientations over a broad impact-parameter range, but its contact times are significantly shorter. This result indicates that the deformation of$ ^{238}\mathrm{U} $ does not simply enhance the probability of initial contact formation. Instead, its primary effect is to stabilize the dinuclear configuration, prolong the contact stage, and facilitate the development of strongly dissipative QF trajectories.A comparison with previous TDHF and DNS studies shows that, despite the different theoretical frameworks, all approaches consistently emphasize the crucial role of entrance-channel structure, deformation, and orientation in determining fusion probability, nucleon transfer, mass equilibration, and QF evolution [9−12, 17, 55]. The present BUU analysis complements these studies by providing direct access to event-by-event contact-stage observables and their correlations with final-state fragment properties.
These results demonstrate that the entrance-channel orientation governs the branching between QE and QF pathways through its influence on the formation and evolution of the contact configuration. They provide a consistent dynamical interpretation of the observed final-state patterns in terms of the underlying contact-stage processes.
The present work highlights the importance of process-oriented observables, such as the contact probability and contact time, for understanding the microscopic origin of orientation-dependent QF dynamics in near-barrier heavy-ion reactions.
Further improvements, including enhanced fluctuation treatments, the incorporation of statistical decay, and more systematic investigations of deformation effects, are expected to refine the quantitative description of the reaction dynamics.
-
The dynamical evolution and orientation dependence of the near-barrier
$ ^{64}\mathrm{Ni}+{}^{238}\mathrm{U} $ reaction at$ E_{\mathrm{c.m.}}= 301.05 \; \;\mathrm{MeV} $ have been investigated within the BUU transport framework. Final-state observables, including fragment mass distributions, MADs, and mass–TKE correlations, have been analyzed together with process-oriented quantities such as the contact probability$ P_{\rm{cont}}(b) $ and the contact time$ T_{\rm{cont}} $ , in order to establish a direct connection between contact-stage dynamics and the observed reaction outcomes.The calculations reproduce the main experimental features characteristic of QF-dominated dynamics, including the double-peaked mass distribution, the weak population near mass symmetry, and the principal correlations among mass, scattering angle, and total kinetic energy. Within the present identification scheme, the reaction is governed by the competition between QE and QF processes, and no fusion events are identified.
A pronounced dependence on the entrance-channel orientation is observed. The x orientation favors strongly dissipative trajectories with significant mass drift, the z orientation exhibits intermediate behavior, and the y orientation is dominated by QE processes. This ordering is consistently reflected in both the fragment distributions and the relative contributions of the different reaction mechanisms.
The analysis of process-oriented observables indicates that the orientation dependence originates from the coupled effects of the contact formation probability, contact lifetime, and nucleon-exchange efficiency through the neck region. While longer contact times generally promote nucleon transfer and mass relaxation, the extent of equilibration is also influenced by the contact geometry and the efficiency of matter transport across the window.
To further assess the role of deformation, an additional reference calculation using an artificially spherical
$ ^{238}\mathrm{U} $ nucleus was performed. The spherical system exhibits contact probabilities comparable to those of the x and z orientations over a broad impact-parameter range, but its contact times are significantly shorter. This result indicates that the deformation of$ ^{238}\mathrm{U} $ does not simply enhance the probability of initial contact formation. Instead, its primary effect is to stabilize the dinuclear configuration, prolong the contact stage, and facilitate the development of strongly dissipative QF trajectories.A comparison with previous TDHF and DNS studies shows that, despite the different theoretical frameworks, all approaches consistently emphasize the crucial role of entrance-channel structure, deformation, and orientation in determining fusion probability, nucleon transfer, mass equilibration, and QF evolution [9−12, 17, 55]. The present BUU analysis complements these studies by providing direct access to event-by-event contact-stage observables and their correlations with final-state fragment properties.
These results demonstrate that the entrance-channel orientation governs the branching between QE and QF pathways through its influence on the formation and evolution of the contact configuration. They provide a consistent dynamical interpretation of the observed final-state patterns in terms of the underlying contact-stage processes.
The present work highlights the importance of process-oriented observables, such as the contact probability and contact time, for understanding the microscopic origin of orientation-dependent QF dynamics in near-barrier heavy-ion reactions.
Further improvements, including enhanced fluctuation treatments, the incorporation of statistical decay, and more systematic investigations of deformation effects, are expected to refine the quantitative description of the reaction dynamics.
-
The dynamical evolution and orientation dependence of the near-barrier
$ ^{64}\mathrm{Ni}+{}^{238}\mathrm{U} $ reaction at$ E_{\mathrm{c.m.}}= 301.05 \; \;\mathrm{MeV} $ have been investigated within the BUU transport framework. Final-state observables, including fragment mass distributions, MADs, and mass–TKE correlations, have been analyzed together with process-oriented quantities such as the contact probability$ P_{\rm{cont}}(b) $ and the contact time$ T_{\rm{cont}} $ , in order to establish a direct connection between contact-stage dynamics and the observed reaction outcomes.The calculations reproduce the main experimental features characteristic of QF-dominated dynamics, including the double-peaked mass distribution, the weak population near mass symmetry, and the principal correlations among mass, scattering angle, and total kinetic energy. Within the present identification scheme, the reaction is governed by the competition between QE and QF processes, and no fusion events are identified.
A pronounced dependence on the entrance-channel orientation is observed. The x orientation favors strongly dissipative trajectories with significant mass drift, the z orientation exhibits intermediate behavior, and the y orientation is dominated by QE processes. This ordering is consistently reflected in both the fragment distributions and the relative contributions of the different reaction mechanisms.
The analysis of process-oriented observables indicates that the orientation dependence originates from the coupled effects of the contact formation probability, contact lifetime, and nucleon-exchange efficiency through the neck region. While longer contact times generally promote nucleon transfer and mass relaxation, the extent of equilibration is also influenced by the contact geometry and the efficiency of matter transport across the window.
To further assess the role of deformation, an additional reference calculation using an artificially spherical
$ ^{238}\mathrm{U} $ nucleus was performed. The spherical system exhibits contact probabilities comparable to those of the x and z orientations over a broad impact-parameter range, but its contact times are significantly shorter. This result indicates that the deformation of$ ^{238}\mathrm{U} $ does not simply enhance the probability of initial contact formation. Instead, its primary effect is to stabilize the dinuclear configuration, prolong the contact stage, and facilitate the development of strongly dissipative QF trajectories.A comparison with previous TDHF and DNS studies shows that, despite the different theoretical frameworks, all approaches consistently emphasize the crucial role of entrance-channel structure, deformation, and orientation in determining fusion probability, nucleon transfer, mass equilibration, and QF evolution [9−12, 17, 55]. The present BUU analysis complements these studies by providing direct access to event-by-event contact-stage observables and their correlations with final-state fragment properties.
These results demonstrate that the entrance-channel orientation governs the branching between QE and QF pathways through its influence on the formation and evolution of the contact configuration. They provide a consistent dynamical interpretation of the observed final-state patterns in terms of the underlying contact-stage processes.
The present work highlights the importance of process-oriented observables, such as the contact probability and contact time, for understanding the microscopic origin of orientation-dependent QF dynamics in near-barrier heavy-ion reactions.
Further improvements, including enhanced fluctuation treatments, the incorporation of statistical decay, and more systematic investigations of deformation effects, are expected to refine the quantitative description of the reaction dynamics.
-
The dynamical evolution and orientation dependence of the near-barrier
$ ^{64}\mathrm{Ni}+{}^{238}\mathrm{U} $ reaction at$ E_{\mathrm{c.m.}}= 301.05 \; \;\mathrm{MeV} $ have been investigated within the BUU transport framework. Final-state observables, including fragment mass distributions, MADs, and mass–TKE correlations, have been analyzed together with process-oriented quantities such as the contact probability$ P_{\rm{cont}}(b) $ and the contact time$ T_{\rm{cont}} $ , in order to establish a direct connection between contact-stage dynamics and the observed reaction outcomes.The calculations reproduce the main experimental features characteristic of QF-dominated dynamics, including the double-peaked mass distribution, the weak population near mass symmetry, and the principal correlations among mass, scattering angle, and total kinetic energy. Within the present identification scheme, the reaction is governed by the competition between QE and QF processes, and no fusion events are identified.
A pronounced dependence on the entrance-channel orientation is observed. The x orientation favors strongly dissipative trajectories with significant mass drift, the z orientation exhibits intermediate behavior, and the y orientation is dominated by QE processes. This ordering is consistently reflected in both the fragment distributions and the relative contributions of the different reaction mechanisms.
The analysis of process-oriented observables indicates that the orientation dependence originates from the coupled effects of the contact formation probability, contact lifetime, and nucleon-exchange efficiency through the neck region. While longer contact times generally promote nucleon transfer and mass relaxation, the extent of equilibration is also influenced by the contact geometry and the efficiency of matter transport across the window.
To further assess the role of deformation, an additional reference calculation using an artificially spherical
$ ^{238}\mathrm{U} $ nucleus was performed. The spherical system exhibits contact probabilities comparable to those of the x and z orientations over a broad impact-parameter range, but its contact times are significantly shorter. This result indicates that the deformation of$ ^{238}\mathrm{U} $ does not simply enhance the probability of initial contact formation. Instead, its primary effect is to stabilize the dinuclear configuration, prolong the contact stage, and facilitate the development of strongly dissipative QF trajectories.A comparison with previous TDHF and DNS studies shows that, despite the different theoretical frameworks, all approaches consistently emphasize the crucial role of entrance-channel structure, deformation, and orientation in determining fusion probability, nucleon transfer, mass equilibration, and QF evolution [9−12, 17, 55]. The present BUU analysis complements these studies by providing direct access to event-by-event contact-stage observables and their correlations with final-state fragment properties.
These results demonstrate that the entrance-channel orientation governs the branching between QE and QF pathways through its influence on the formation and evolution of the contact configuration. They provide a consistent dynamical interpretation of the observed final-state patterns in terms of the underlying contact-stage processes.
The present work highlights the importance of process-oriented observables, such as the contact probability and contact time, for understanding the microscopic origin of orientation-dependent QF dynamics in near-barrier heavy-ion reactions.
Further improvements, including enhanced fluctuation treatments, the incorporation of statistical decay, and more systematic investigations of deformation effects, are expected to refine the quantitative description of the reaction dynamics.
Dynamic description and orientation effects in the near-Coulomb barrier 64Ni + 238U reaction
- Received Date: 2026-05-26
- Available Online: 2026-10-15
Abstract: The orientation dependence of the near-Coulomb-barrier $^{64}\mathrm{Ni}+{}^{238}\mathrm{U}$ reaction at $E_{\mathrm{c.m.}}=301.05 ~\;\mathrm{MeV}$ is investigated within the Boltzmann–Uehling–Uhlenbeck transport framework. Three representative orientations of the deformed $^{238}\mathrm{U}$ target are considered, and an event-by-event window analysis is performed to connect final-state observables with the underlying contact-stage dynamics. The calculated fragment mass distribution, mass–angle distribution, and mass–total-kinetic-energy correlation reproduce the main qualitative features of the available experimental data, including the double-humped mass structure and the weak population near mass symmetry. Within the present event-identification criterion and evolution time, no fusion events are identified. The x orientation gives the largest quasifission component and the strongest mass drift toward symmetry, the z orientation is intermediate, whereas the y orientation is dominated by quasielastic or weakly dissipative events. The analysis of the contact probability $P_{\rm{cont}}(b)$, contact time $T_{\rm{cont}}$, and fragment Z, N, and $N/Z$ indicates that the orientation dependence originates from the combined effects of contact formation, contact lifetime, and nucleon-exchange efficiency through the neck region. An additional reference calculation using an artificially spherical $^{238}\mathrm{U}$ nucleus shows that, although the contact probability remains comparable to those of the x and z orientations, the contact time is significantly reduced. This result suggests that the deformation of $^{238}\mathrm{U}$ primarily enhances the persistence of the dinuclear configuration rather than simply increasing the probability of initial contact formation. These results provide a dynamical interpretation of how the entrance-channel orientation governs the branching between quasielastic and quasifission trajectories.



 DownLoad: